Dry Brine Brisket
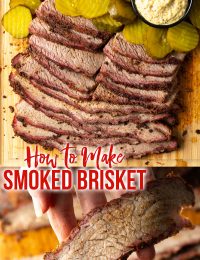
Smoking brisket can feel intimidating the first time, but it doesn’t have to be. I’ve developed this dry brine brisket recipe to take the guesswork out of the process, from my dry brine recipe for seasoning the meat, to temperature tips, and proper slicing. Follow my method, and you’ll end up with juicy brisket, a flavorful bark, and the kind of barbecue people remember.
The way I see it, there are two kinds of people in this world: Those who love beef brisket, and people who REALLY LOVE beef brisket. And I’m going to go ahead and tell you upfront that this dry brine brisket recipe is for serious fans. When I’m a bit short on time, I prepare our Texas Style Oven Brisket recipe. It doesn’t take quite as long as the traditional smoking method, but still makes a mighty fine piece of beef that is full of flavor. However, this beef brisket recipe follows an old-school method of seasoning with a dry brine, smoking the meat low and slow, and slicing it just right. If you want the real deal 24-hour smoked brisket that comes out incredibly tender with that deep, rich smoky flavor, well you’ve come to the right place!
Wilhelmina – ⭐⭐⭐⭐⭐ Just awesome! So incredibly tender and the flavor is spot on. This is a winner!
Table of Contents

Sommer’s Recipe Highlights
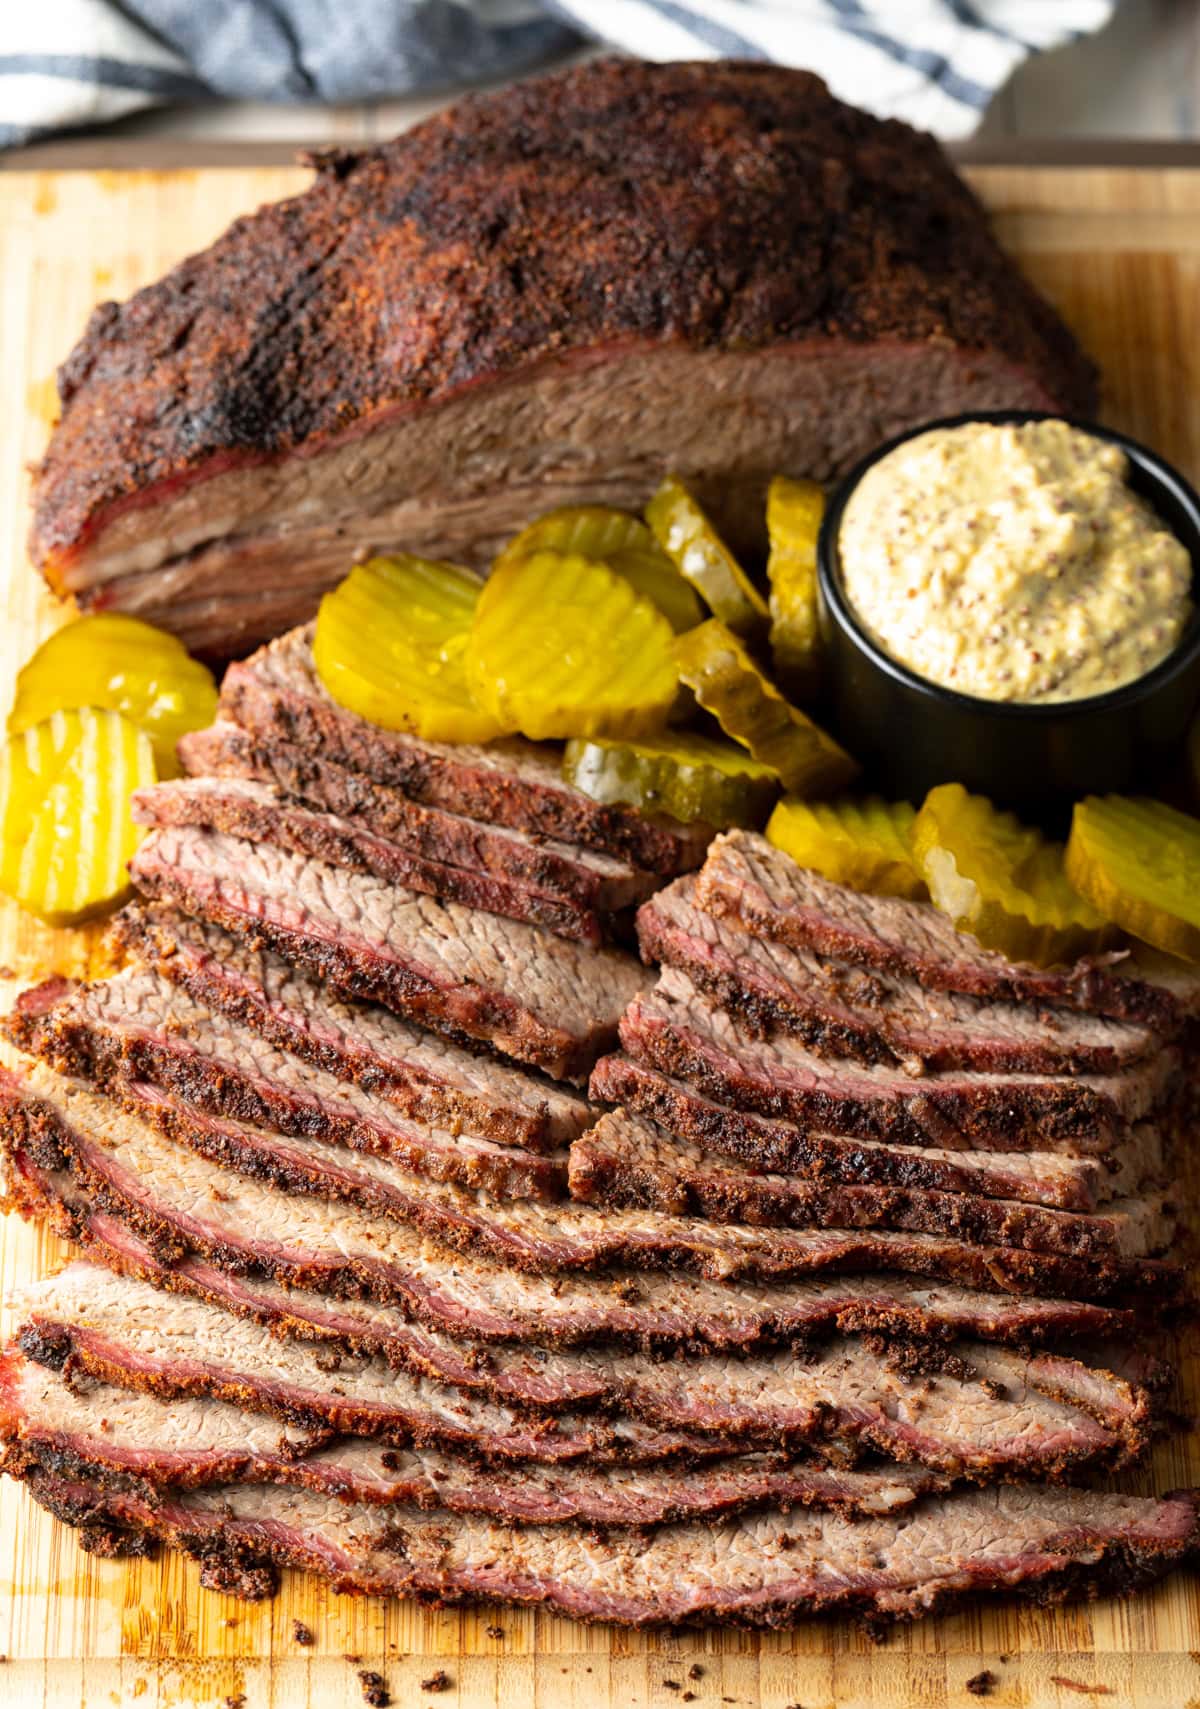
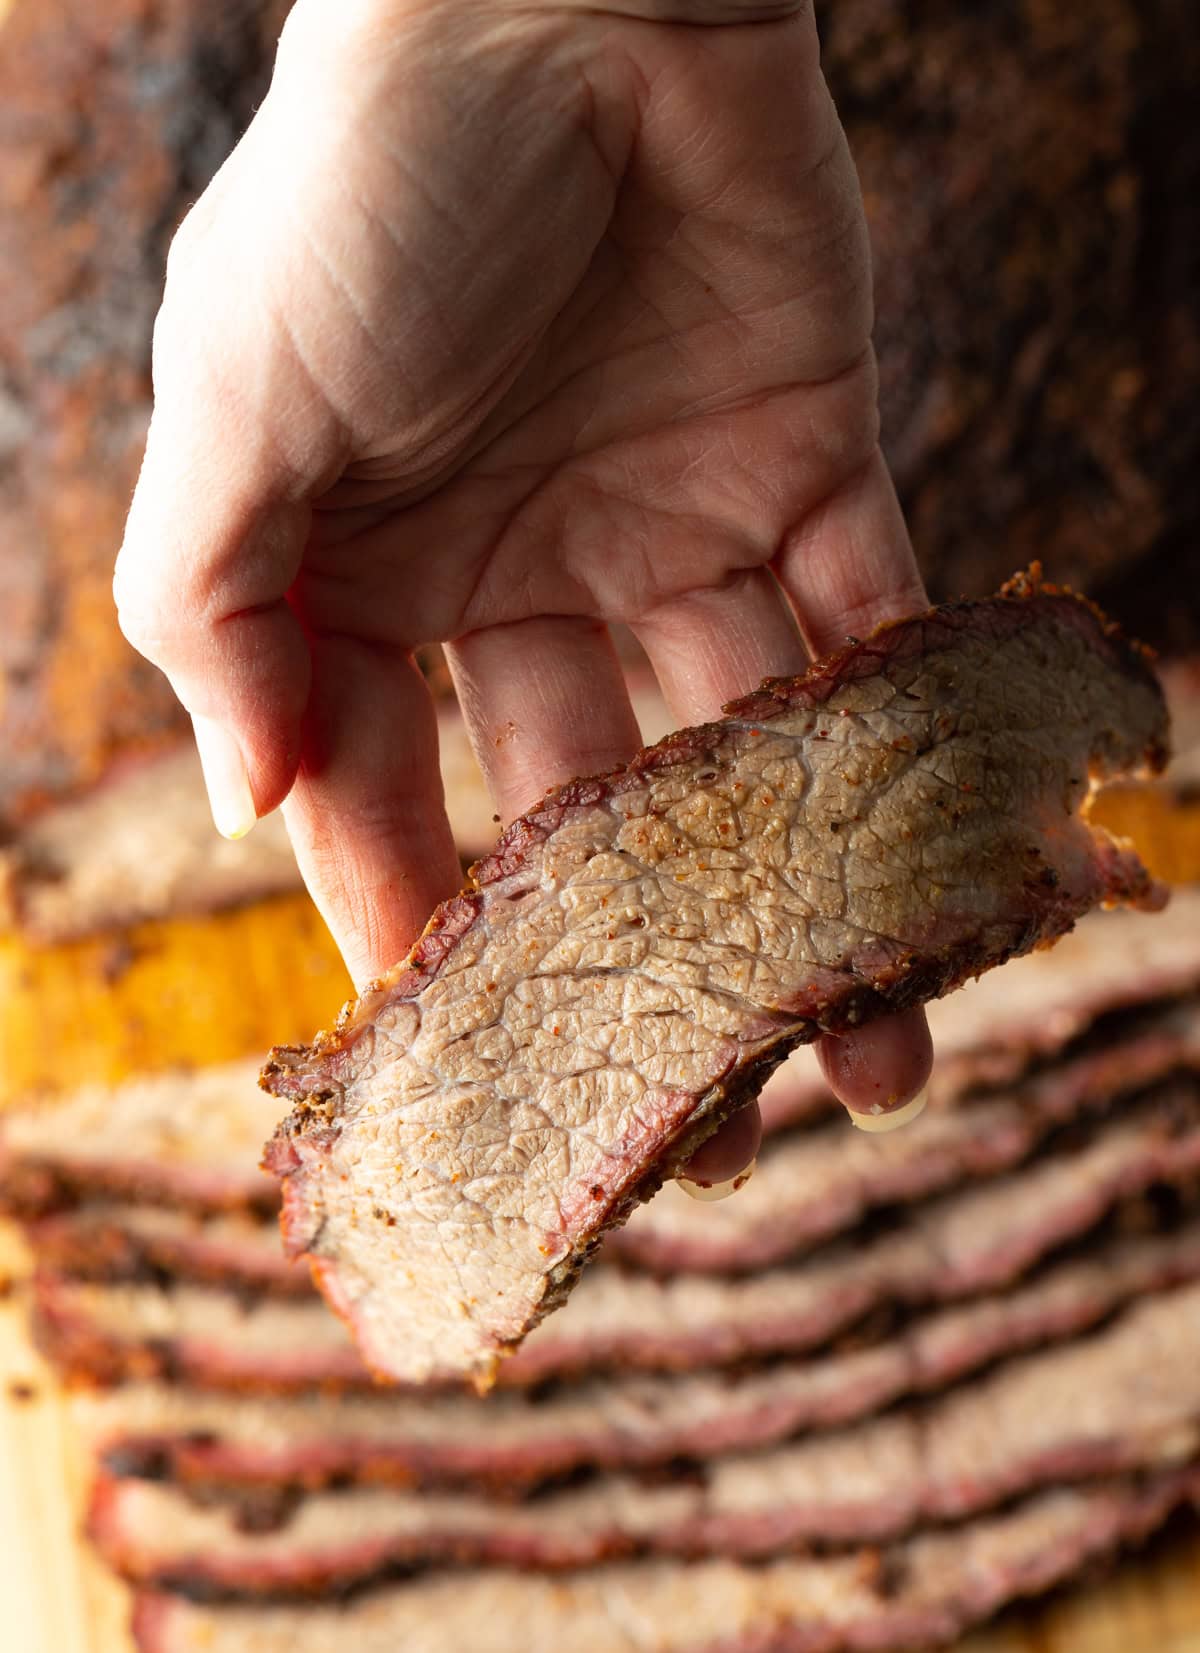
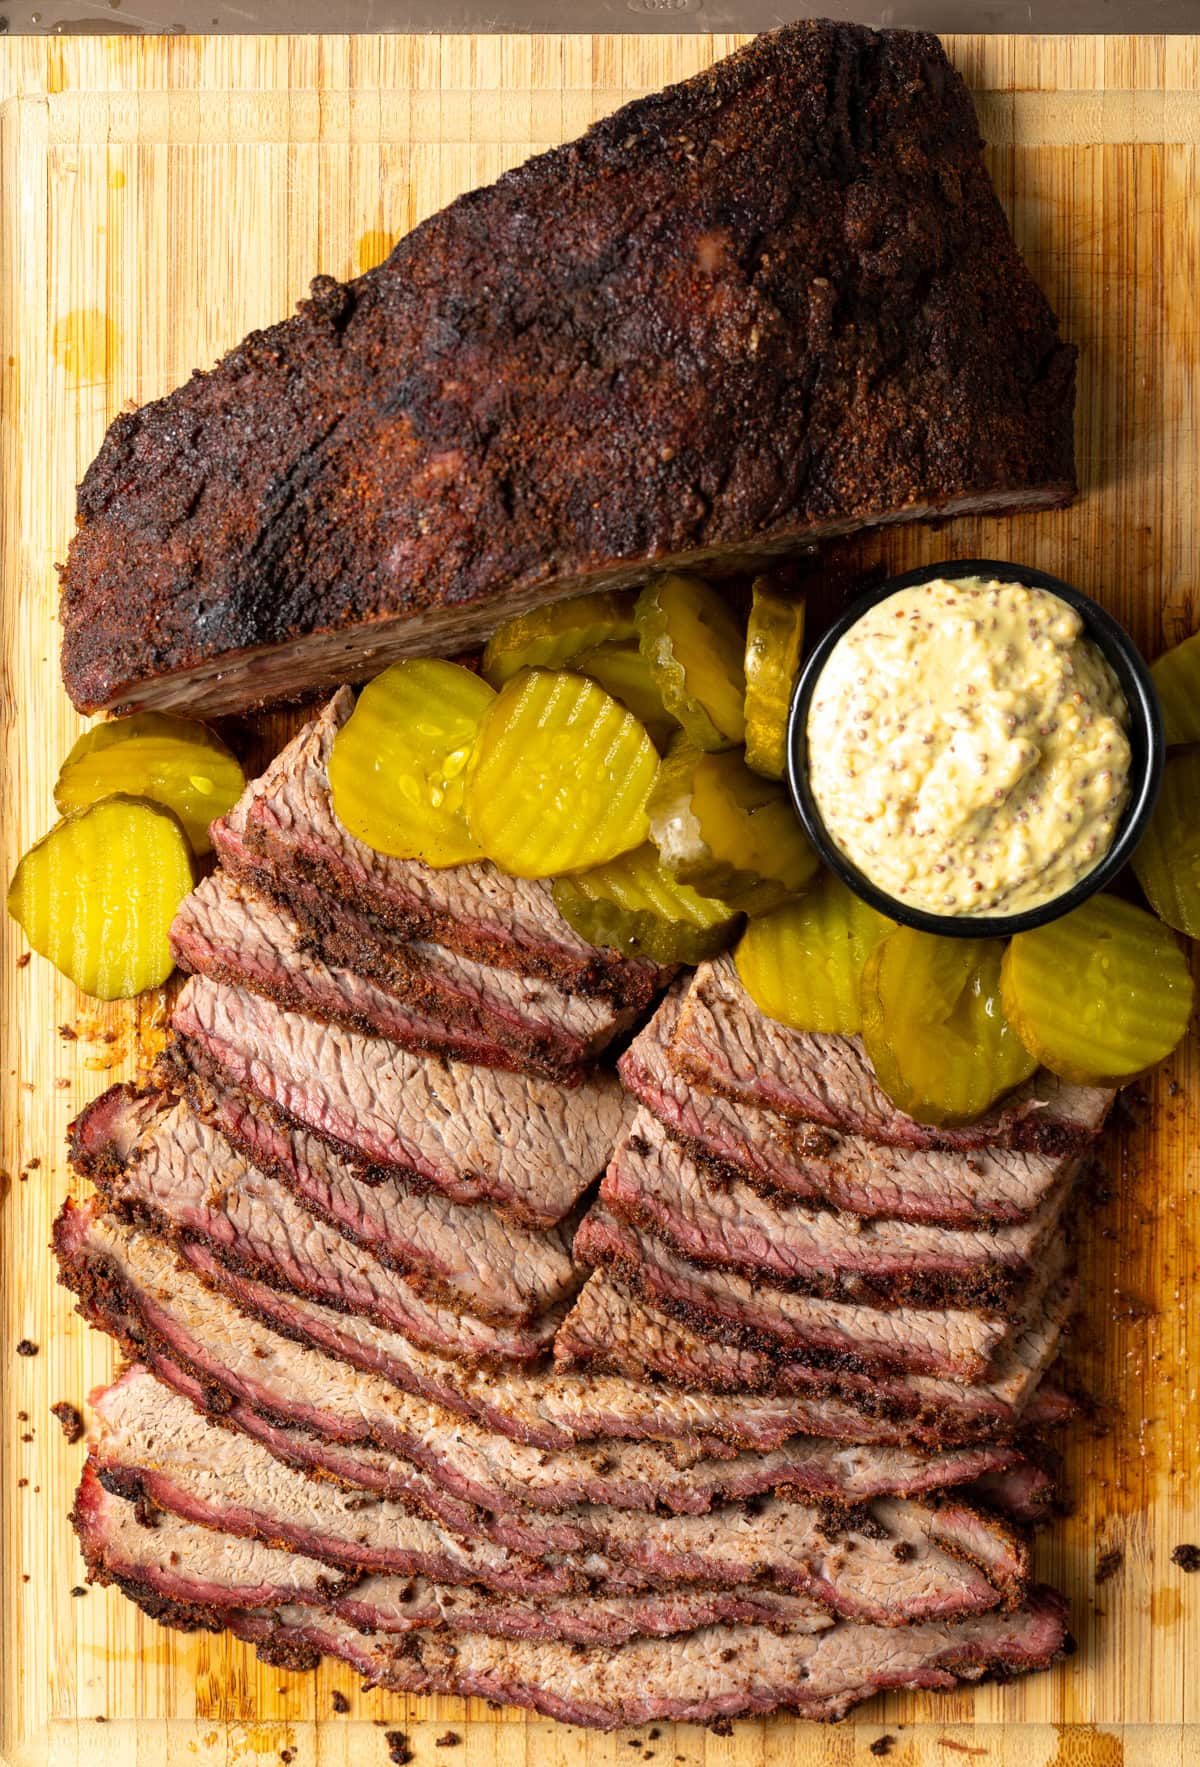
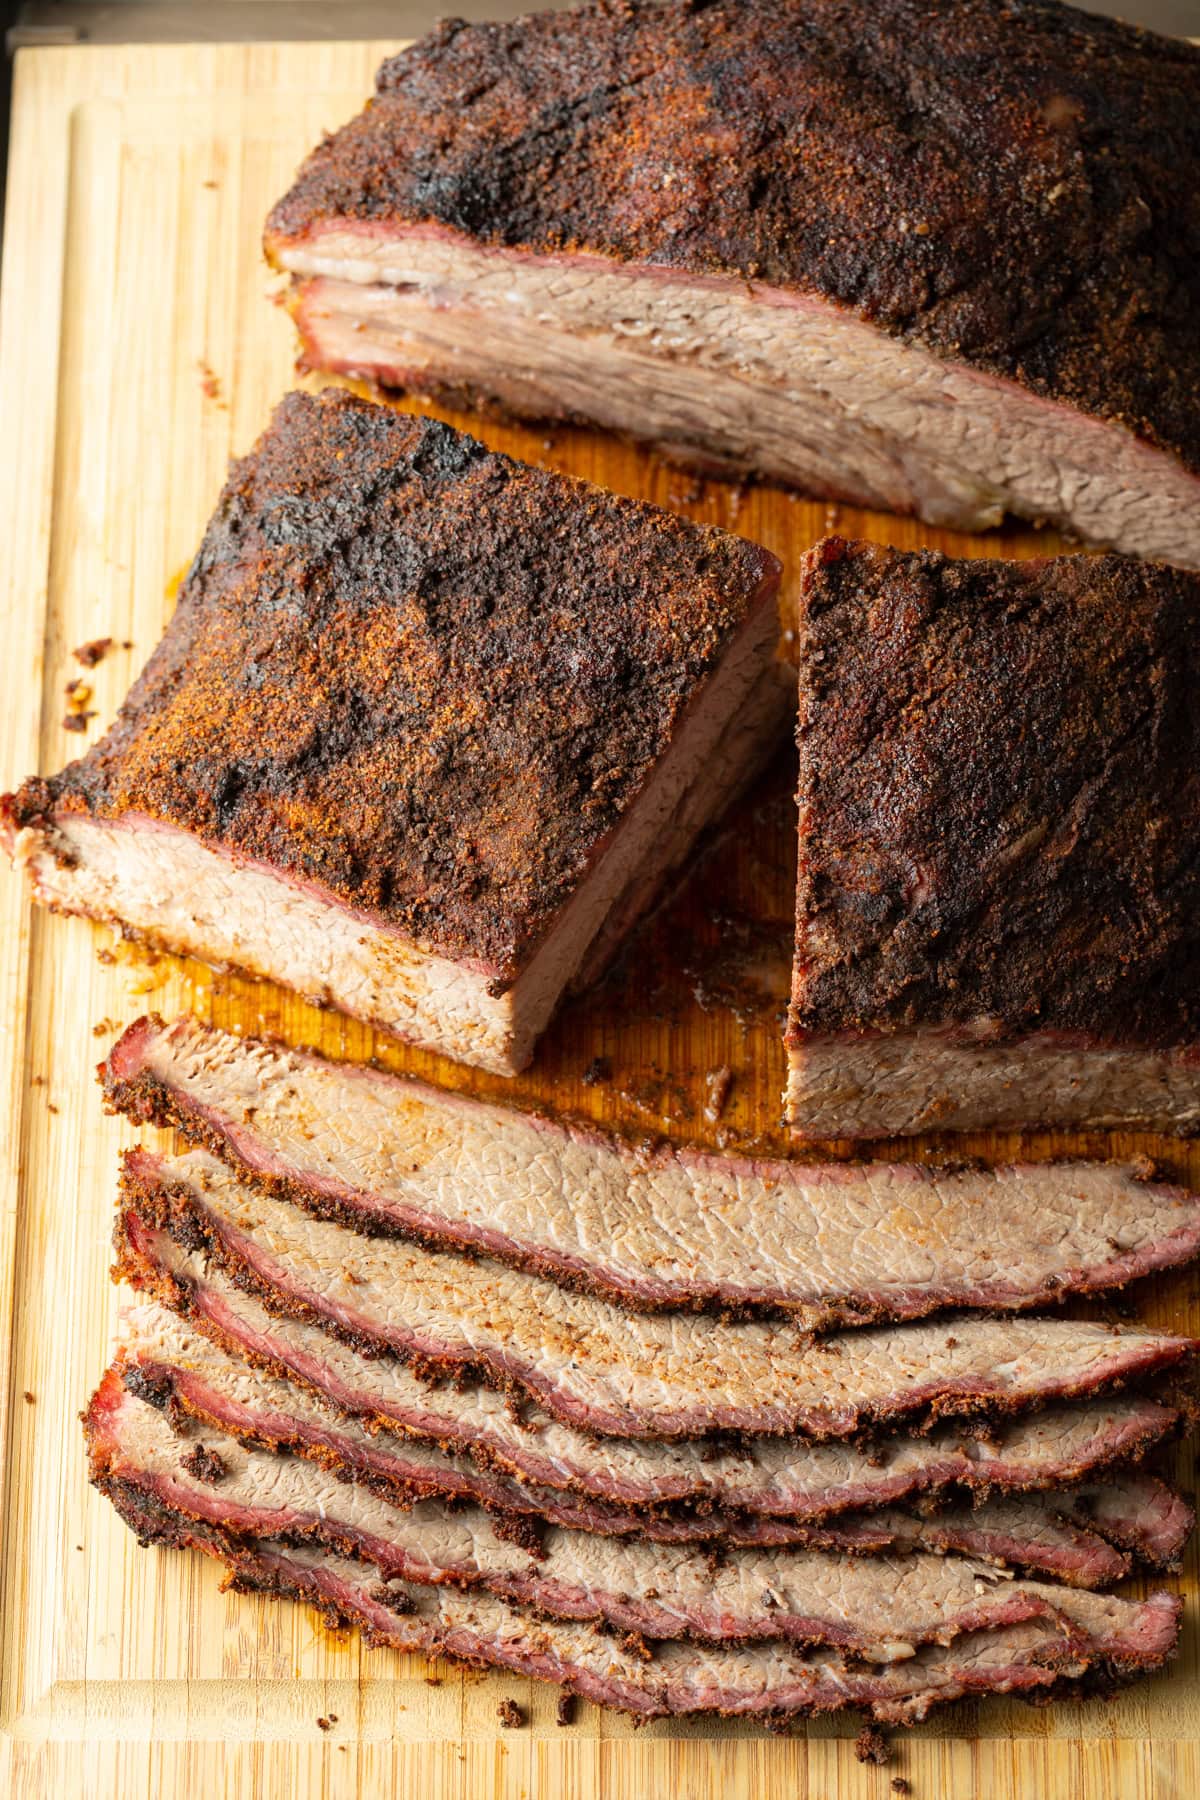
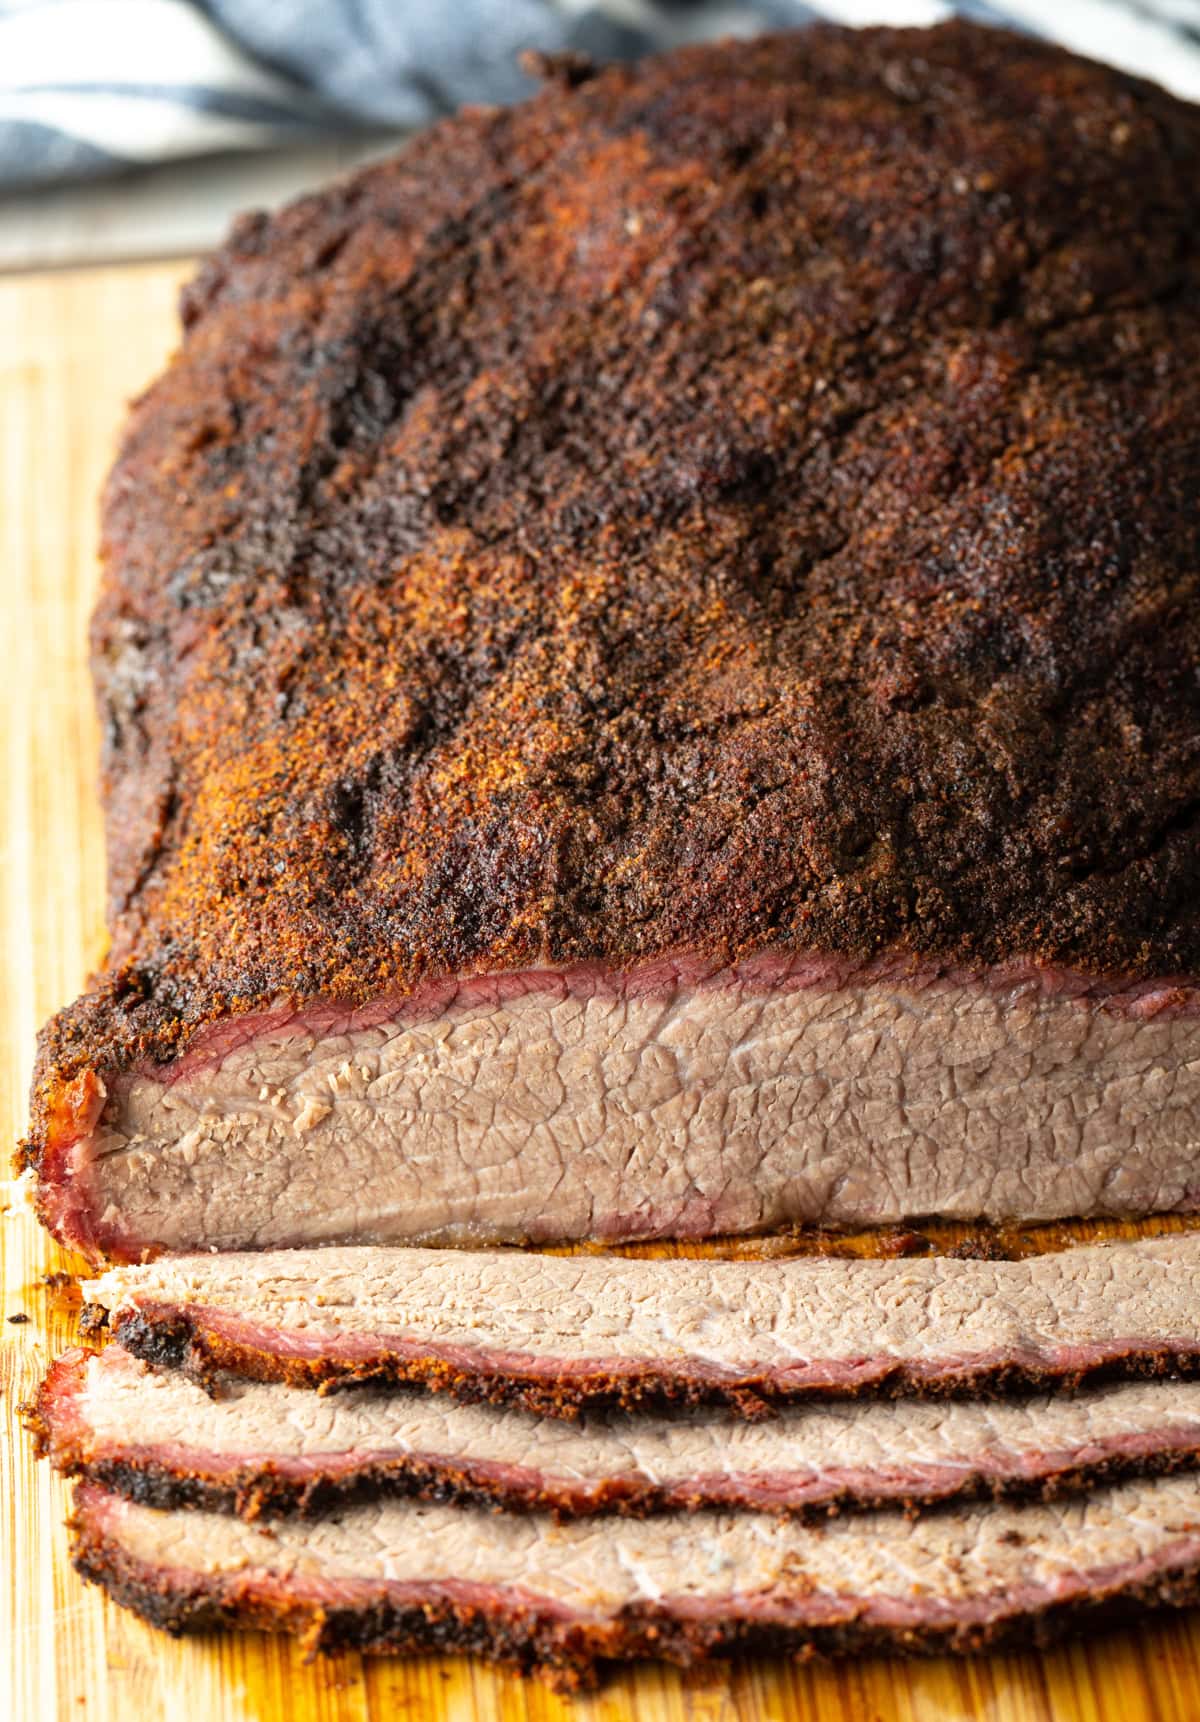
What makes a brisket great? I always look for a firm and crisp bark (more on this below), a pronounced pink smoke ring underneath the bark, an even smoky flavor throughout the meat, and a good stretch in the brisket slices when I pull it.
Today I’m sharing my secret hack for making sure every box is checked! Here I share tips on how to properly trim the beef and prepare a fantastic dry rub seasoning, get just the right smoked brisket temp, info on the essential resting process, and how to thoughtfully slice pieces for the most satisfying texture. Plus, I’ll discuss what to serve with this beef brisket for the ultimate southern experience!
This recipe is for people who: A) have some sort of smoker, charcoal or electric, and B) are serious enough about their meat to take the time to dry brine and slow smoke a brisket. It’s a commitment, for sure… Financially, in time, and attention. Yet there’s nothing quite like a dry-rubbed brisket with a pink smoke ring and the perfect text. Let me show you how to do it!
Equipment You Need
Let’s first discuss what equipment is necessary to properly prepare this smoked beef recipe. You will need…
- Charcoal or electric smoker
- Good quality charcoal and wood
- Probe meat thermometer with an alarm
- Pink butcher paper (or aluminum foil) and kitchen twine
- Rimmed baking sheets
- Large cutting board
- Sharp chef’s knife
The type of wood you use for smoking is a matter of preference… Typically hickory, mesquite, pecan, cherry, and apple are used for beef brisket. Some people even like to blend them!
Key Ingredients
- Whole Packers Brisket – with flat and endpoint intact! (see notes below)
- Kosher Salt – to taste
- Black Pepper – to taste
- Ancho Chile Powder – for a hint of smoky flavor in that bark
- Granulated Sugar – to caramelize and balance out the flavors
- Garlic Powder – for a depth of flavor
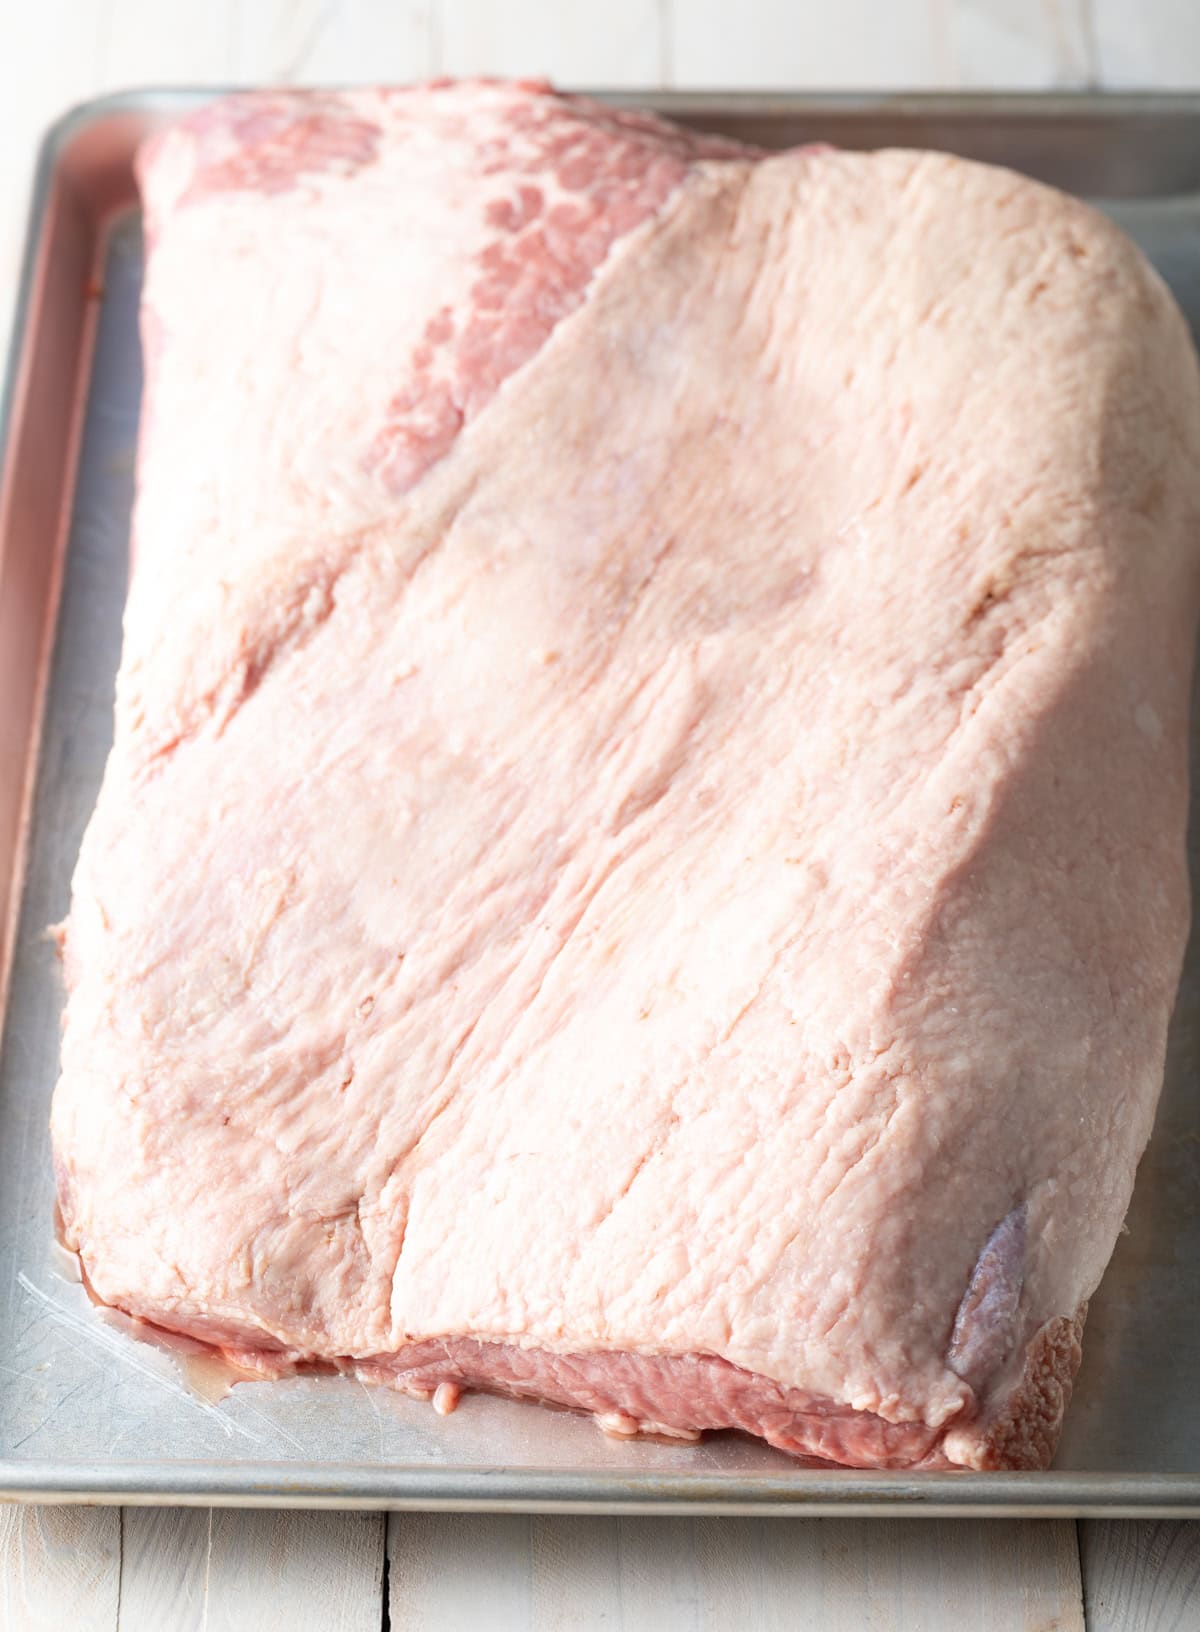
Pro Tip: Most of the time, what I see at the grocery store meat department are pieces of flat brisket or corn beef brisket. Corned beef brisket is heavily seasoned and not at all what we’re looking for to make this style of brisket. What you want is a whole packer brisket (12 to 14-pound “Packers” brisket) that includes both the flat end and the point. Ask your butcher for this… And then here’s my second tip: ask them to trim it for you! You want to trim off as much fat as possible so that the brisket dry rub can actually rest on the surface of the beef.
How To Make
Trim the Brisket
Most people believe that if you leave a good fat layer on the meat it will melt and the fat will soften the meat as it cooks. However, if you think about this from the standpoint of oil mixing with water, it doesn’t actually work that way. Therefore, it’s best to thoroughly trim the fatty layer off the outside of the brisket.
Again, you can (and should!) have the butcher do this for you, or get a sharp knife and get after it. I always make sure to take the fat cap off of both sides, including the thin silver skin membrane.
Dry Brine the Brisket
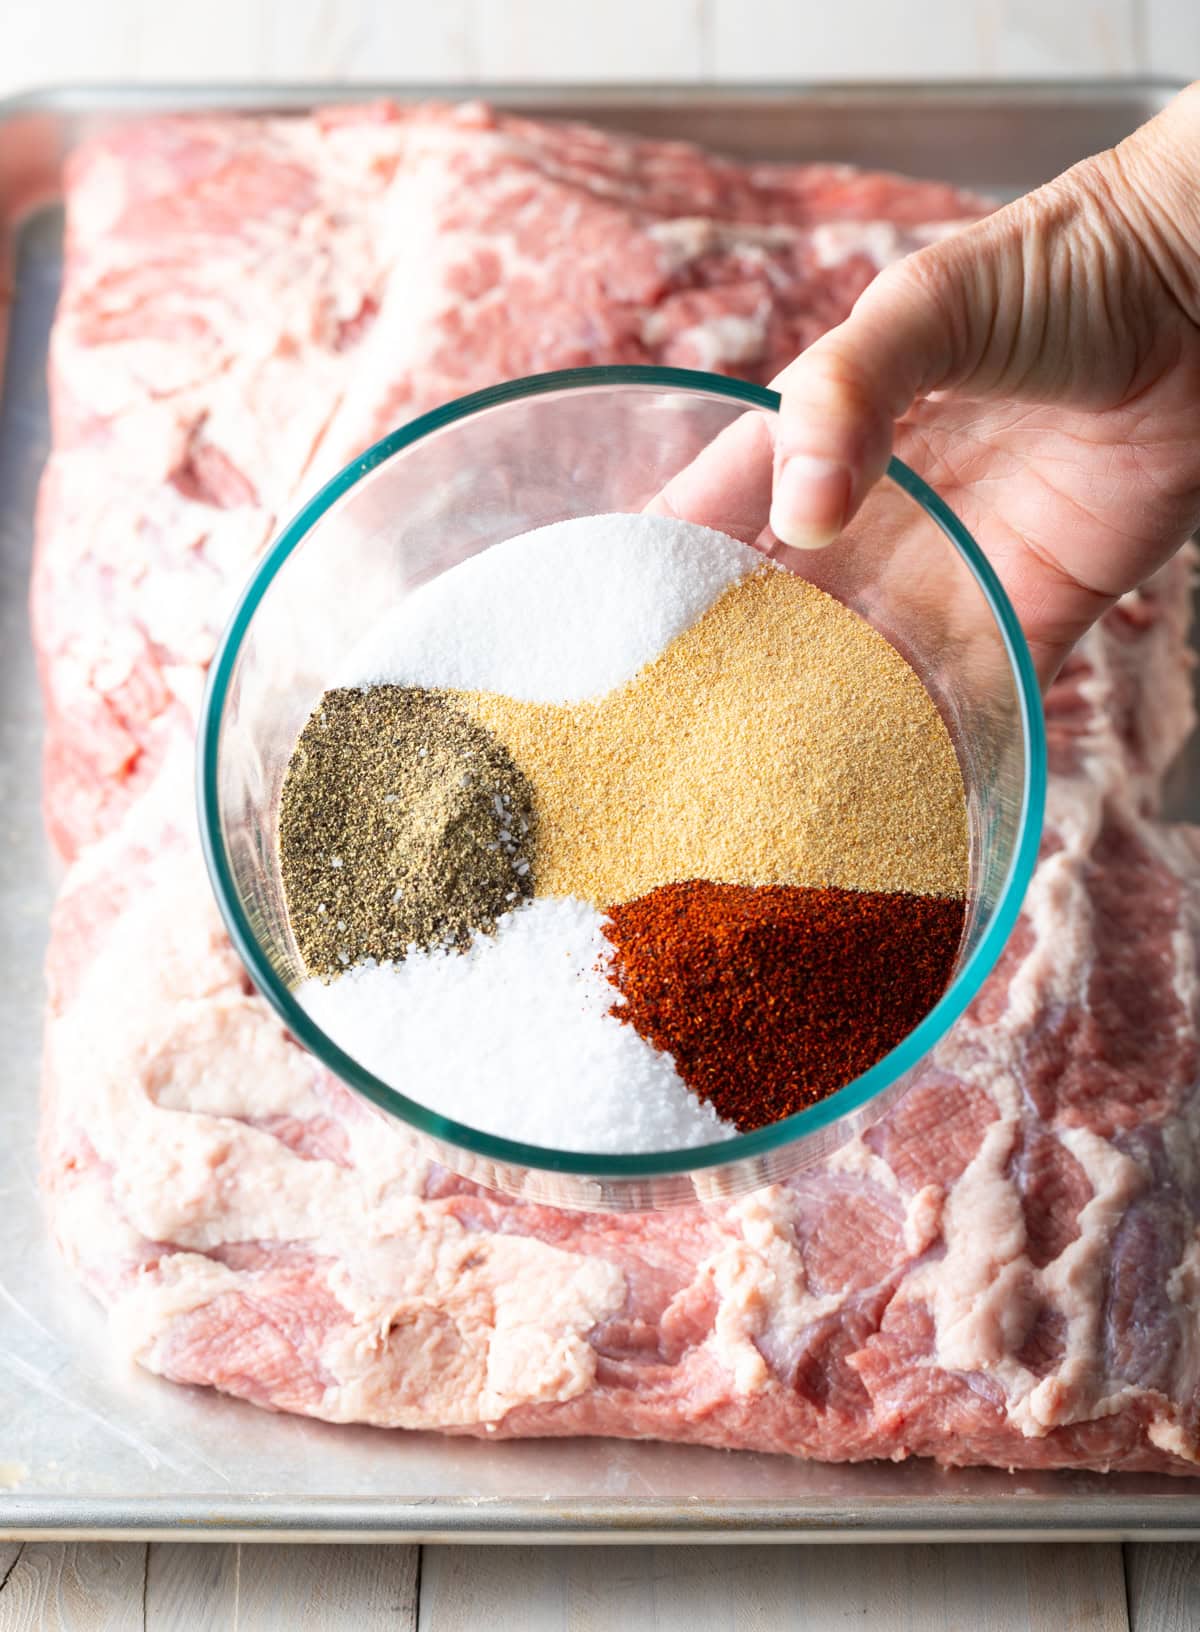
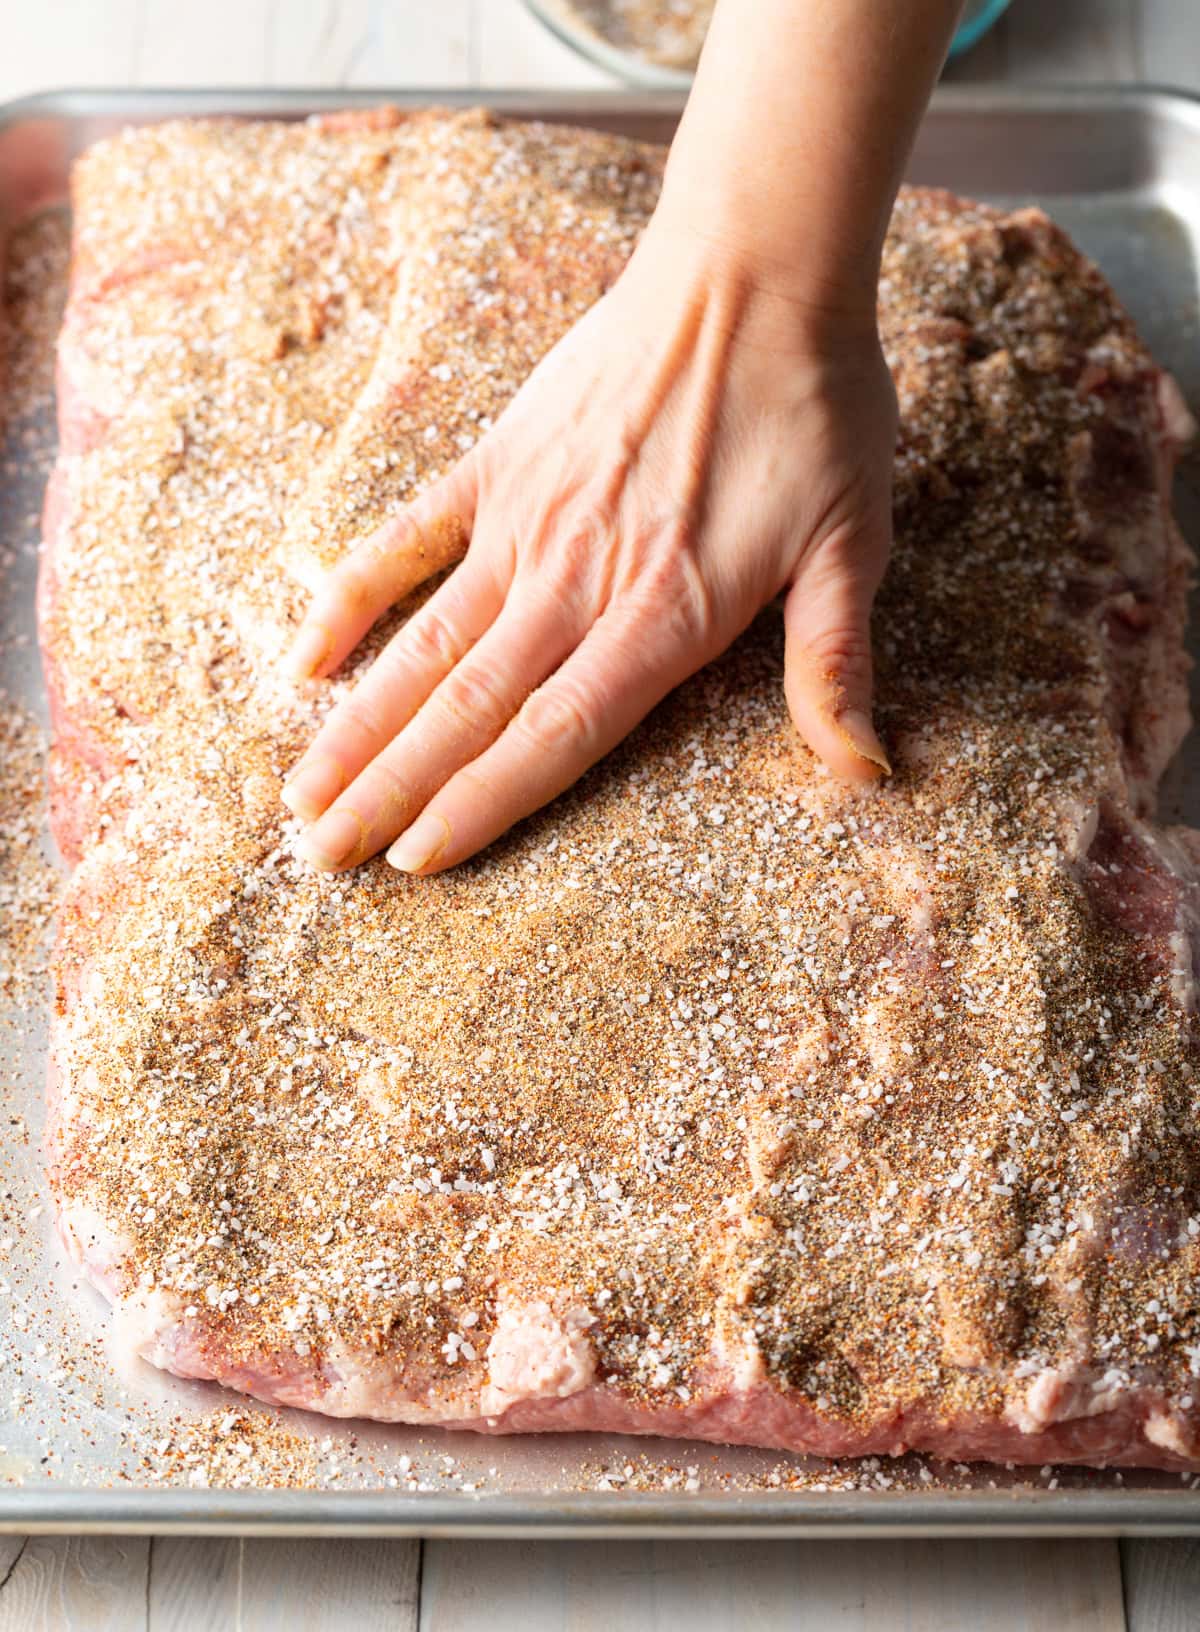
Dry brining is simply rubbing the beef brisket with a salt-heavy spice rub and letting it sit overnight. This allows the salty dry rub time to fully penetrate the meat and season it internally. Don’t skip this step. The salt also helps hold in the moisture so there’s no need to inject beef broth into the brisket. An excellent dry brine ensures the proper internal smoked brisket temp can be reached without over-charing the outside.
In a small bowl, I mix all the seasonings together. I place the trimmed brisket on a large rimmed baking sheet. Then I use your hands to rub the dry brine seasoning evenly over the entire surface of the brisket. Finally, I cover it and place it in the refrigerator overnight, 8-12 hours.
Prep the Smoker
Whether you are using a charcoal smoker or an electric smoking cabinet, prep the smoker with the necessary charcoal and soaked wood chips, or wood smoking pellets. Bring the temperature to 225°.
This is where electric smokers come in handy! They keep the heat consistent and help you achieve the correct smoked brisket temperature without babysitting the smoker as much. I get amazing results from an electric smoker, which usually takes several hours less cooking time than a charcoal smoker.
If you don’t have a charcoal or electric smoker, you can set up a gas or charcoal grill as a smoker!
Smoke Unwrapped
Next, I move the brisket into the smoker and remove the baking sheet. I insert a meat thermometer probe into the center of the thickest part of the brisket. Then I close the cabinet and set the alarm to 150°.
Wrap and Continue Cooking
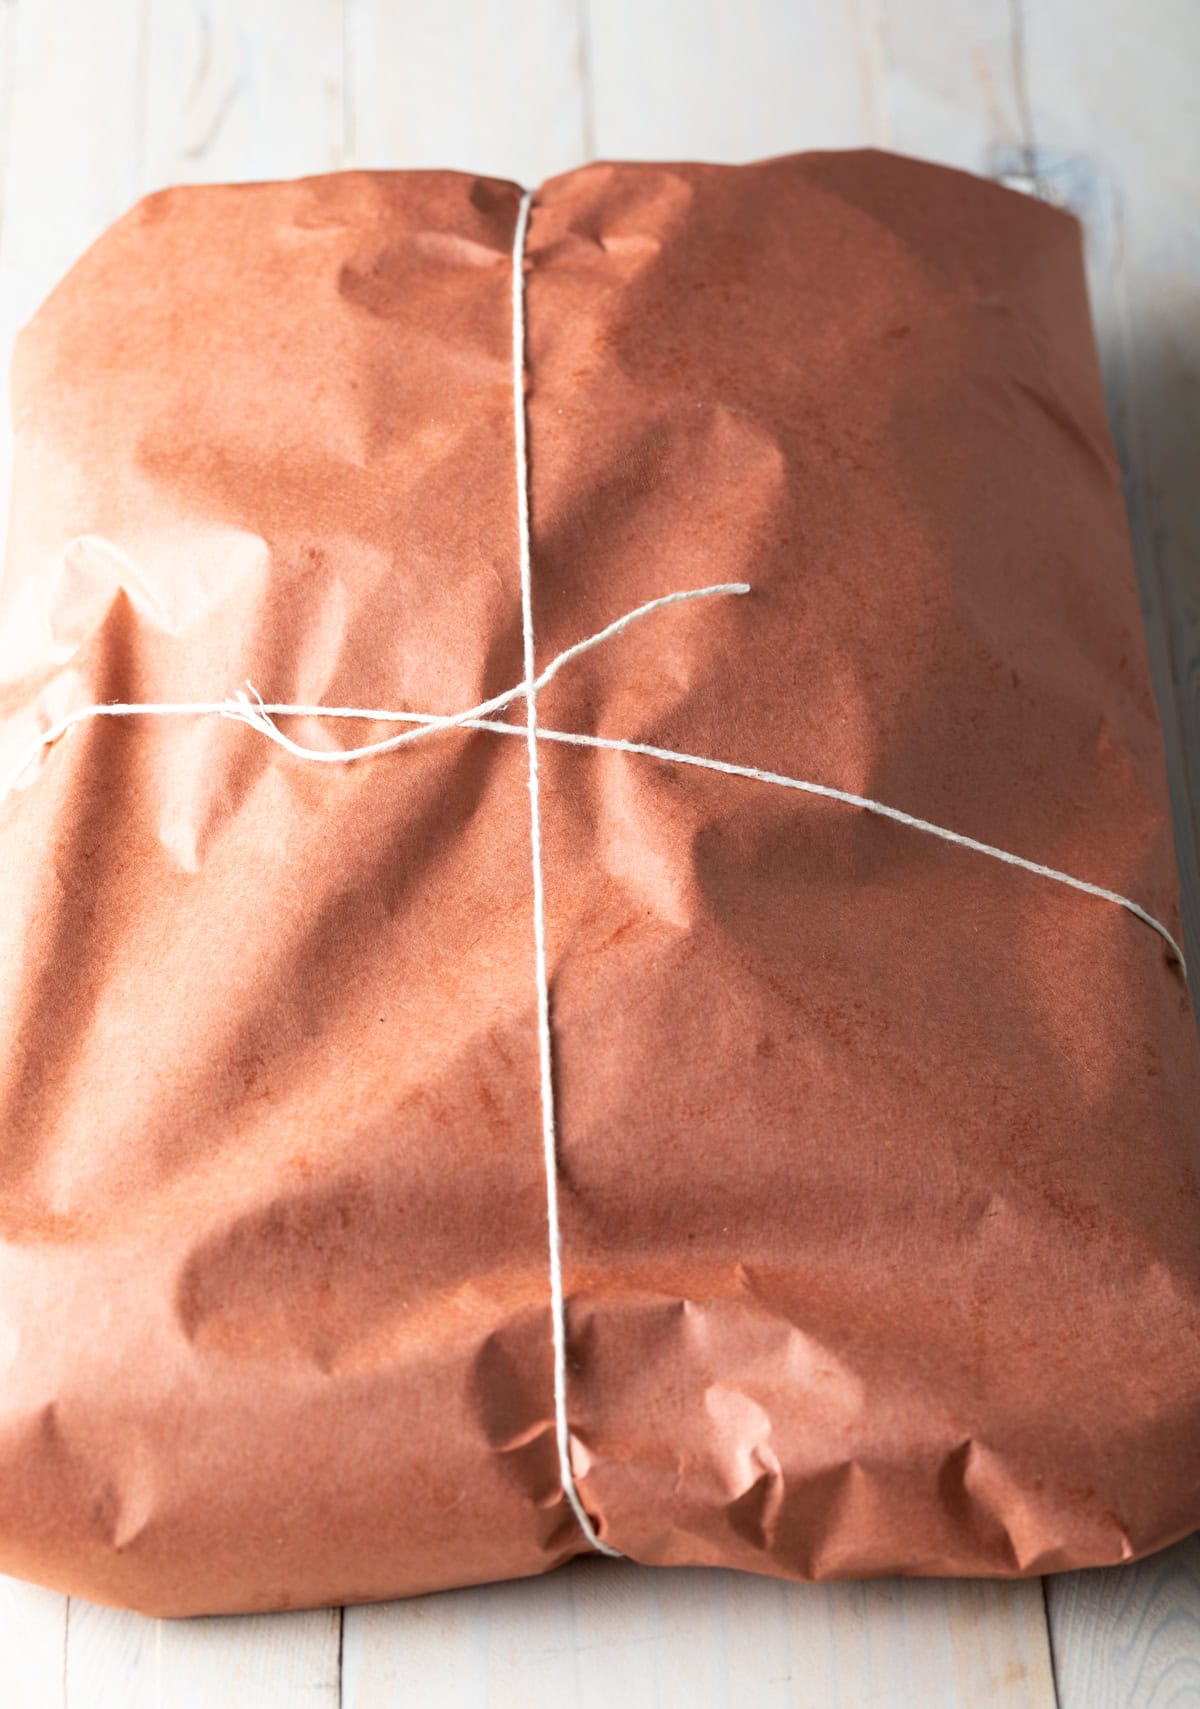
Once the alarm goes off, the internal temperature of the smoked brisket should be 150°. I use pink butcher paper (or heavy-duty foil) to tightly wrap the brisket. You can use kitchen twine if needed to keep it secure. Or you may find you want to use two layers of paper or foil. Once wrapped, I place the brisket back on the smoker and insert the meat thermometer once again.
Now I close the smoker and set the alarm to 195°F. Note: When the smoker hits 195°degrees F I go ahead and preheat my oven to 225°F to create a “faux cambro” AKA a hotbox for cooling. More on this below!
Why 150 Degrees? This is the temperature where a brisket usually stalls… The brisket might stay at this temperature for hours (if not wrapped) before the internal temperature continues to rise. Yet at 150, the brisket has had plenty of time to absorb smoky flavor and create a pink smoke ring, so it’s ok to wrap it.
Why the Pink Butcher Paper? Many home smoke aficionados will tell you to wrap the brisket in foil. However, this causes the brisket to steam and negatively affects the texture of the bark. I have found that using pink butcher paper will help the internal temperature to continue rising while allowing steam to escape. Just make sure to wrap your brisket well!
The Wobble Test
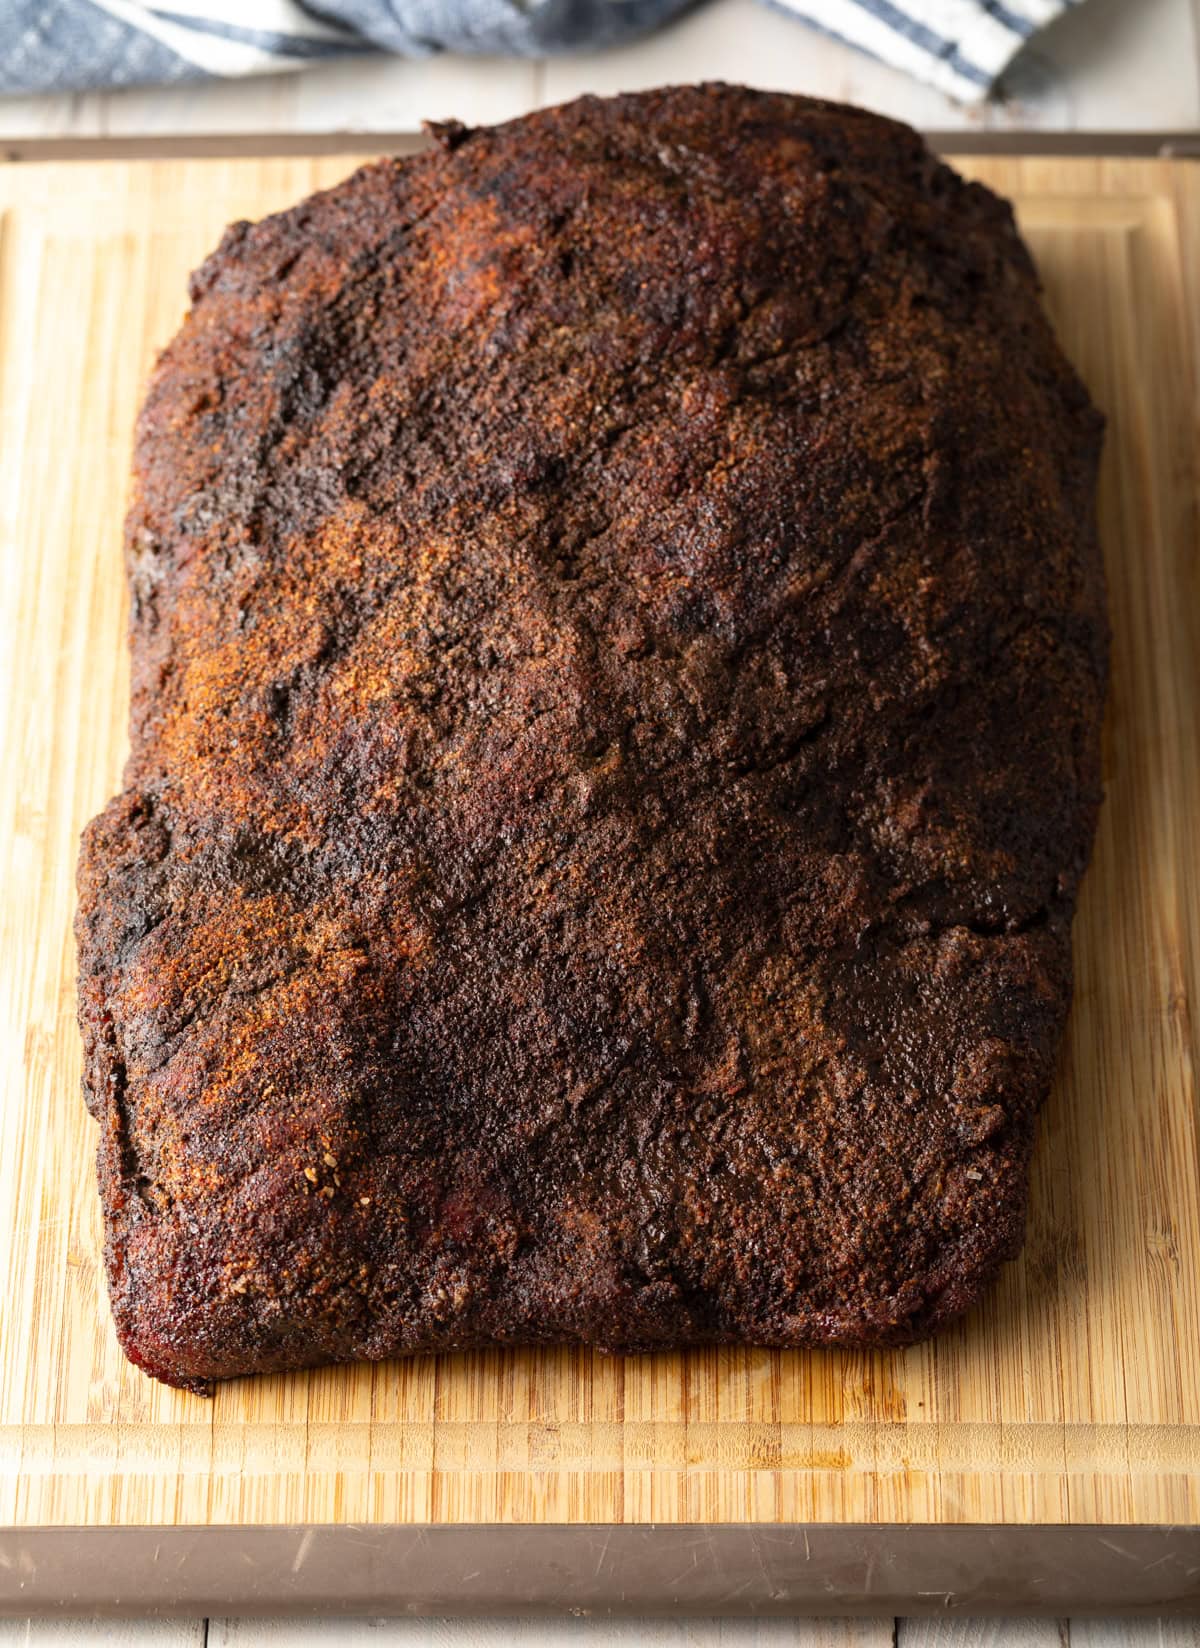
Now for the fun part… Once the brisket reaches 195° to 200°F, I remove it from the smoker. Then I unwrap the brisket and poke it on the thickest end to see if it wobbles or jiggles. If it does not, it may not have reached the proper interior temperature.
However, if it jiggles, it’s ready!
Let the Brisket Rest
Allowing the beef to rest before slicing is absolutely essential! I know it’s going to be hard not to dive right into that tender, smoky meat. But trust me, it is well worth the wait for the perfect texture and taste!
The “Faux Cambro” Brisket Rest Method: Now I remove the wrappings, and place the unwrapped brisket on a rimmed baking sheet. Remember, I turned the oven to 225° when the brisket internal temperature reached 195°F.
I place the unwrapped beef in the warm oven, then turn the oven OFF. This will allow the brisket temperature to come down slowly, as well as firm up the brisket bark on the outside. Once the temperature comes down to 150°, it is safe to slice the brisket. Do not slice the brisket any earlier than one hour after it comes off the smoker.
How to Slice
Keep in mind that brisket is a leaner and dryer cut of beef. Therefore, it is best to cut it immediately before serving. If you cut into it too soon, you will lose all the precious juices that keep it so moist.
If your brisket comes off the smoker and you’ve let it cool and dry in the oven for an hour, and you don’t plan to eat for another couple of hours, just let it sit in the oven and do not pre-slice it. If you ever go to a Texas roadside barbecue stand, you’ll notice they cut the brisket to order, to keep it as moist as possible.
There are all sorts of methods for slicing a brisket “the right way”, however, I find the easiest method is to cut off about 2 to 2 1/2 inches on the thin end. Again, this should be used for brisket burnt ends or brisket sandwiches.
Here’s a super handy diagram I made to show how to cut a brisket. This is based on the directions of the muscles in this cut of beef, so each slice has the proper tender stretch.
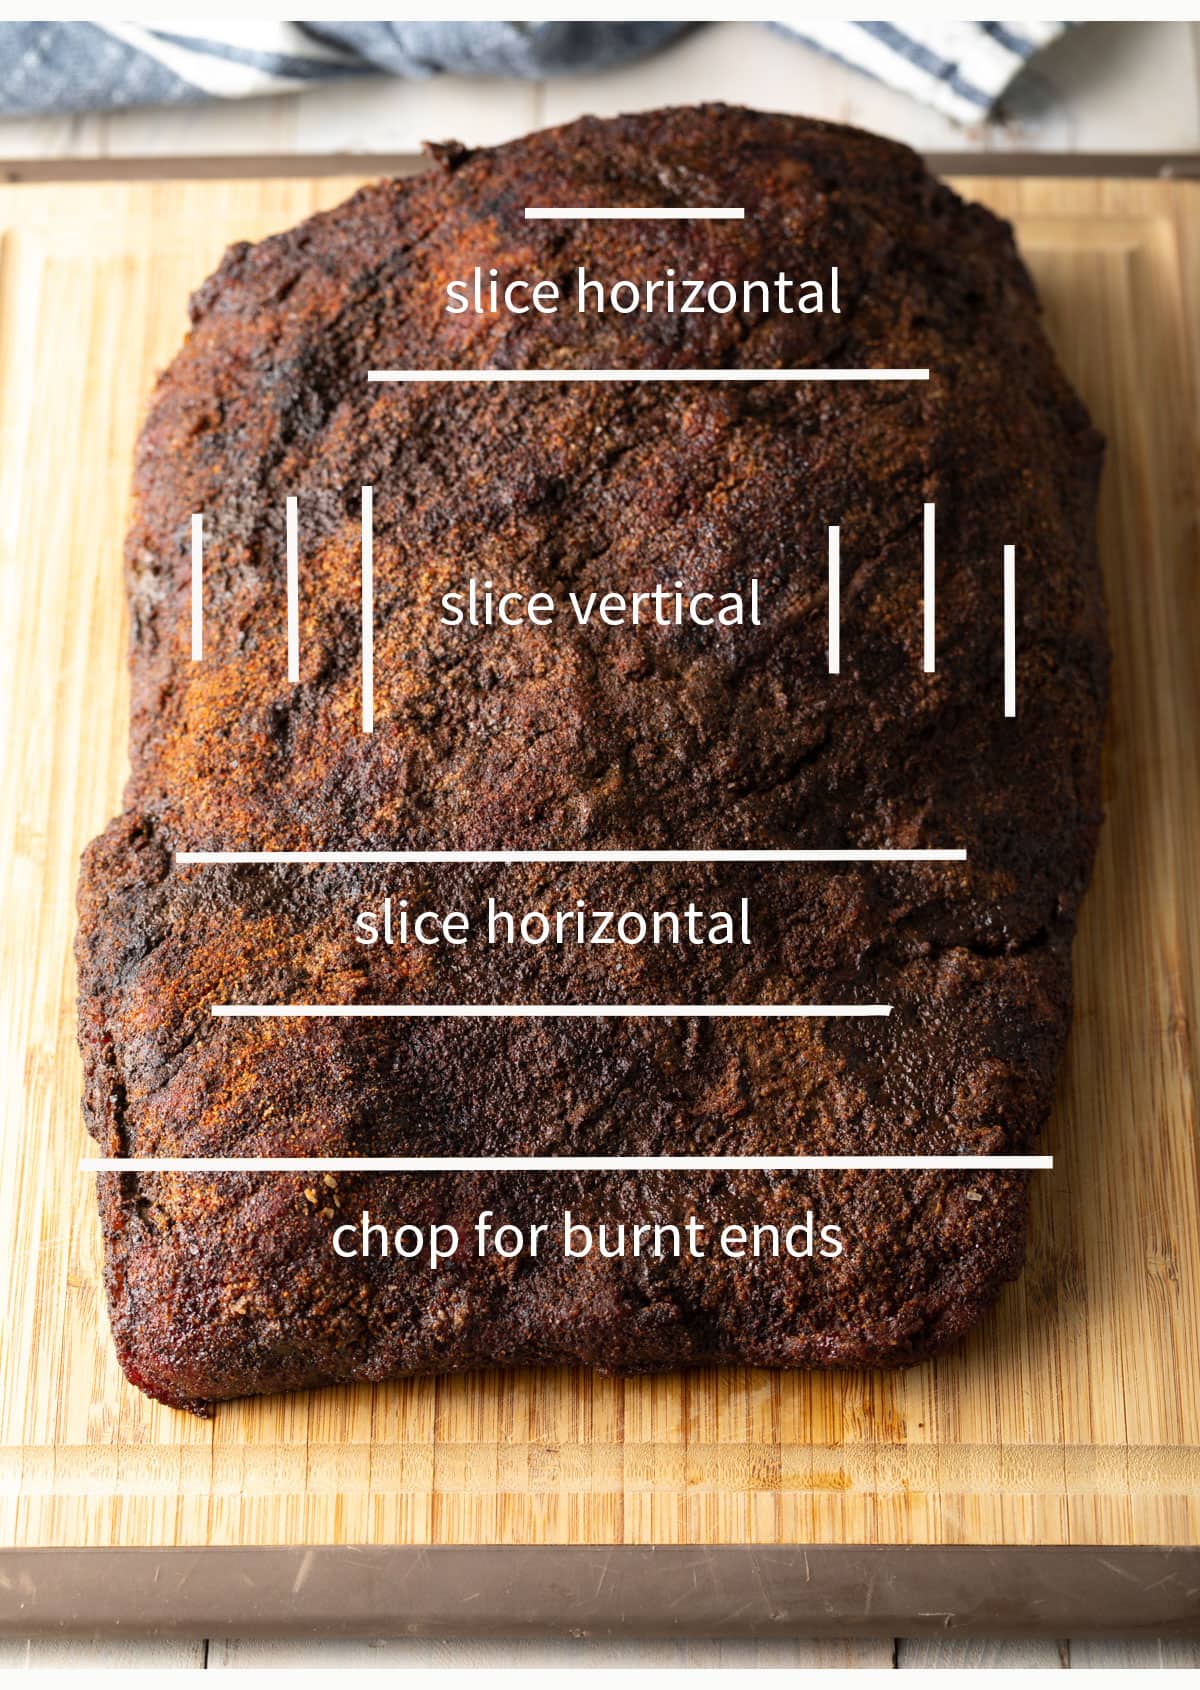
When I am ready to serve the brisket, and not a moment before, I place the brisket on a large cutting board. Cut 2 or 2 1/2 inches off of the thin end to use in other recipes.
Then I slice the brisket thinly against the grain about 1/3 of the way into the brisket. At this point, I cut the remaining 2/3 of the best brisket in half. Turn the middle portion perpendicular to the first section and cut against the grain again.
Sometimes it helps to cut the section into two large pieces to make it easier to slice. Then I cut the last section on the thickest end of the brisket in the same direction as the first section.
Pro Tip: When in doubt, I just look for the grain from the marbling, and cut against it.

Brisket Cooking Hack
Now that I’ve discussed staying attentive to your smoker all day long, let’s discuss my personal favorite hack that can make this process so much easier!
The truth about smoking any piece of meat is that it is going to absorb all the smoked flavor that it can take on, within the first 30 minutes to 60 minutes.
That means after the first hour, it technically no longer needs to be left on the smoker to continue cooking. I can actually turn your smoker off and transfer the brisket to a 225°F oven for the remaining cooking time. This offers several perks that I love…
- I’m saving expensive wood pellets.
- I don’t have to babysit the heat as much as when using a charcoal smoker.
- I usually have a much more consistent heat in the oven, than on an electric or charcoal smoker.
- Most modern ovens come with temperature probes, so my oven will alert me when it’s time to wrap the meat, and then again stop cooking.
Seriously, you will be amazed at how much flavor is infused into the meat in just the first hour of smoking. Plus, you still get that beautiful pink smoke ring! I just always make sure that once I transfer the brisket to the oven, I still follow the instructions according to internal temperature and wrapping.
Serving Suggestions
Those who are serious about Texas barbecue would tell you that you should serve a brisket as-is, dry rub only, no sauce. However, the rest of America and most of the world love a good sauce on barbecued meat. Choose whichever serving style you prefer!
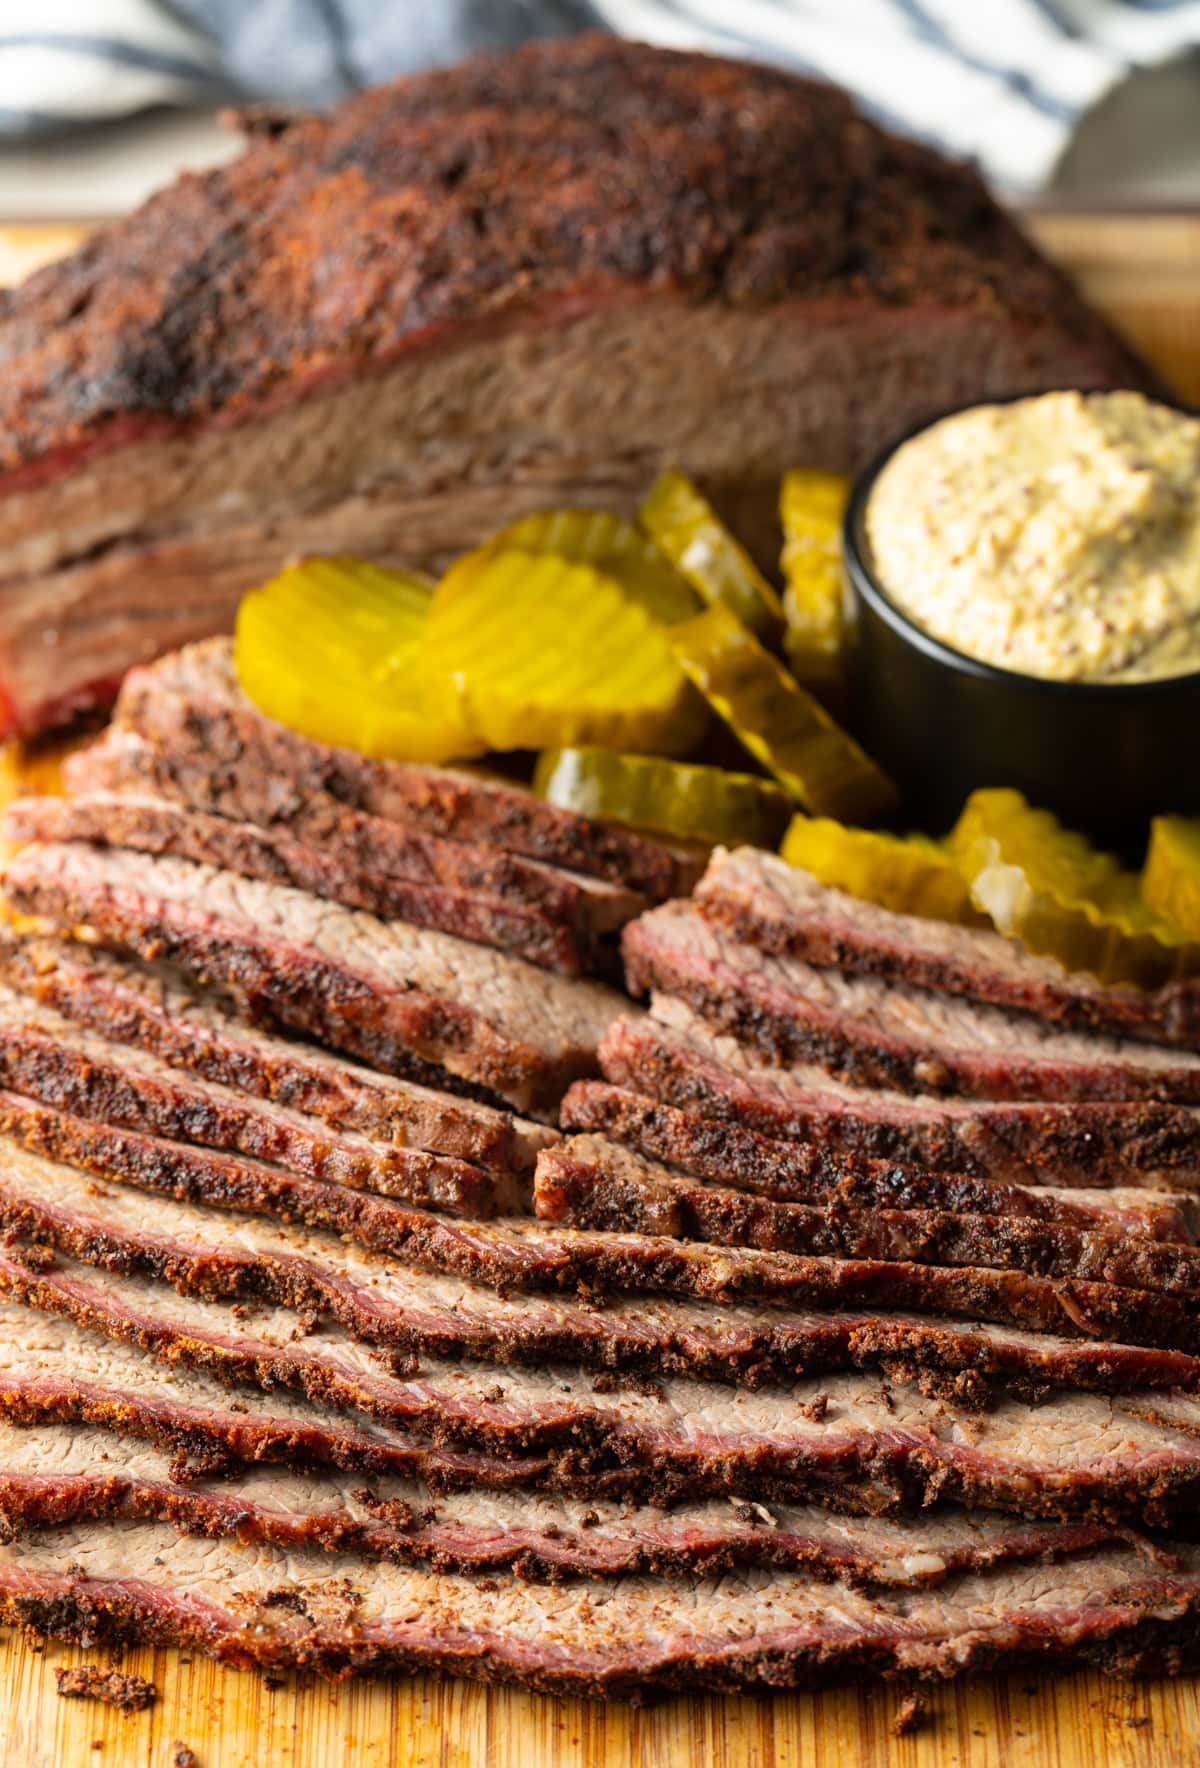
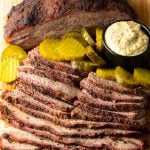
I like to serve chopped or sliced beef brisket as a main dish protein, or on rolls, with spicy mustard and sweet bread and butter pickles (my personal fave), or with your favorite tomato-based barbecue sauce. (I’m a fan of Stubbs!)
Then I round out the meal with my favorite classic southern sides like corn pudding, macaroni salad, broccoli salad, potato salad, baked beans, cathead biscuits, wilted salad, or corn on the cob.

Frequently Asked Questions
The brisket “bark“ is formed by smoking a dry-rubbed brisket, unwrapped, in a smoking cabinet or chamber. This tightens the exterior of the meat and creates a thick spice-rubbed crusty layer. There is also a lovely pink ring of smoke flavor underneath. Once you wrap the smoked brisket to keep the temp rising, the bark will soften. But don’t worry! As you cool the brisket in the oven and open air, the bark will tighten up again.
Smoked beef brisket will keep well for up to 5 days. Transfer the sliced and cooled pieces to an airtight container and keep them in the refrigerator. Either reheat or enjoy cold.
You can also freeze brisket, either whole before slicing or after it has been sliced! Either way, place the beef in a freezer-safe zipper bag and wrap it in a layer of foil. Then keep in the freezer for up to 12 months for a whole unsliced brisket, or 6 months if you freeze smoked brisket slices.
More Delicious Beef Recipes


Dry Brine Brisket
Video
Ingredients
- 12-14 pound WHOLE “packers brisket” with flat and point end intact (do not buy corned beef)
- 3 tablespoons kosher salt
- 3 tablespoons ground black pepper
- 2 tablespoons ancho chile powder or standard chili powder
- 2 tablespoons granulated sugar
- 2 tablespoons garlic powder
Instructions
- Trim the Brisket: Either ask your butcher to trim the fat off your Packers brisket, or use a sharp knife to trim most of the fat off the top and bottom of the brisket, including the silver skin membrane. The less fat on the brisket, the better the dry brine can season the meat.
- Dry Brine the Brisket: In a small bowl mix all the seasonings together. Place the trimmed brisket on a large rimmed baking sheet. Then use your hands to rub the dry brine seasoning over the entire surface of the brisket. Cover and place in the refrigerator overnight, 8-12 hours.
- Prep the Smoker: Whether you are using a charcoal smoker or an electric smoking cabinet, prep the smoker with the necessary charcoal and soaked wood chips, or wood smoking pellets, and bring the temperature to 225°
- Smoke Unwrapped: Move the brisket into the smoker and remove the baking sheet. Insert a meat thermometer probe into the center of the thickest part of the brisket. Close the cabinet and set the alarm to 150°.
- Wrap and Smoke: Once the timer goes off, use pink butcher paper (or heavy-duty foil) to tightly wrap the brisket. Use kitchen twine if needed to keep it secure. You may find you want to use two layers of paper or foil. Place the brisket back on the smoker and insert the meat thermometer once again. Close the smoker and set the alarm to 195°. *When the smoker hits 195° preheat your oven to 225° to create a “faux cambro” AKA a hotbox for cooling.
- Wobble Test: Once the brisket reaches 195° to 200°, removed it from the smoker. Unwrap the brisket and poke it on the thickest end to see if it wobbles or jiggles. If it does not, it may not have reached the proper interior temperature. However, if it jiggles it’s ready!
- Faux Cambro Brisket Rest: Remove the wrappings, and place the unwrapped brisket on a rimmed baking sheet. Place it in the warm oven, then turn the oven OFF. This will allow the brisket temperature to come down slowly, as well as firming up the brisket bark on the outside. Once the temperature comes down to 150°, it is safe to slice the brisket. Do not slice the brisket any earlier than one hour after it comes off the smoker.
- Brisket Slicing: When you are ready to serve the brisket, and not a moment before, place the brisket on a large cutting board. Cut 2 or 2 1/2 inches off of the thin end. Save this tough portion for chopped brisket or burnt ends. Then slice the brisket thinly against the grain about 1/3 of the way into the brisket. At this point, cut the remaining 2/3 of the rest of the brisket in half. Turn the middle portion perpendicular to the first section and cut against the grain. Sometimes it helps to cut the section and two large pieces to make it easier to slice. Then cut the last section, on the thickest end of the brisket, the same direction as the first section. When in doubt, look for the grain, and cut against it.
- Serve immediately with sweet pickles, spicy mustard, or Texas-style barbecue sauce.

Just awesome! So incredibly tender and the flavor is spot on. This is a winner!
Thank you so much for the recipe!
Was wondering what the temps would be if I wanted it to be rare?
Cant wait to try it!!
Just awesome! So incredibly tender and the flavor is spot on. This is a winner!
Classic brisket recipe & technique! Love it!
This brisket looks delicious. Thanks for sharing the recipe.
A great recipe! So easy to make and a great juicy brisket every time!
Just awesome! So incredibly tender and the flavor is spot on. This is a winner!
This was the most informative post, and I loved the helpful cutting techniques as well!