

Cinnabon Cinnamon Roll Recipe
 by Sommer Collier — last updated on Oct 16, 2026
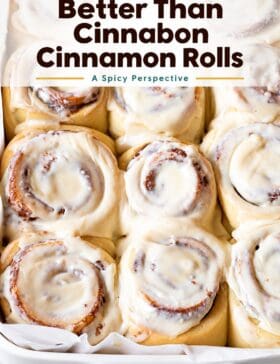
I know it’s a bold claim, but I think my homemade cinnamon rolls are even better than Cinnabon! They’re made with soft, fluffy layers of sweet dough, swirls of rich cinnamon filling, and a generous slather of cream cheese frosting. These are the kind of cinnamon rolls that make getting out of bed in the morning totally worth it!

Several weeks ago I took my children out on a lunch date. After lunch, the kids noticed a Cinnabon shop and proceeded to coax me over to the counter. I hadn’t had a Cinnabon roll in a long long time, so I gave in rather quickly. With nostalgic anticipation, I unraveled my first cinnamon roll layer and proceeded to taste what I remembered to be life-changing. Yet what was my reaction? Meh. Not as good as I remembered. It was too… something. And not enough something else. In fact, my gut reaction was a prideful confident statement, “I can do better at home.”
In all honesty, you really can do better at home if you know what makes a killer cinnamon roll. So today I want to share my secrets for making my “Better Than Cinnabon Cinnamon Roll Recipe”. That way, you can do better at home as well.
If you love sweet breakfasts, also check out my elevated Pain Perdu recipe that is always better made from scratch!
Kristina – ⭐⭐⭐⭐⭐ This is the third cinnamon roll recipe I’ve tried recently and this one was the best! I followed the recipe to-a-tee and they were amazing! Thanks for the great recipe and the thorough instructions!
Table of Contents


Sommer’s Recipe Highlights
Better than the mall version – I know that’s a bold statement, but I stand by it! After my last taste of the store-boght version, I decided to craft and tweak my cinnamon roll reciep until I got it just right. These babies have more cinnamon filling, softer layers, and enough cream cheese frosting to make a proper mess of your fingers.
It’s all about the dough – I’ve found that the difference between a decent cinnamon roll and a really good one is the dough. I scald the milk, use plenty of butter, and give the dough time to rise properly. It’s a little more work than opening a can of refrigerated rolls, but there’s no comparison. PS, you can do this… I’ll show you how below!
My two-round frosting trick – I don’t wait for the rolls to cool before frosting them. Half of the frosting goes on straight out of the oven, so it melts between the layers. The rest goes on about five minutes later and stays thick on top. You get frosting inside and outside the rolls, which is exactly how I want them.
And if you think getting sticky fingers is part of the fun, check out my monkey bread recipe.

Key Ingredients and Tips
- Whole Milk – I scald the milk first, then let it cool before adding the yeast. Whole milk gives the dough a little extra richness, which is exactly what I want in my dough. Just make sure the milk has cooled to around 105-110°F before adding the yeast. Too much heat will kill it, so use a cooking thermometer here!
- Unsalted Butter – I use real butter here, and plenty of it! It makes the dough tender and gives the rolls that buttery flavor you just can’t get with shortening. I’m using it in all three layers, so buy extra.
- Granulated Sugar – I don’t make the dough overly sweet because there’s a full cup of brown sugar in the filling. A little sugar in the dough is plenty to activate the yeast.
- Active Dry Yeast – And speaking of yeast, make sure to buy a fresh package! I let it sit in the warm milk mixture for about 10 minutes until it’s nice and foamy before mixing the dough.
- Large Eggs – I use two large eggs for a richer, softer dough. Set them out ahead of time so they aren’t refrigerator-cold when you add them.
- All-Purpose Flour – Regular flour works great for this recipe. I try not to add more than necessary because too much flour can make the rolls heavy. For accurate measuring, fluff the flour in the bag, spoon it into your measuring cup, and level off the top.
For the Cinnamon Filling
- Brown Sugar – Light or dark brown sugar both work, but I usually go with light brown. Dark brown sugar has a stronger molasses flavor.
- Ground Cinnamon – I use 2½ tablespoons of cinnamon. It sounds like a lot, but we’re making twelve big cinnamon rolls, and I want to taste cinnamon in every bite.
- Ground Nutmeg – I always add a little nutmeg to my cinnamon filling. You won’t necessarily pick out the flavor, but it gives the cinnamon a little something extra.
For the Cream Cheese Frosting
- Cream Cheese – Full-fat cream cheese, please! I like my frosting thick and tangy, not runny. Set the cream cheese out early so it mixes smoothly with the butter.
- Vanilla Extract – I use two teaspoons of vanilla in the frosting. Since the frosting isn’t baked, I think it’s worth using a good-quality vanilla extract. (Ok… so I always think that!)
- Powdered Sugar – This sweetens and thickens the frosting. If your powdered sugar is clumpy, sift it first.

How to Make
Find the full recipe with ingredient proportions, detailed instructions, and a video tutorial in the printable form at the bottom of the post.
Scald the milk – First, I set out the butter, eggs, and cream cheese so they can come to room temperature. Then I pour the milk into a small saucepan and heat it just until it reaches a boil. As soon as it starts bubbling, I pull it off the heat. This is called scalding, and it helps to acheive the perfect dough texture, so don’t skip. The scaleded milk needs to cool down first, or you’ll kill the yeast before it has a chance to do anything.
Mix in the butter and sugar – I pour the hot milk into the bowl of my stand mixer and add ½ cup of butter. The hot milk melts the butter while the butter helps cool down the milk. Win-win! Once the butter is completely melted, I stir in the white sugar.
Activate the yeast – Before adding the yeast, I check the milk mixture with a thermometer. It should be lukewarm, around 105-110°F. If it’s still too hot, I stir in ½ cup of the measured flour to cool it down. Then I add the yeast and wait about 10 minutes. I want to see foam on top before moving on. If nothing happens, my yeast is old or I killed it! Either way, I’ll have to start from scratch, so be careful in this step.
Knead the dough – Next, I attach the dough hook to my mixer and turn it on low. I add the eggs, salt, and remaining flour, using up to 4 cups total. Then I let the mixer knead the dough for about 10 minutes. The dough should start pulling away from the sides of the bowl and become smooth and tacky. If it’s still extremely sticky after the first 2-3 minutes, I sometimes add another ¼ cup of flour.

Let the dough rise – Once the dough forms a smooth clump, I cover the mixing bowl with plastic wrap and set it somewhere warm. Then I leave it alone for about 60-90 minutes, until it doubles in size. This is a great time to make the filling.
Mix the cinnamon filling – I mix the brown sugar, softened butter, cinnamon, and nutmeg into a thick paste. I’ve found this is much easier than sprinkling loose cinnamon sugar over the dough. It spreads more evenly, and I don’t lose half the filling when I roll everything up.
Roll out the dough – Once the dough has doubled in size, I turn it out onto a well-floured work surface. I fold it into thirds and press it flat, then turn it and fold it into thirds again. (Like a pamphlet fold.) After pressing it into a rough rectangle, I use a rolling pin to roll it into a large 16×20-inch rectangle. Don’t worry if the edges aren’t perfectly straight.
Spread on the filling – I spread the filling almost to the edges, leaving about 1½ inches bare along one long side. That’s the edge I’ll use to seal the roll. An offset spatula (AKA frosting spreader) makes this much easier, especially if the butter is properly softened.

Roll and slice – Starting at the long edge covered with cinnamon filling, I roll the dough into a tight even log, working toward the uncovered edge. Then I line a 9×13-inch baking dish with parchment paper and cut the log into 12 equal cinnamon rolls. I like to use a sharp serrated knife to cut the rolls without squishing the spirals. I tuck the loose end underneath each roll as I arrange them in the baking dish.

Let them rise again – I preheat the oven to 350°F and let the cinnamon rolls rise in the baking dish for at least 30 minutes while the oven heats. They should look noticeably puffier and start filling in the spaces between the rolls. This second rise is what helps make them so light and pillowy.

Bake until fluffy and golden – Now I bake the cinnamon rolls for 20-25 minutes, until the edges are just barely golden and the centers have puffed up nice and high. Don’t overbake them! They should look set in the center but still be pale and fluffy on top.

Whip up the frosting – While the cinnamon rolls are baking, I beat the softened cream cheese, butter, vanilla extract, and powdered sugar together until the frosting is completely smooth and creamy.
Frost while warm – The moment the cinnamon rolls come out of the oven, I gently spread about half the cream cheese frosting over the tops. The heat softens the frosting so it melts down into all those little cracks and cinnamon swirls. Then I wait about 5 minutes and spread on more frosting for a thick, creamy finish.

Serving Suggestions
Of course, you can eat these cinna-rolls all on its own and have a lovely breakfast or brunch! But they go well with other things, too. I would serve these with a full spread, especially when feeding a crowd! Try serving them with some of these breakfast options:
- Denver Omelette
- Biscuits and Gravy Casserole
- Easy Egg Bites
- Amish Breakfast Casserole
- Blintz Pancakes

Storage
Room Temperature – I usually leave them out on the counter, covered of course, for the first 24 hours. After that, any leftovers go into the fridge because of the cream cheese frosting.
Refrigerator – I usually keep the rolls together in the baking dish and cover it tightly. They’ll keep in the refrigerator for 3-4 days. Keeping them together seems to help prevent those outside edges from drying out.
Freezer – If I know I’m going to freeze some, I prefer to set those rolls aside before frosting. Once they’re completely cool, I wrap them individually and freeze them in a freezer bag for up to 3 months. That way, I can pull out one or two whenever I want.
Reheating – About 15-20 seconds in the microwave usually does the trick for one refrigerated roll. I just want it warm enough to soften the dough and frosting, not piping hot.
Make Ahead – You can shape the rolls the night before and refrigerate them in the baking dish. In the morning, set them out until they’re puffy, then bake as directed. I usually allow 45-90 minutes, depending on how cold the dough is and how warm the kitchen is.

Frequently Asked Questions
You can make the dough the day before. Roll them, cut them, and place the baking dish in the fridge until morning. Then set them out to rise while the oven warms. Bake and glaze!
The eggs make the dough more pliable and give it stretch. They also make the texture finer, the flavor richer, and the color better. I would not omit them unless you are allergic.
Yes, you can half the recipe. Making a smaller batch (or the same-sized rolls) should not affect the overall cooking time. However, if you make the rolls smaller, you will need to reduce the cooking time.
Yes, you can! This is a great substitute for whole milk because you do not have to scald it. You can use it as-is.
You can. However, the dough will be much heavier and will not rise as much. I would suggest using two-thirds all-purpose flour and one-third whole wheat flour for fluffy rolls.
Help Me Spread the Word about this Fabulous Free Recipe! Sharing this recipe link on Pinterest and Facebook is super impactful, and I greatly appreciate it! Find the share buttons below the recipe form.
More Breakfast Recipes



Cinnabon Cinnamon Rolls Recipe
Ingredients
For the Dough:
- 1 cup scalded whole milk
- 1/2 cup unsalted butter
- 1/3 cup granulated sugar
- 2 1/2 teaspoons dry active yeast (or 1 packet)
- 2 large eggs
- 4 cups all-purpose flour (plus additional as needed)
- 2 teaspoon salt
For the Cinnamon Roll Filling:
- 1 cup brown sugar packed
- 1/2 cup unsalted butter softened
- 2 1/2 tablespoons ground cinnamon
- 3/4 teaspoon ground nutmeg
For the Cream Cheese Frosting:
- 1/2 cup cream cheese softened
- 1/2 cup unsalted butter softened
- 2 teaspoons vanilla extract
- 2 cups powdered sugar
Instructions
For the Dough:
- Set the butter, eggs and cream cheese out to warm to room temperature. Place the milk in a small saucepan. Bring to a boil. The moment it reaches a boil, remove from heat. (This process is called scalding, and it ensures the milk doesn’t affect the yeast’s ability to rise. Don’t skip!)
- Pour the hot milk into the bowl of an electric mixer and add 1/2 cup butter, to bring the temperature down. Stir and allow the butter to melt completely. Then stir in the sugar. Touch the milk mixture to test the temperature. It should be close to luke warm. If it is not, add 1/2 cup flour and test again. Once it is just above room temperature, stir in the yeast and let it foam for approximately 10 minutes. (Too-hot liquid can kill yeast.)
- Place the bread hook on the mixer and turn on low. Add the eggs, salt, and remaining flour up to 4 cups. Allow the mixer to “knead” the dough until it pulls away from the sides. Run the mixer for approximately 10 minutes to allow the dough to stretch and develop the gluten. If the dough seems too sticky after the first 2-3 minutes add an additional 1/4 cup flour. After 10 minutes, turn the mixer off. Cover the top with plastic, and allow the dough to rise until double in size, approximately 60-90 minutes in a warm kitchen.
For the Cinnamon Roll Filling:
- Mix the brown sugar, softened butter, cinnamon, and nutmeg until smooth. Keep at room temperature until ready to use.
- Dump the inflated dough out on a well-floured work surface. Fold into thirds and press flat. Then turn and fold into thirds again and press into a rectangle. Roll the rectangle out into a large 16 X 20 inch sheet.
- Using a large flat spreader, spread the cinnamon filling over the sheet into a thin layer. Leave 1 1/2 inches bare (cinnamon-free) on one long edge. Be careful not to gouge holes in the dough. Starting at the cinnamon-covered long edge, roll the dough sheet tightly toward the uncovered edge to form a long tight log. Place a piece of parchment paper in a 9 X 13 inch baking dish. Then cut the log into 12 equal rolls. Tuck the loose end under each roll to secure it, and place them in the baking dish to rise.
- Preheat the oven to 350 degrees F. Allow the rolls to rise for at least 30 minutes while the oven heats. Then bake for 20-25 minutes, until the edges are barely golden and the center of each roll is puffed high up.
For the Cream Cheese Frosting:
- While the rolls are in the oven, beat the cream cheese, butter, vanilla, and powdered sugar together until completely smooth. The moment the rolls come out of the oven gently spread half the glaze over the tops and allow it to seep down into the cracks. Five minutes later, add more glaze if desired. Serve warm or at room temperature.


I made these last night! Hands down the best cinnamon rolls I’ve ever attempted. This is the only recipe I’ll ever use now. My family and I say thank you!
Hi Zara, thanks so much for sharing! You just made my day. :)
can I use a bread machine to make these hand don’t work to good
Hi Kandy, Sure! Happy Baking!!
Would these work with almond milk instead? Thanks!
Hi Sam! Probably… but I have never tried it so I can’t say for sure.
I have never made a cinamon roll in my life other than the Pillsbury ones. ? I made these three times this week and they were so easy to make!! These directions are easy to follow and the end result are fabulous cinnamon rolls! My sons think I’m the best. So if you ever wanted to learn how to make delicious cinamon rolls this is the recipe to try. I did end up letting the yeast bubble for longer on accident the 2nd time around and I like how they turned out better. Also they need to cook about 40 min but that could just be my oven. Thank you for sharing this awesome recipe!!!
I’m surprised that no one asked, but OK to add raisins in the cinnamon mixture?
Hi Judy, Of course! Go for it!! :)
I have these in the oven with about two minutes to go. They smell amazing and look gorgeous! I cannot wait to dive in!
A-ma-zing! You have two thumbs up by myself, my husband, and my brother, who just happened to wander over from next door about the time these were headed into the oven. Thanks so much for sharing!
Just finished the rise step. I followed the recipe exactly and my dough didn’t rise at all. Not sure what went wrong? Hopefully they’ll still turn out okay.
Hi Amy, sorry to hear that! My guess would be that your yeast is old. I replace all my leavening agents (yeast, baking powder, baking soda…) twice a year, even if there is some left. There’s nothing worse than finding out too late that your baked goods aren’t going to rise. :(
In the oven now!! Look so awesome and pretty simple to make!
These look so delicious!! I’ve never attempted homemade cinnamon rolls but I think I am going to have to try these! Would these be okay to make at night and then leave the rolled up mixture in the fridge overnight and bake in the morning?? Thank you for answering!
Hi Faith! Yes, although you may need to bake them just a tad longer if the dough is cold.
Thank you for replying!! I am going to make these tonight and cook them in the morning. SO excited!! :)
So i have been avoiding making cinnamon scrolls thinking they would be a pain to make. I bit the bullet and attempted this recipe! IT was super easy and turned out perfect. the dough mixture seemed a bit sticky when mixed, however, once left to rise, it was just right. Personally, i might reduce the sugar in the glaze next time but the dough texture and taste was just right and that to me is the tricky part. Thank you!
If I don´t have a dough mixer, can I just knead it with my hands? How long do I need to knead it?
Absolutely! It’s just takes a lot more time… In fact, I would double the knead time in this recipe. Good arm workout thought! ;)
Absolutely loved these! I’ve been making the clone of a cinnabon recipe for the past year and have been searching for cinnamon rolls that aren’t dense and bland; closer to what I grew up eating. These are perfect! They turned out light and fluffy the first time and could not have been easier. I used my bread maker and just added the ingredients according to the bread maker instructions, after they rose in the bread maker I continued on as the recipe instructed. Will recommend these to friends and will definitely make again!