Strawberry Rhubarb Pie
My strawberry rhubarb pie is a classic no-frills summer recipe that tastes as beautiful as it looks! Some flavor combinations become classics for a reason, and strawberry rhubarb is one of the very best. I love how the tartness of rhubarb balances the natural sweetness of strawberries to create a pie filling that’s bright, vibrant, and perfectly balanced. Tucked inside a flaky pie crust, it’s one of my favorite summer desserts.
I make a lot, and I mean a lot, of pies throughout the year. And while they all have a special place in my heart, I must admit that fresh summer berry season is my favorite! Over the years, I’ve created several fruit pie recipes that always get rave reviews. However, my husband Dan’s favorite strawberry pie variation is strawberry rhubarb pie made with my quick pie crust. There is something about baking rhubarb and strawberries together that creates a tangy-sweet flavor that tastes just like pure summer. In fact, I even use frozen fruits to make this recipe in the fall and winter, or whenever I need some perky summertime vibes in my life.
Table of Contents

Sommer’s Recipe Highlights
Summer Fruit Sensation – Mixing and baking crisp and tart rhubarb with sweet, tender strawberries makes a delicious flavor combination and balance of textures that don’t lean too far one way or the other. It’s bright, perky, and perfect for summer!
As Easy as Pie – Like all of my favorite fruit pie recipes, including my new fresh strawberry pie recipe, this one doesn’t need any special steps to make the filling in one bowl, and no par-baking is necessary for the crust. You can even use frozen fruit and a store-bought crust to make the process even easier!
Looks as Good as it Tastes – I’m sharing my simple “secret” tips for making the best strawberry rhubarb pie with a buttery, golden brown crust that looks like it came from a bakery. And if you need a real showstopper, you can use decorative cookie cutters to cut the top crust as you like with pretty patterns. I’ll show you how!
Key Ingredients and Tips
- Double pie crust – My buttery homemade pie crust recipe is way easier to make than you might think! But if you’re in a hurry, store-bought crust also works well.
- Strawberries and rhubarb – I love fresh rhubarb and strawberries; however, as I mentioned, this recipe is also wonderful with frozen. Don’t thaw the frozen fruit! Thawing will cause the berries and rhubarb to release moisture and make the bottom of the pie soggy. Instead, keep the fruits frozen while making the recipe.
- Sugar – I use good ‘ol fashioned granulated white sugar.
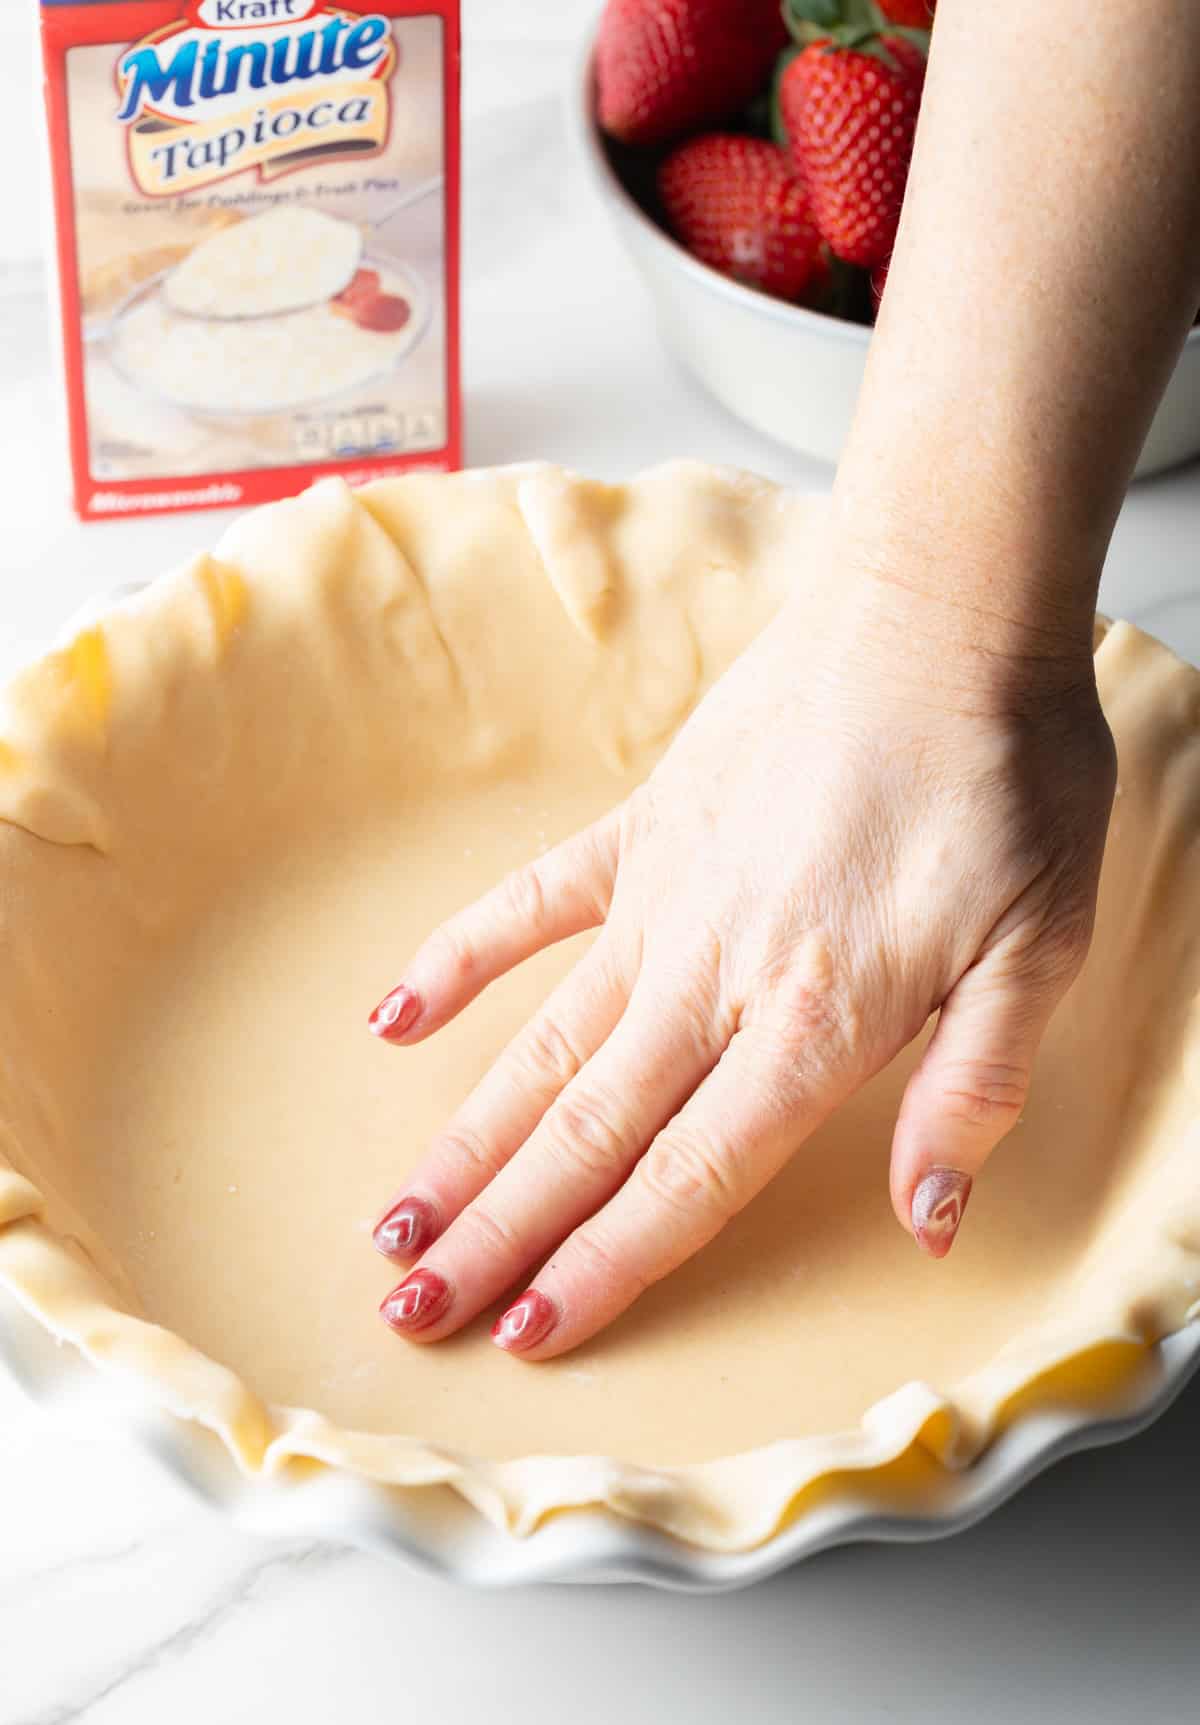
- Tapioca – Minute tapioca is a traditional thickener for berry pies. It can be found at all major grocery stores, and comes in a small package, so it doesn’t take up a lot of room in the pantry. Although you can use flour to thicken the filling, I highly recommend sticking with tapioca.
- Vanilla extract – I cannot stress enough how important it is to use quality extract in bakes! It makes a world of difference in the taste, and is absolutely worth spending a bit more.
- Lemon zest – Fresh zest is the best zest!
- Large egg and water – I combine these to make an egg wash for the pie before baking.
How to Make
Find the full ingredient proportions, detailed instructions, storage tips, and a video tutorial in the printable form at the bottom of the post.
Prepare Crust – I start by preheating the oven to 400 degrees Fahrenheit before getting out my 9-inch deep dish pie pan. I suggest using a ruffled, or scalloped, pan to make it very easy to crimp the top crust. After I make and chill my homemade crust, I use a lightly-floured rolling pin to roll the dough into a 12-inch circle that’s only about 1/4-inch thick. A silicone rolling mat with measurements makes it much easier to shape and move the piecrust without it breaking apart.
Then I transfer the piecrust by rolling it gently over the top of the rolling pan, unrolling into the pan, and gently tucking the piecrust down against the bottom and slightly up the sides of the pan. Be careful not to stretch it! I fold the edges over the top rim of the pan and place it in the refrigerator to chill while I prep the filling.
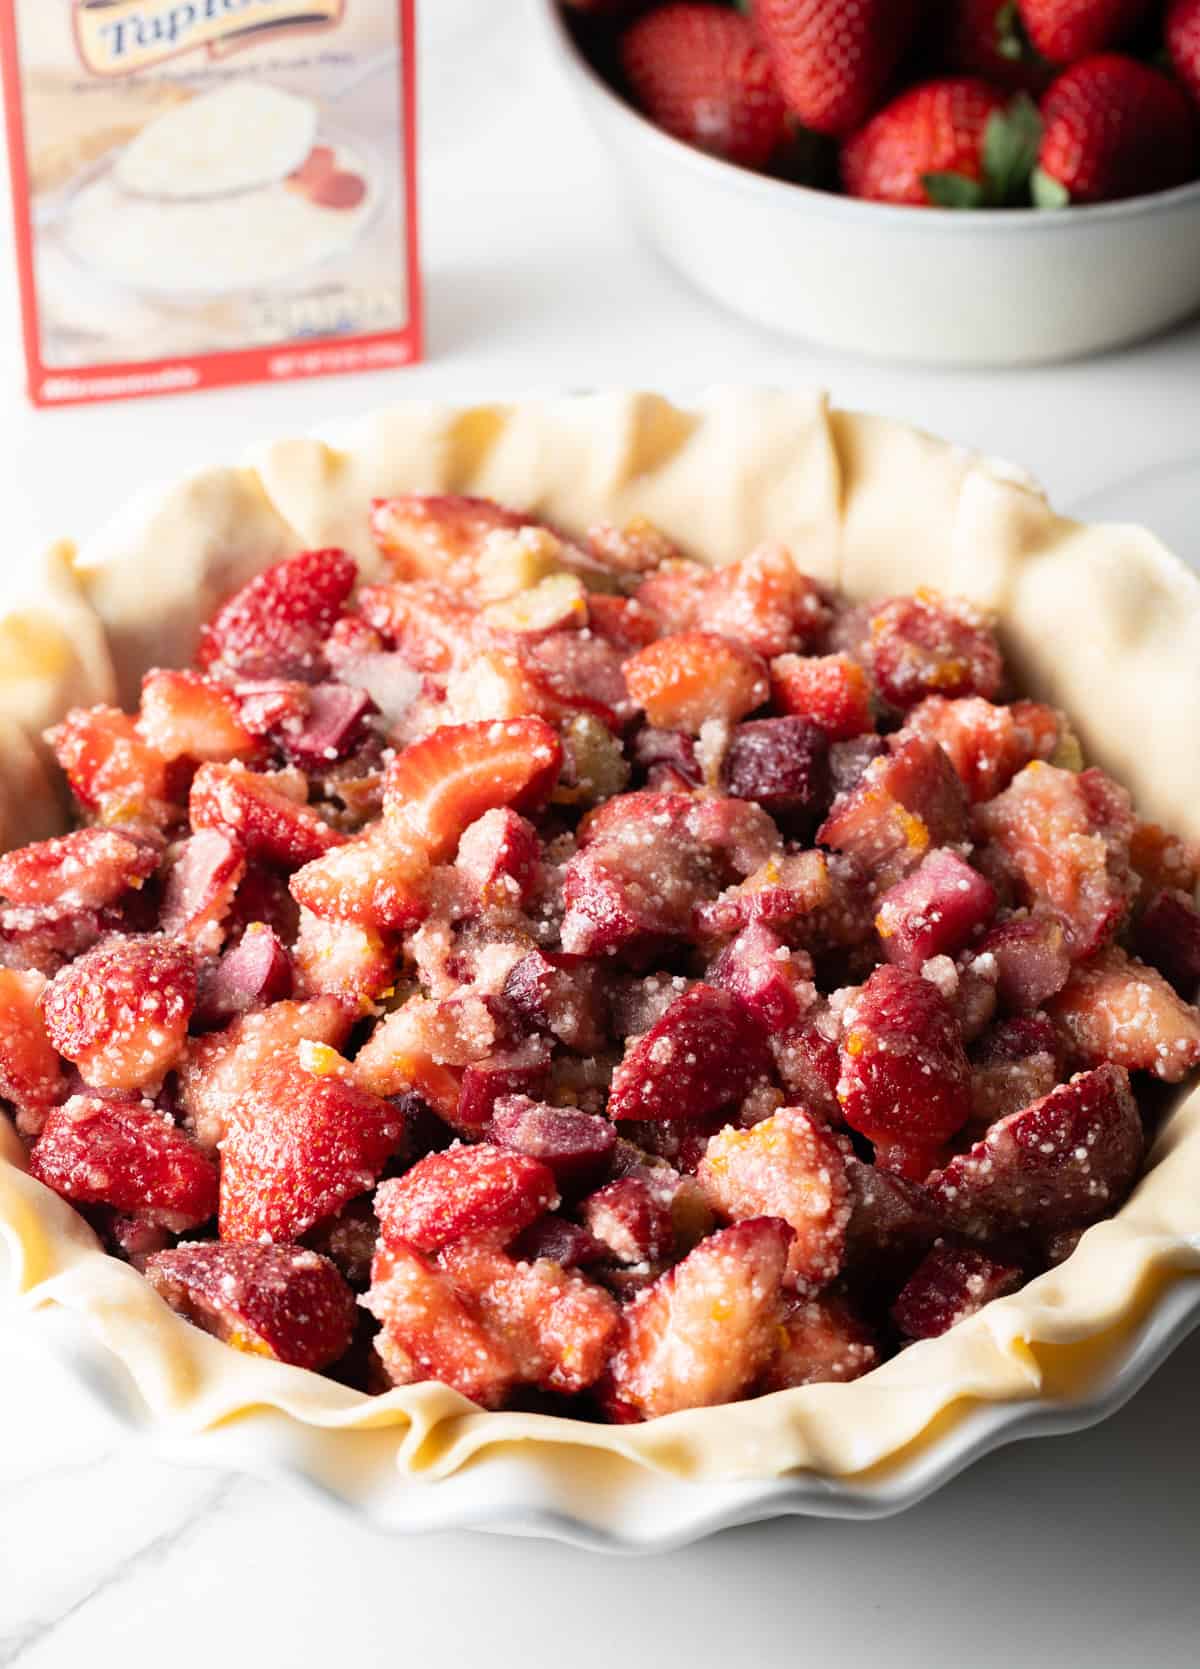
Chop and Mix – Next, I get out my chopping board, sharp knife, a large bowl, and silicone spatula. If the leaves are still attached to the rhubarb I chop them off and discard. (Always remember, rhubarb greens are poisonous! If you buy rhubarb from the store, it will only include the stalks.) I wash the strawberries and rhubarb stalks with cold water and dry them with a clean towel. Then I cut the rhubarb stalks into even 1/2-inch pieces, and add them to the bowl. Slice the tops off of the strawberries, chop them into quarters, and add those pieces to the bowl as well.
Now I sprinkle on the sugar, tapioca, vanilla extract, fresh lemon zest, and salt over the strawberries and rhubarb. I use my spatula to gently mix the sugar mixture with the fruit. I want everything to get evenly coated without too much smushing, so the rhubarb and berry pieces stay fairly intact and create a gorgeous, satisfying, and chunky filling.

Add Mixture to Pie – Once the fruit and sugar blend is combined, I take the pie crust from the fridge and transfer the mixture into it, carefully moving everything around with the spatula to ensure the pie crust is completely filled. There should be plenty of the strawberry and rhubarb filling to create a small mound on top. But it shouldn’t be overflowing. Back into the fridge it goes, so we can work on our top crust!
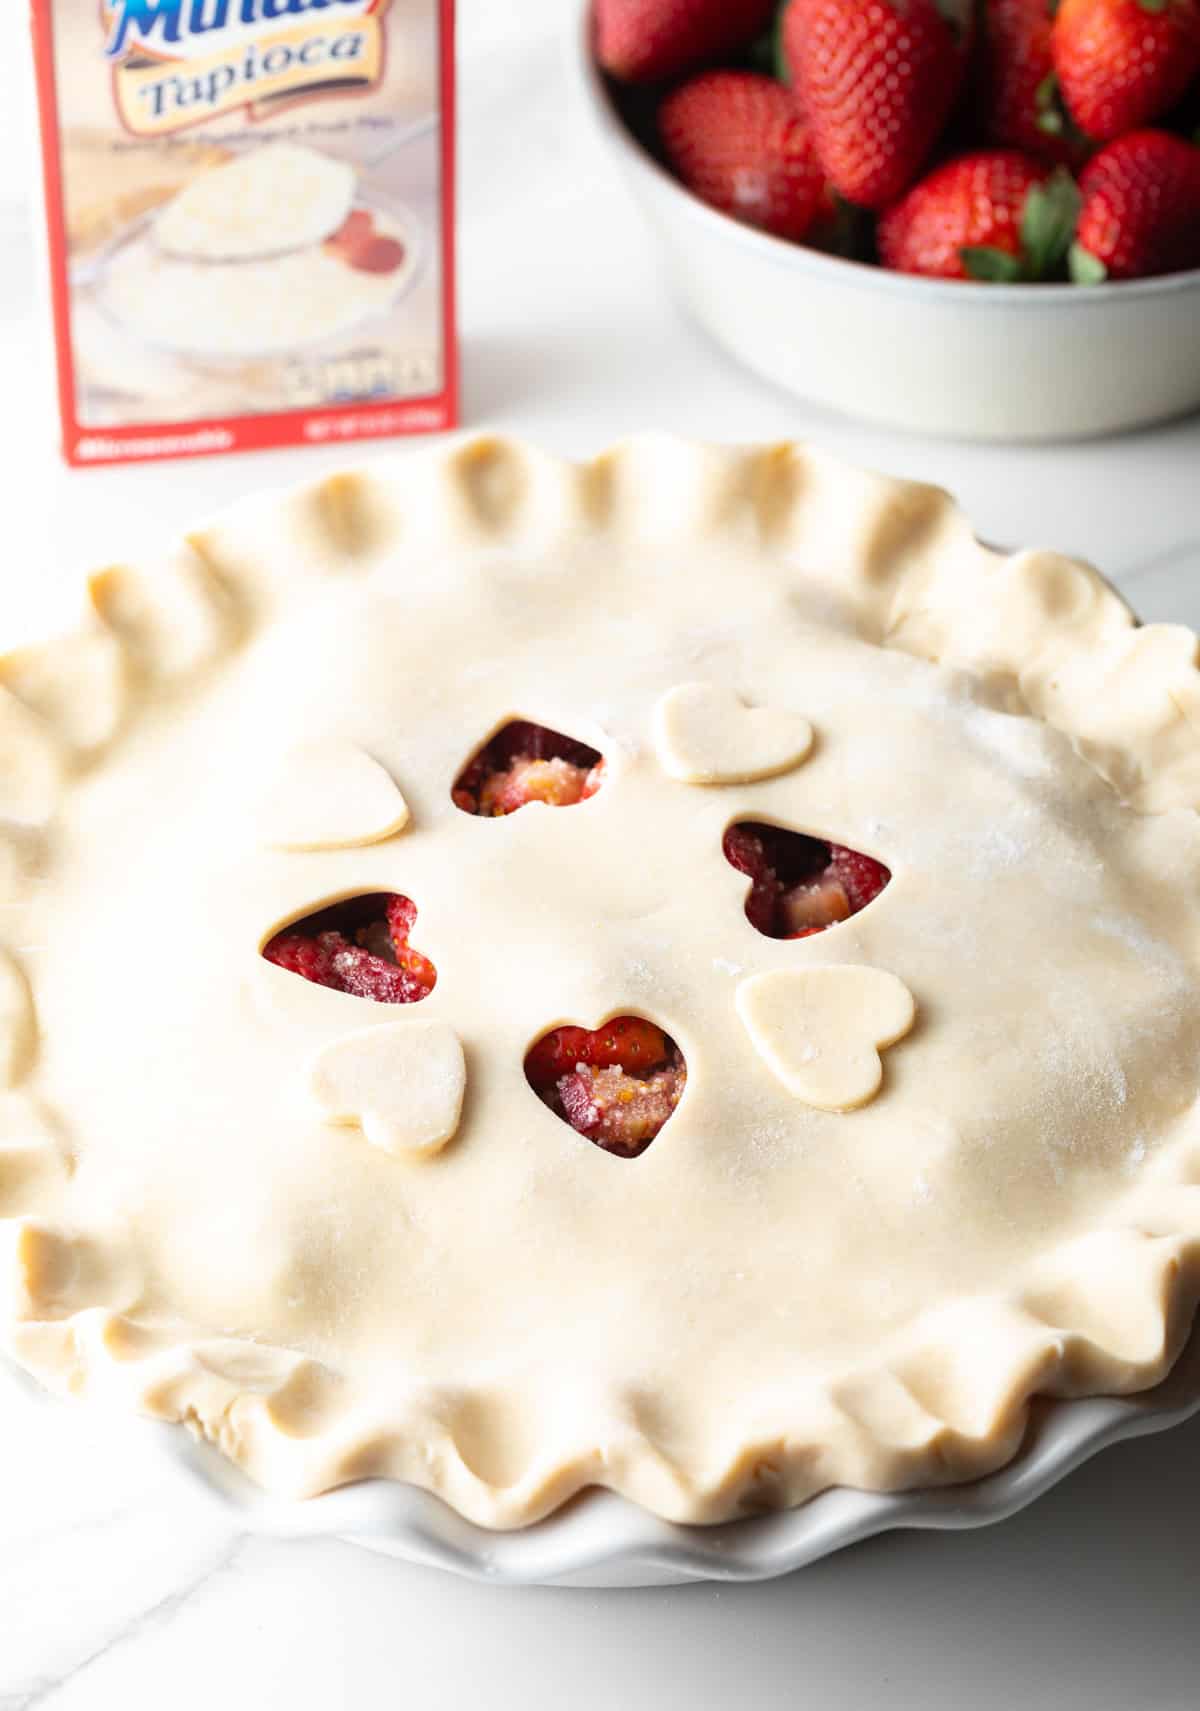
Top Crust – Now the fun part… Time to make the pretty top pie crust! Or you can keep things as simple and quick as you want (no shame for basic in this house!) with a few small openings. Either way, start by rolling out the second layer of pie crust dough into a 9 1/2-inch circle. Again, I recommend using a silicone baking mat to help get the size just right and keep the counters clean.
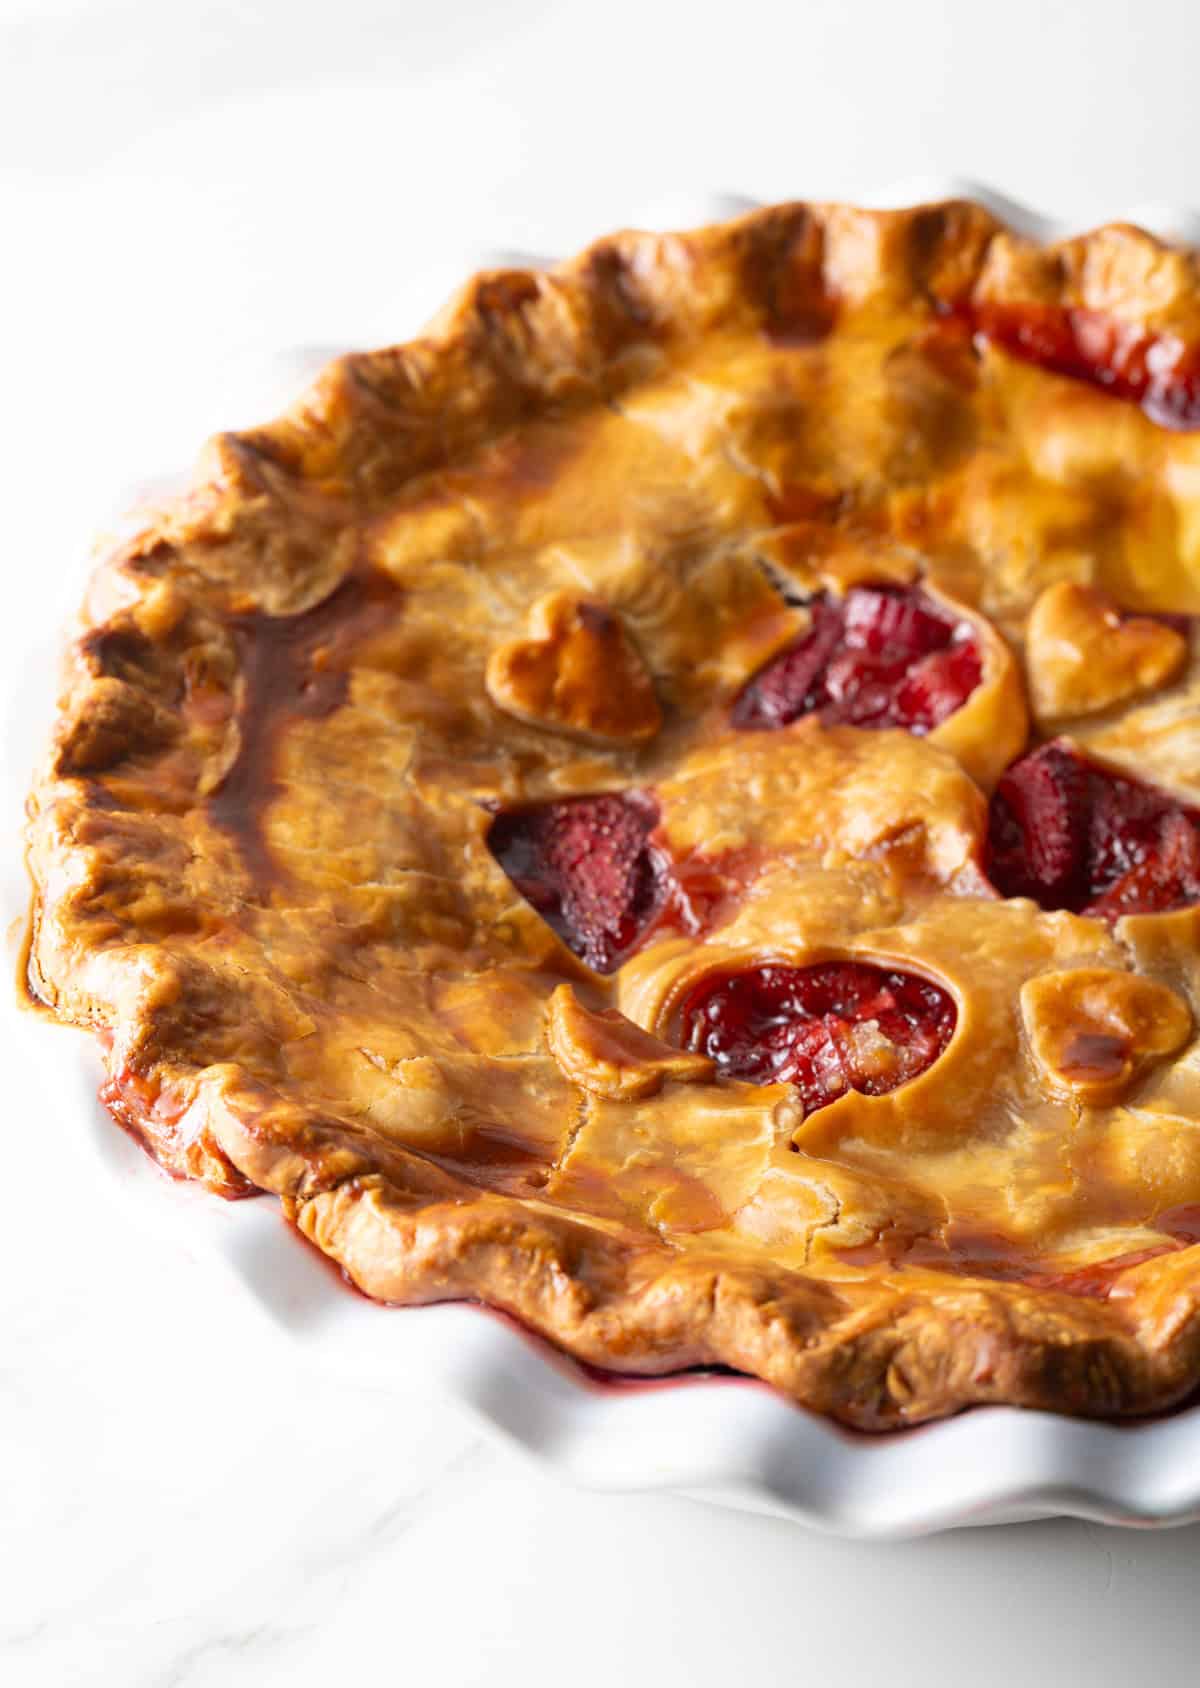
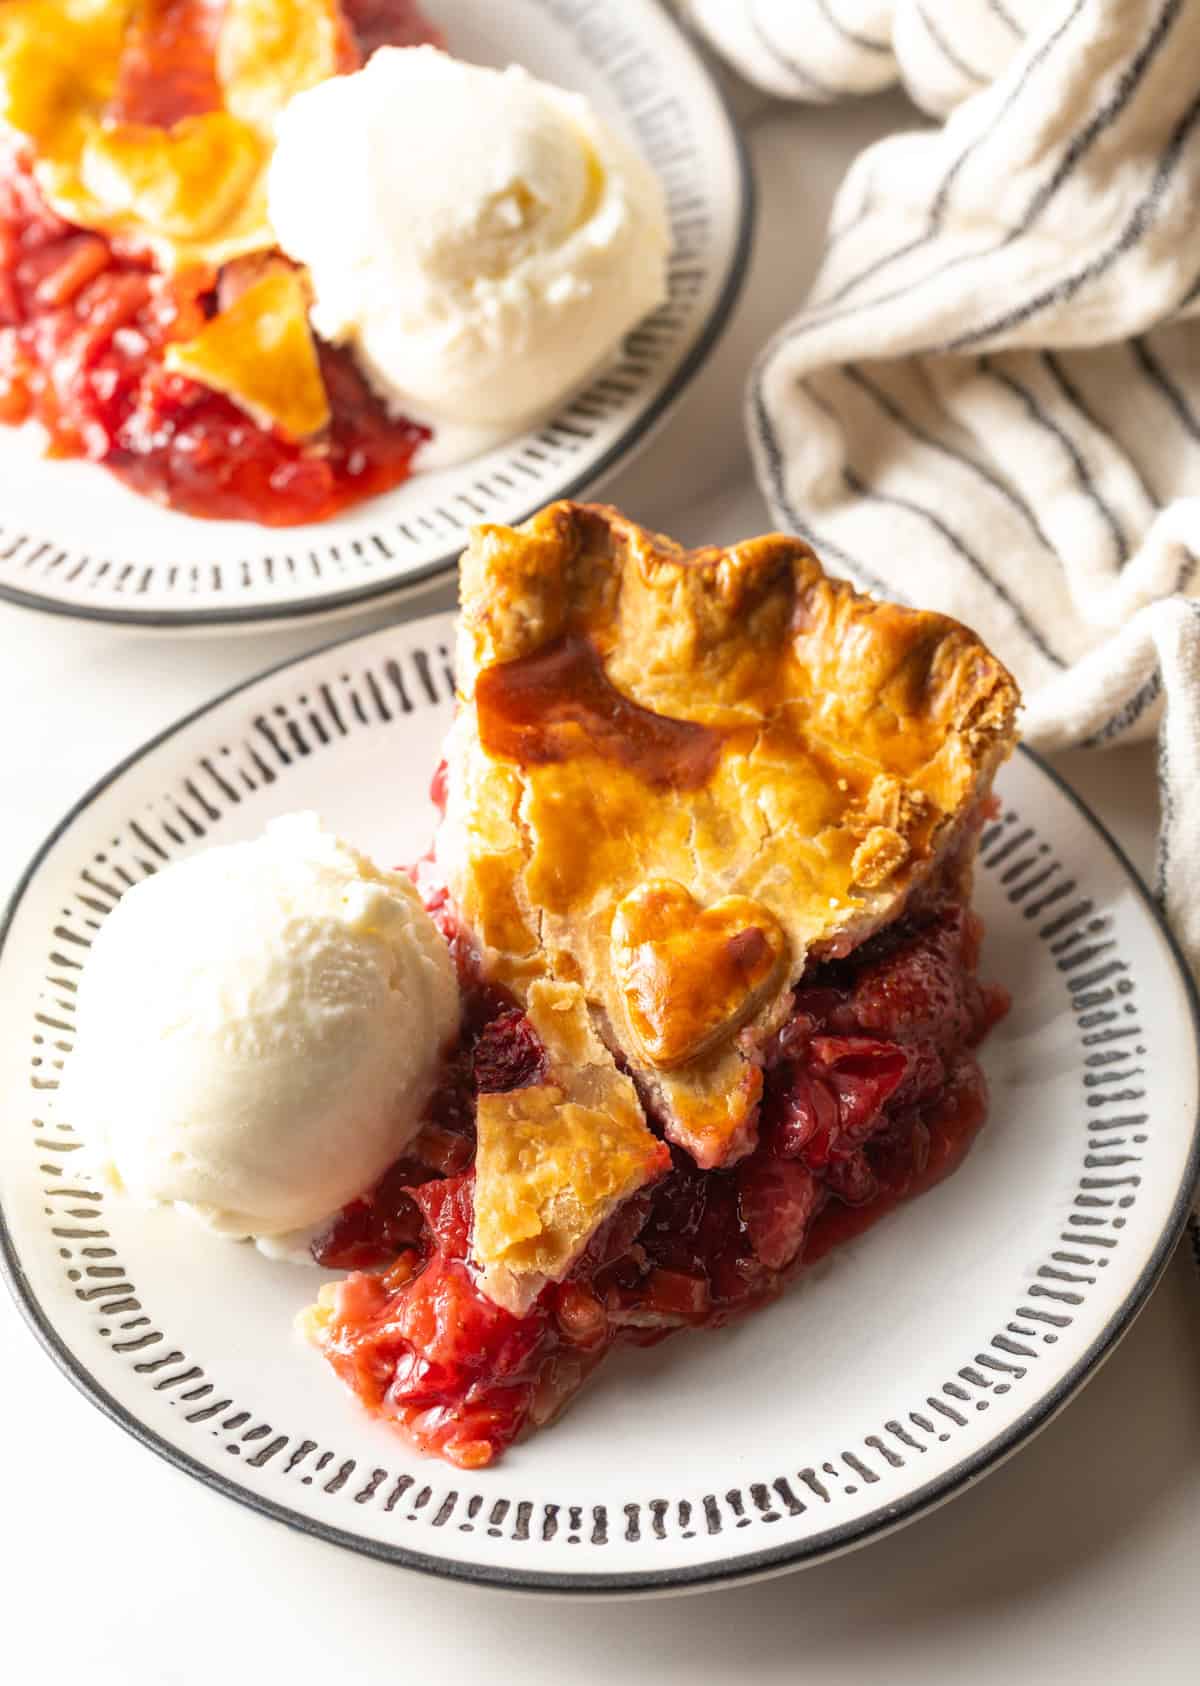
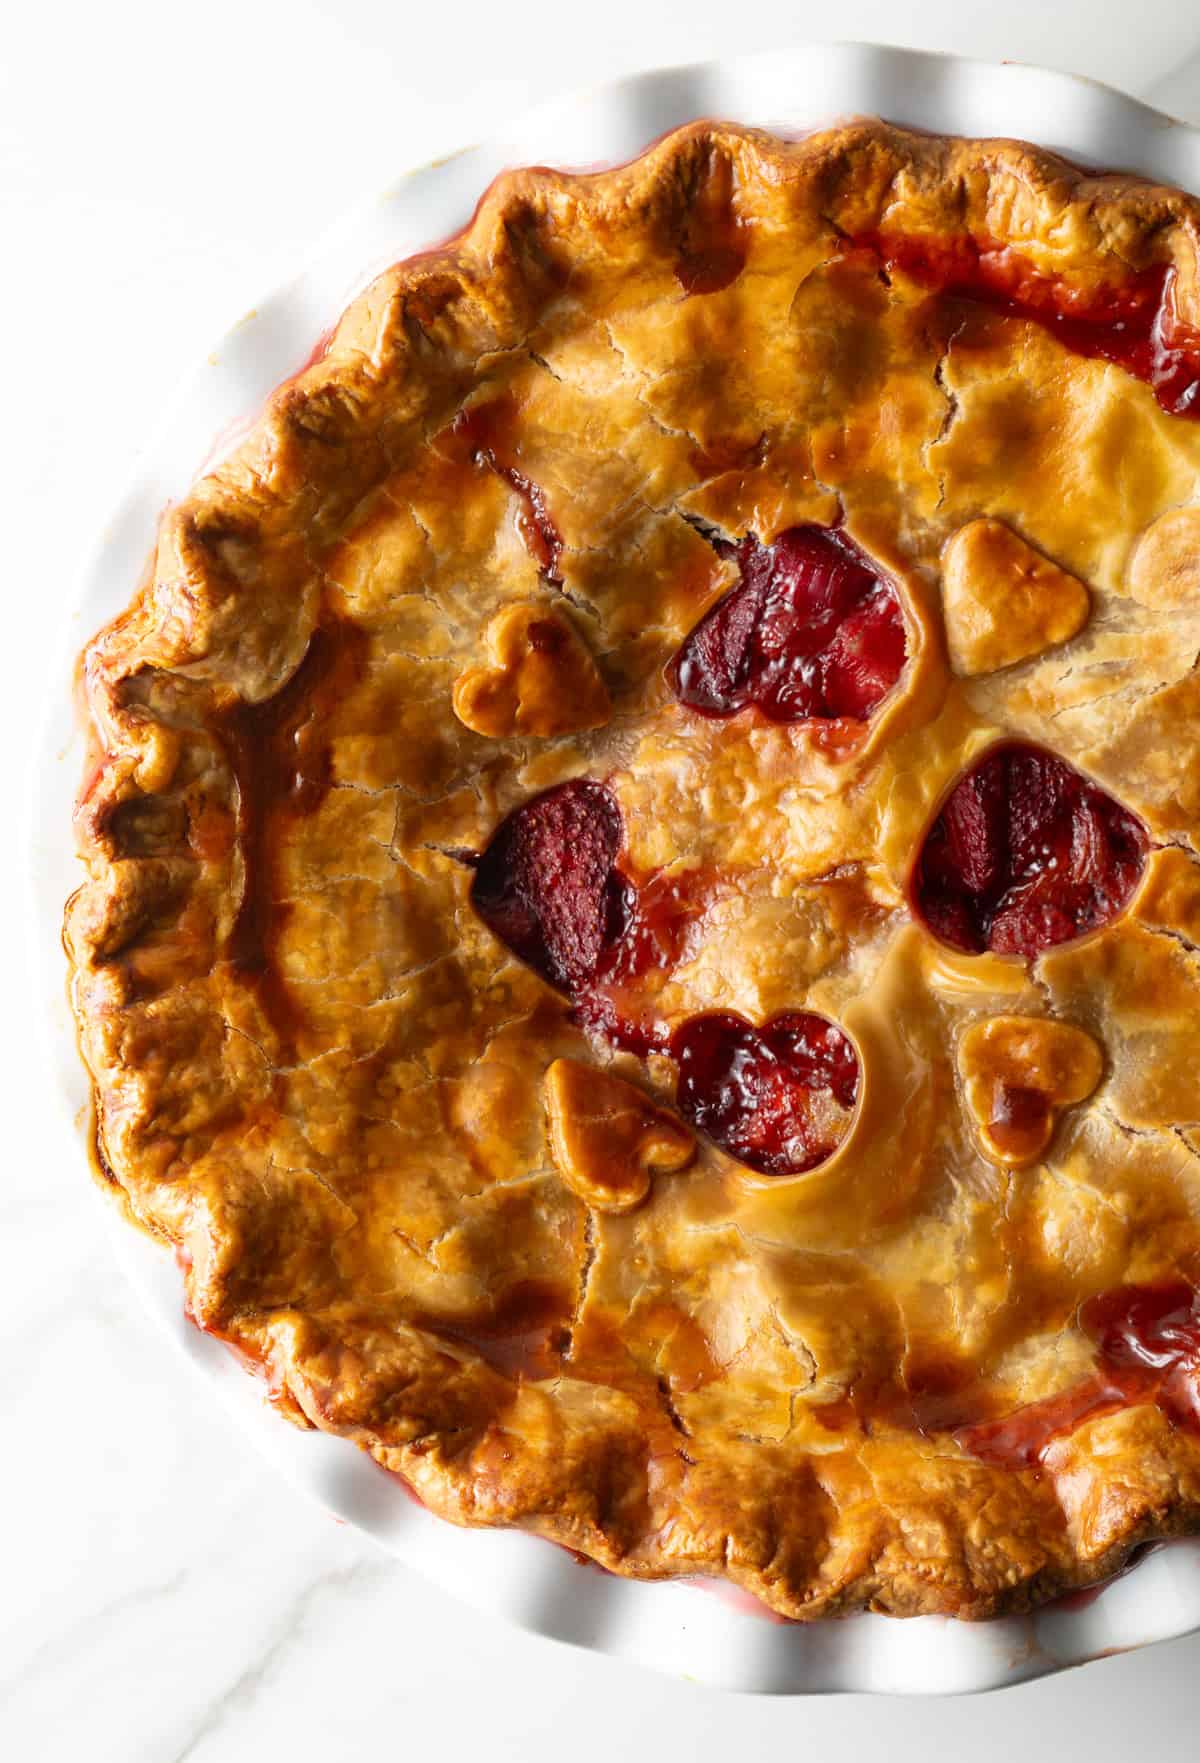
Before placing the dough on top of the pie, there needs to be at least a handful of slits or cutouts on the top of the crust to vent steam as the fruits bake in the pie. Otherwise, the moisture gets trapped and makes the filling soupy. When I’m making this recipe for company, or want something a ‘lil fancy for the family, I love to use cute cookie cutters like these adorable little heart ones I’m using here. Placing the cut out pieces on top of the pie as well adds a lovely touch and avoids wasting any of the crust.
After stamping or slicing the crust, I carefully drape it over a lightly floured rolling pin and transfer it across the fruit pie to cover. You might need to move it around slightly to get it perfectly in place, but try not to slide it around too much, as it’ll mess with the filling and stretch the dough. Once I’ve got it dialed in, I use my thumbs to gently crimp the pie crust all the way around the edge, like in the picture below. I want to press the edges slightly up and at an angle to fit the pan, and not simply crimp flat onto, or wrap around, the edge of the pie pan.
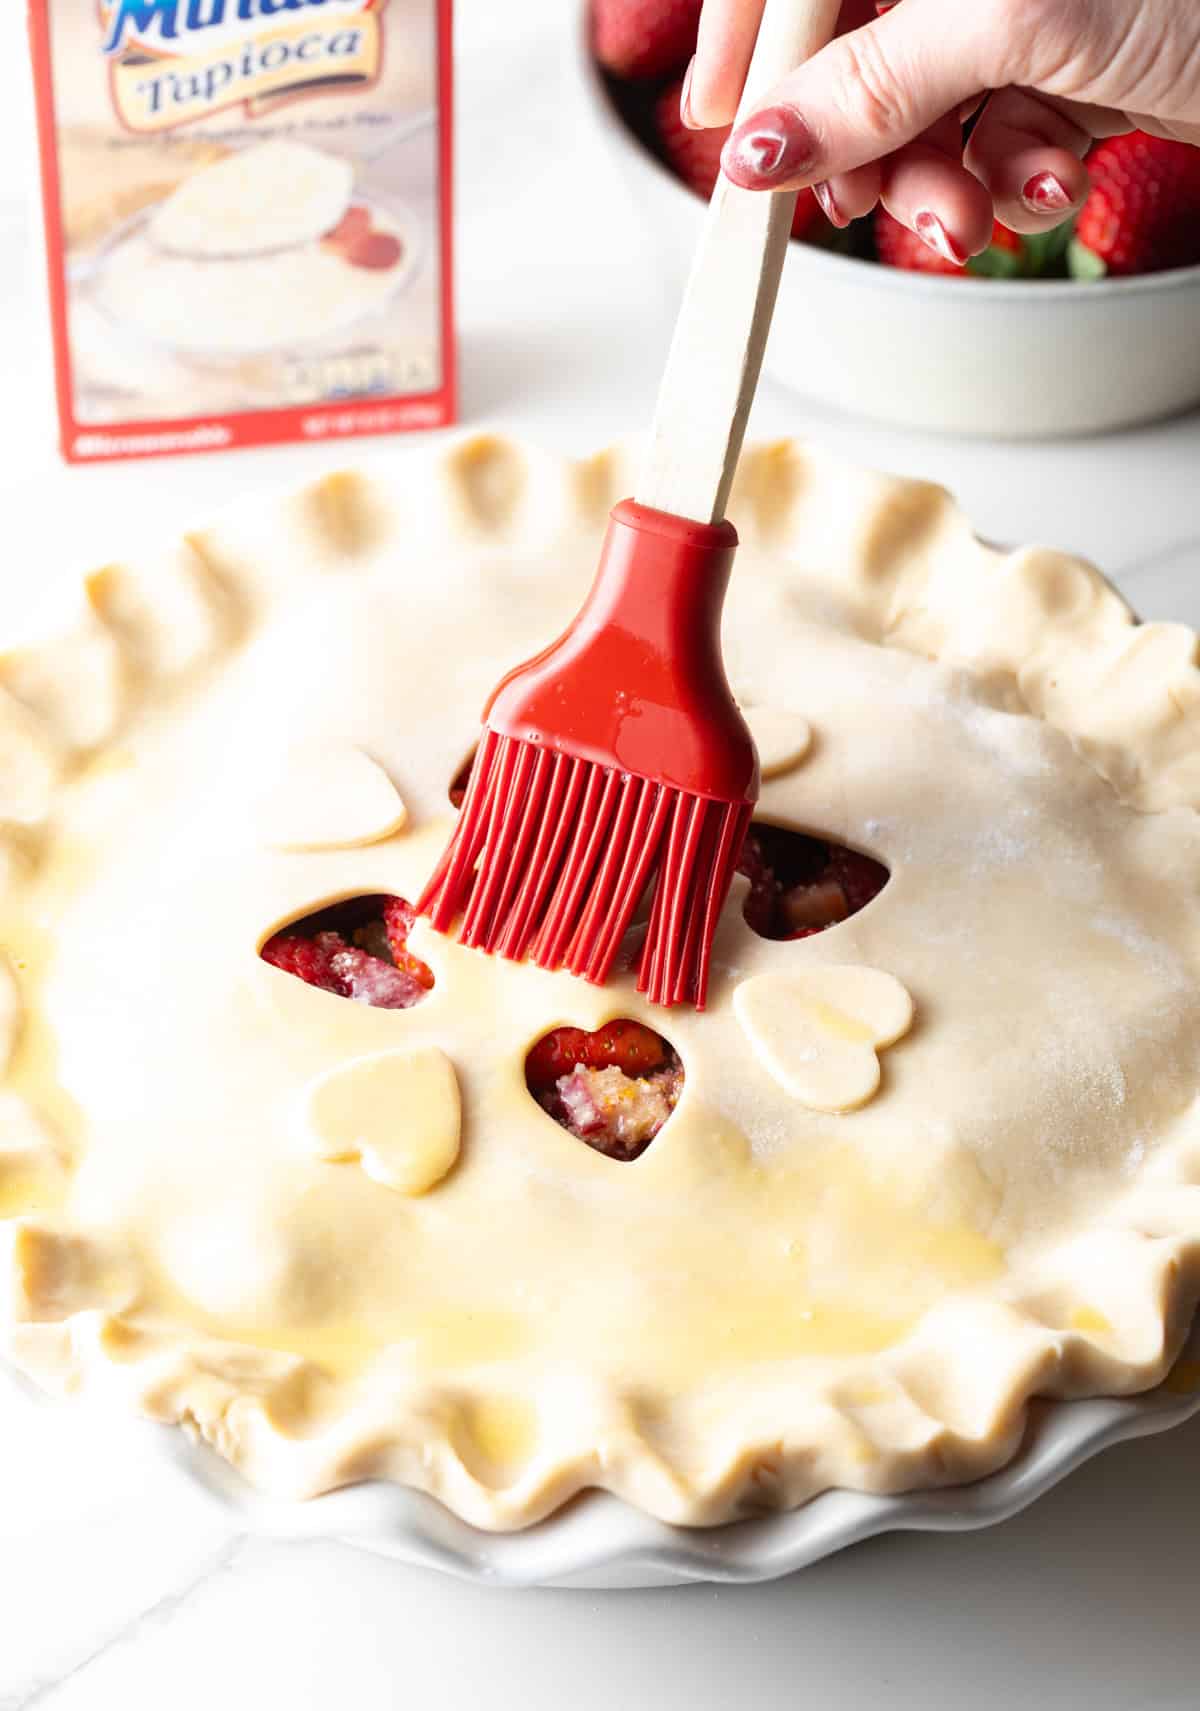
Egg Wash – The last thing I do before baking the pie is to crack an egg into a small dish, add a tablespoon of water, and quickly whisk to make a smooth liquid. I use a silicone pastry brush to lightly brush a thin layer of the egg wash over the entire top piecrust. This will give the baked pie that beautiful golden color and slightly glossy, bakery-style shine!
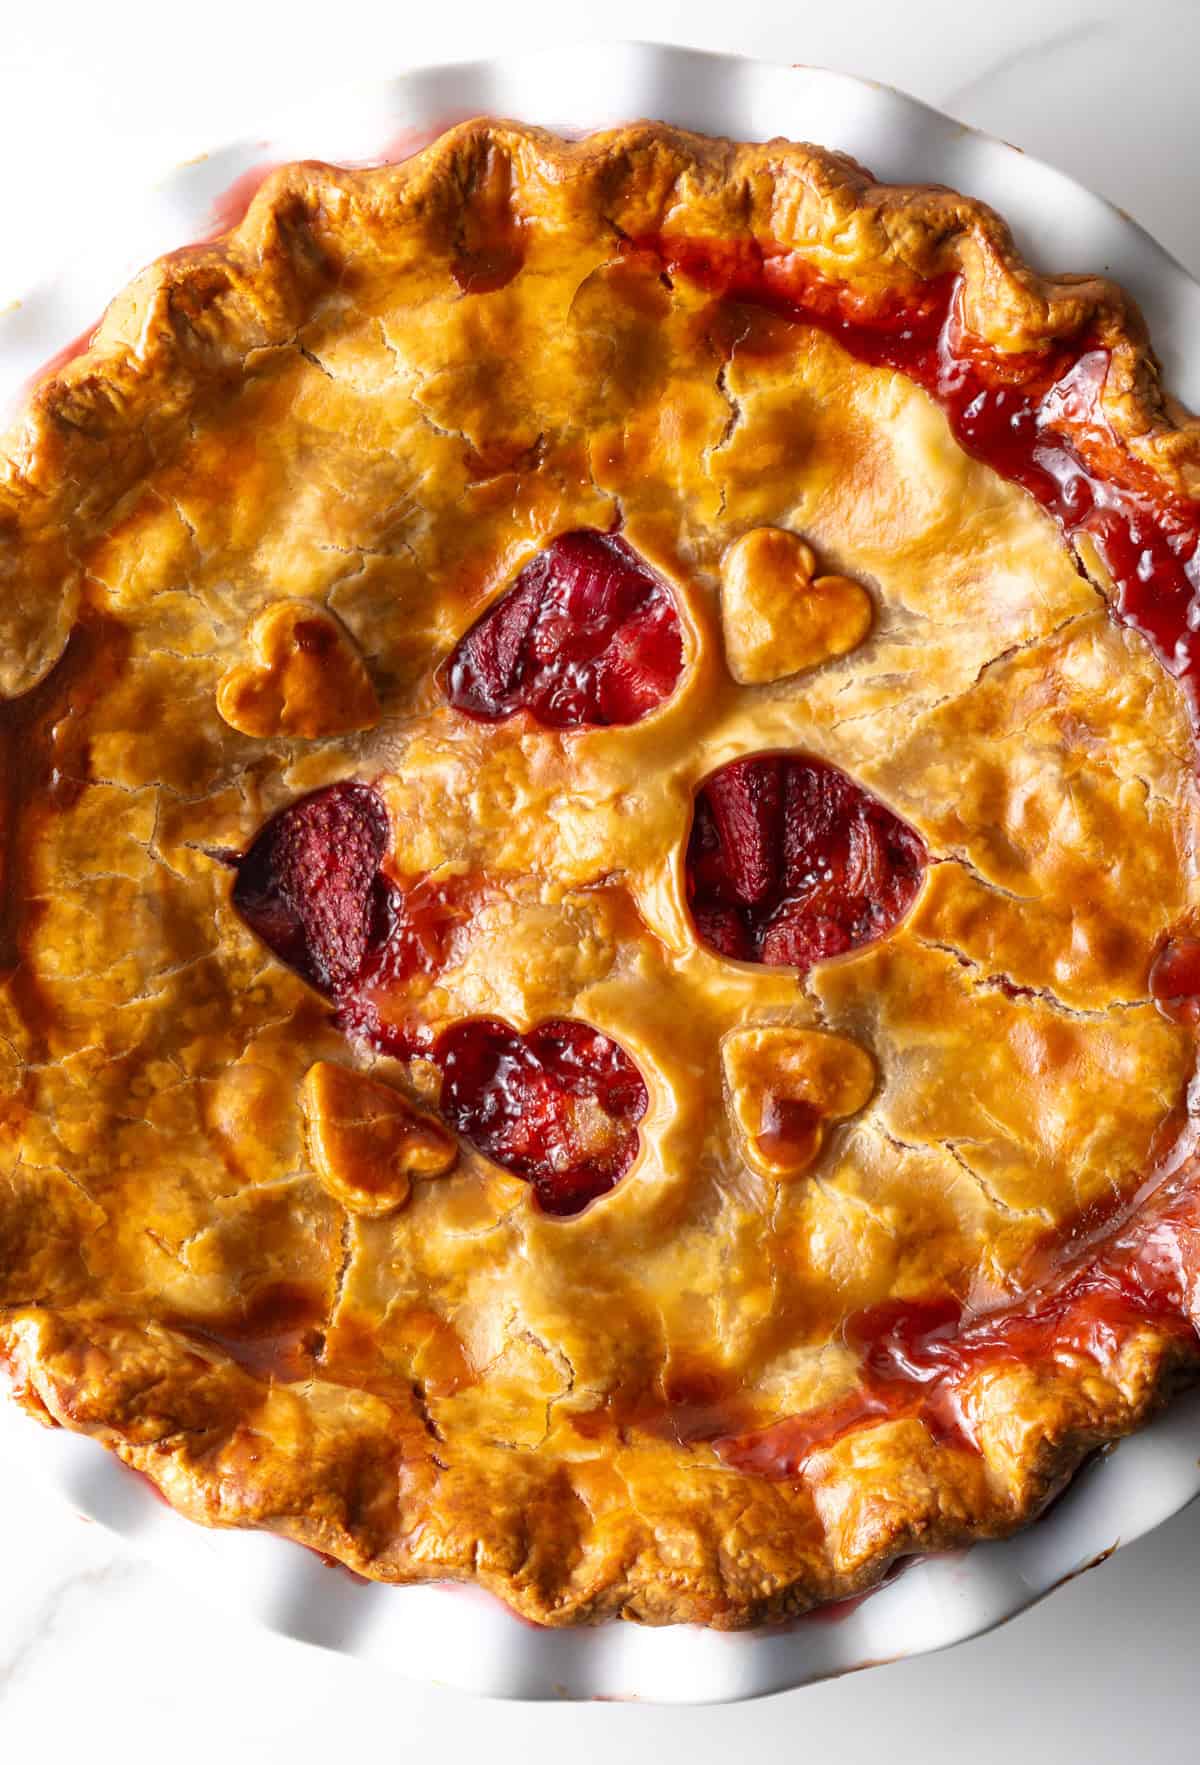
Bake – Now I place the pie directly on the rack in the center of the oven. Don’t try to bake it on a baking sheet! That would distribute the heat unevenly and throw off the cooking time. After 25 minutes, I lower the oven temperature a tad, down to 375 degrees Fahrenheit, and continue baking for another 45-50 minutes. The initial high heat makes the cold butter in the dough puff up and create those flaky pie crust layers. Otherwise, the butter just sorta melts and ruins the whole thing. In other words, yes you do have to actually follow the recipe if you want it to turn out perfectly. (Anyone who’s ever read blog comments sections knows what I’m talking about :))
When the rhubarb and strawberry pie is done baking, I remove it from the oven and carefully place it on a wire cooling rack. It needs to sit and cool undisturbed for at least 2-3 hours to let the gooey filling firm up to slice. Cutting into a fruit pie before it’s ready can make a runny filling, so patience definitely pays off here!
Expert Tips
Cold pie dough is essential to bake a proper fruit pie. Not only does cold dough make the piecrust ultra crisp and flaky, it allows the fruit filling to bake thoroughly in the oven without burning the crust. If you work the pastry dough piecrust too much, you may need to chill it for 20 minutes to harden it before you roll it out.
With most berry pies, like my fabulous blueberry pie, this strawberry rhubarb pie filling is juicy and will probably bubble up through the vent holes a bit as it bakes. Depending on how deep your “deep dish pipe pan” is, you may need to place a rimmed cookie sheet on the oven rack below the pie to catch any drips.
Want to make a pie to freeze? Great idea! I prepare the rhubarb and strawberry pie in a disposable aluminum pie plate so it can go from cold to hot in the oven. Bake it according to the regular recipe and let it chill for several hours before wrapping the pie in a layer of plastic wrap, followed by a layer or two of aluminum foil. I keep it in the freezer for up to 3 months, and thaw it in the fridge overnight or at room temperature for 60-90 minutes so the pie is no longer frozen solid. Then I preheat the oven to 350 degrees and bake the pie for 20-30 minutes, until the filling is hot and bubbling, and the piecrust is crisp.
Serving Suggestions
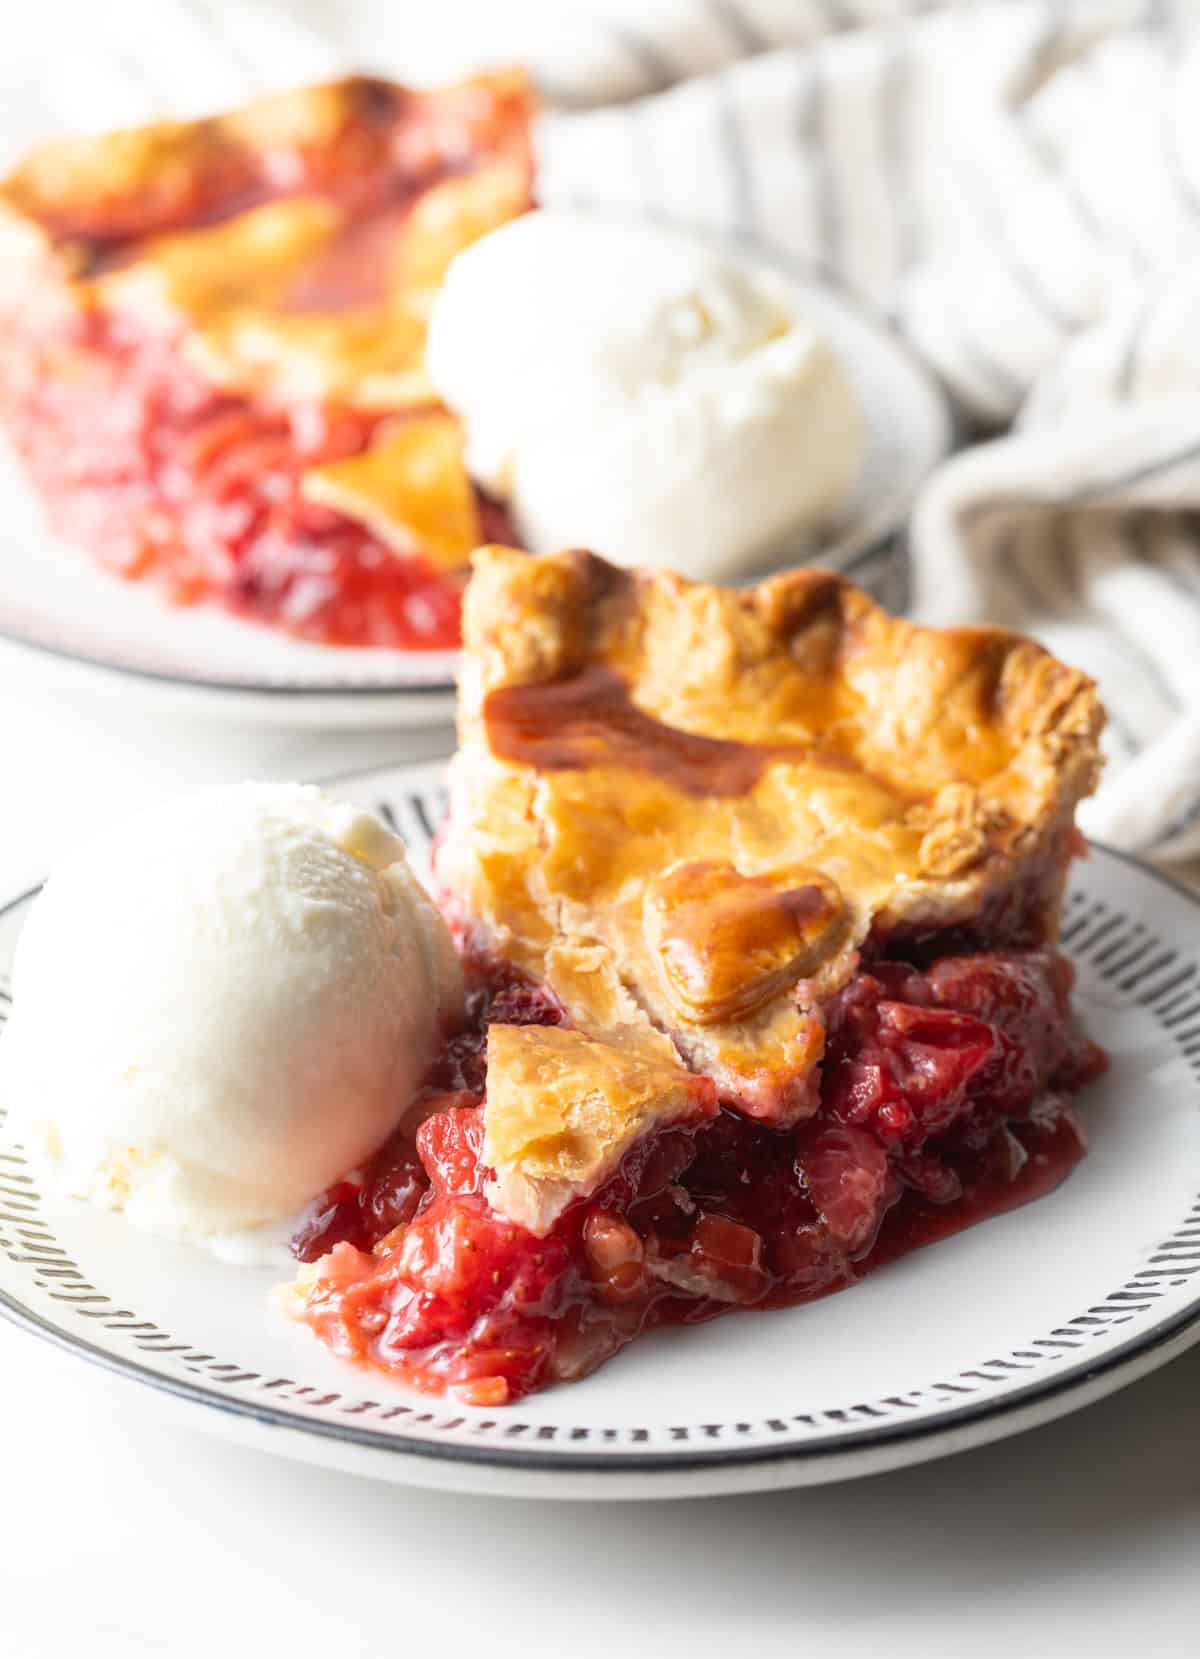
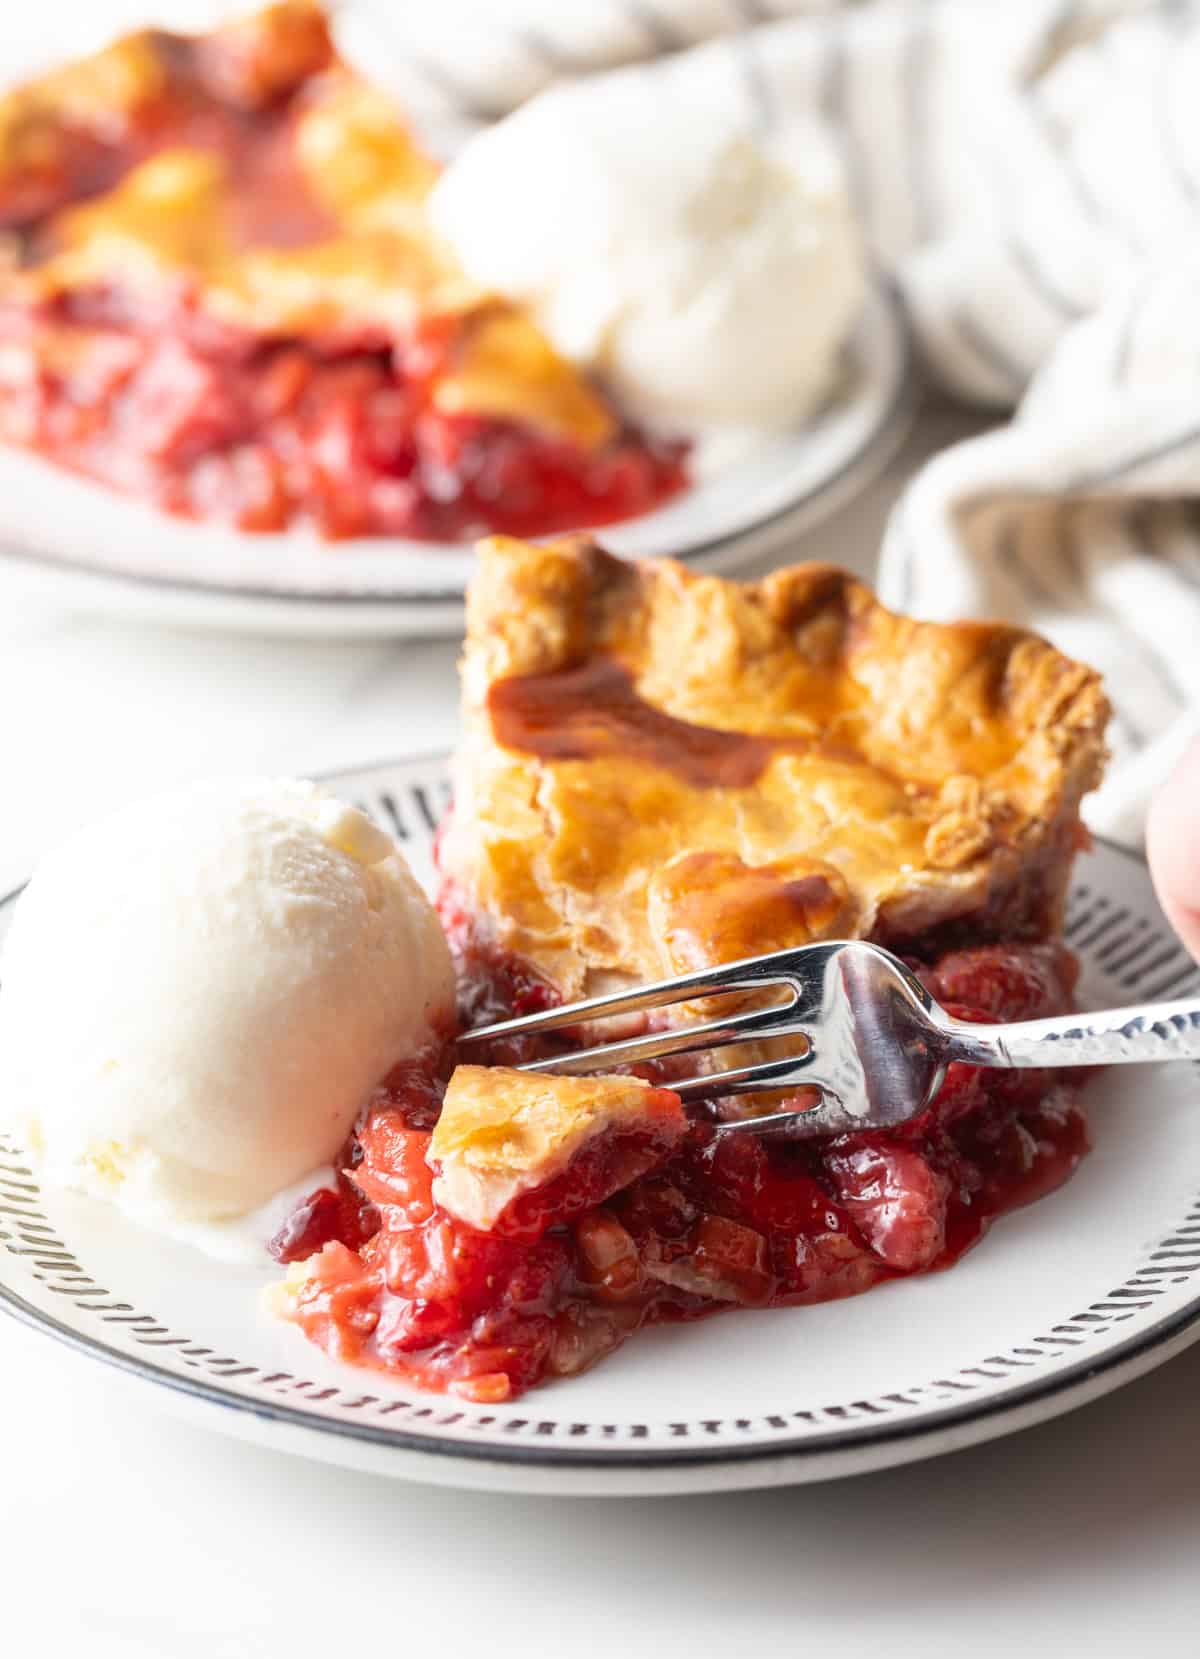
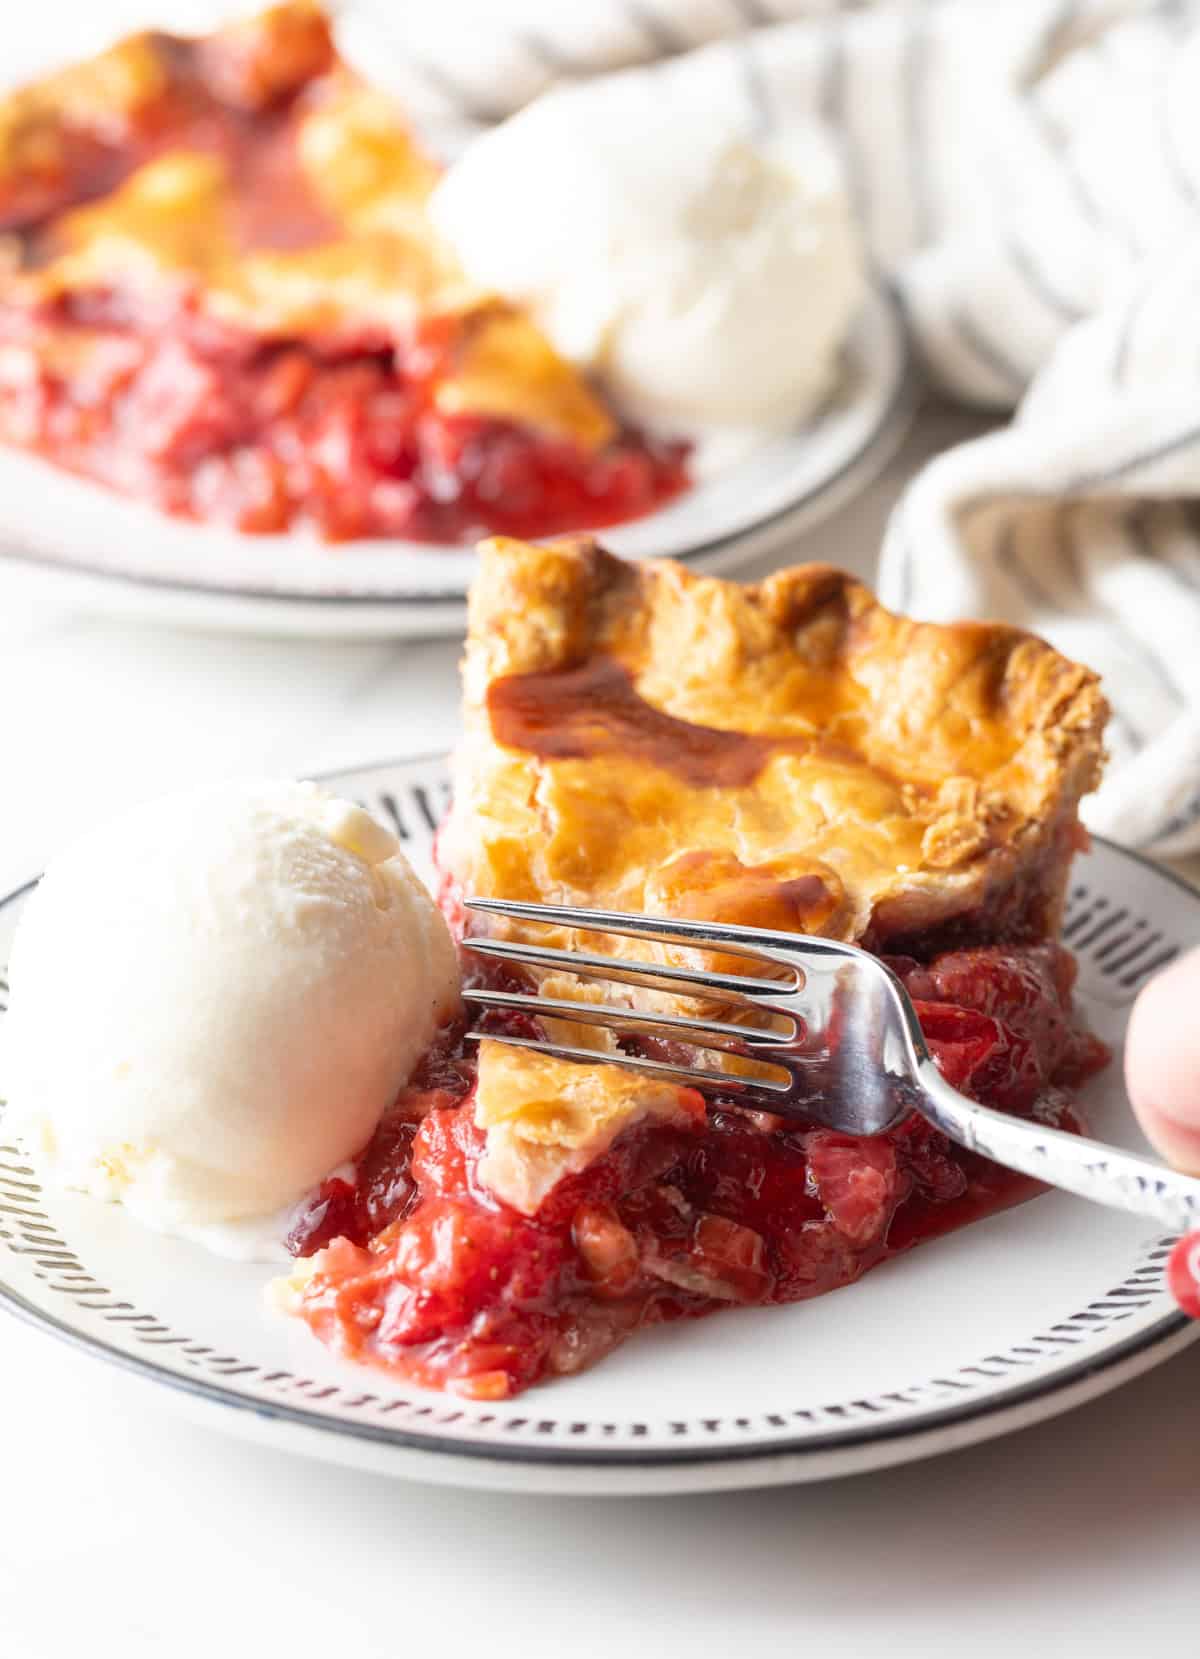
Not to overstate the obvious, but… Slices of sweet, juicy rhubarb strawberry pie with a perfectly flaky and buttery crust are of course perfect to pair with a cold scoop of homemade vanilla ice cream or a pile of fluffy whipped cream on top. Feel free to serve the pie at room temperature, slightly chilled, or briefly warmed in the microwave for 10-20 seconds on low power.
Storage Notes
This pie is terrific to make ahead! Once it reaches room temperature, I cover the pie dish loosely with aluminum foil or plastic wrap and store it in the fridge. The strawberry and rhubarb pie should keep well for up to 4-5 days, but we usually eat the whole thing within a day or two. If you can, I recommend letting the pie come to room temperature for 20-30 minutes before slicing portions. Then enjoy at room temp, or gently heat individual slices in the microwave for 15-20 seconds at 50% power.
Frequently Asked Questions
Nope, there is no need to peel the stalks. However, you absolutely need to cut off and discard the poisonous rhubarb leaves before using. (Looking at you, gardeners!)
No, this pie is ready to fill and bake straight away, no parbaking necessary. It’s in the oven for over an hour, so pre-baking would result in an over-baked, dry, crunchy crust.
Watch the pie crust to make sure it doesn’t turn dark too quickly. If it starts looking dark long before the very filling is baked through, loosely place a piece of foil over the top of the pie.
Using tapioca as a thickener is a great way to practically guarantee the fruit filling won’t be watery or runny. If you do wind up with the dreaded soggy bottom, it’s likely due to not enough or too small slits in the crust to let the steam escape. Or the pie simply wasn’t baked for long enough. Try putting it back in the oven at 375 degrees for another 10-15 minutes before checking again. I suggest covering the pie loosely with aluminum foil to keep the crust from burning.
Help Me Spread the Word about this Fabulous Free Recipe! Sharing this recipe link on Pinterest and Facebook is super impactful, and I greatly appreciate it! Find the share buttons below the recipe form.
More Pie Recipes


Strawberry Rhubarb Pie
Video
Ingredients
- Double pie crust homemade pie crust or store-bought refrigerated crust
- 3 cups chopped rhubarb fresh or frozen and thawed
- 3 cups chopped strawberries fresh or frozen and thawed
- 1 ¼ cups granulated sugar
- ¼ cup + 1 teaspoon minute tapioca
- 1 teaspoon vanilla extract
- 1 teaspoon fresh lemon zest I used a Meyer lemon
- ½ teaspoon salt
- 1 egg + 1 tablespoon water for eggwash
Instructions
- Preheat the oven to 400°F. Set out a 9-inch deep dish pie pan.
- Roll one crust out into a 12-inch circle. Carefully move the piecrust to the pie pan. *If you have a silicone rolling mat with measurements, it makes it much easier to shape and move the piecrust without it breaking apart. Another good method of moving the piecrust is to roll it gently over the top of the rolling pin, then unrolling it in the pan.
- Gently tuck the piecrust down against the bottom and sides of the pan, being careful not to stretch it. Then fold the edges over the top rim. Place the piecrust in the refrigerator to chill while you prep the filling.
- Set out a cutting board and mixing bowl. Chop the rhubarb into ½-inch pieces. Then trim the tops of the strawberries and cut them into quarters. Add them both to the bowl.
- To the bowl, add the sugar, tapioca, vanilla extract, fresh zest, and salt. Gently mix until the rhubarb and strawberry pieces are well coated. Move the filling to the refrigerated pie pan and smooth it out in an even layer. Then place the pan back in the fridge.
- Roll the second piecrust out into a 9 ½-inch circle. The top crust will need vents. You can either use cookie cutters, like I did, to cut out cute little vent holes, or plan to cut vents in the top crust with a sharp knife after it's on the pie. Gently move the top crust over the strawberry rhubarb filling. Fold the edges of the top crust underneath the edges of the bottom crust and crimp well all the way around the edge of the pie pan. If needed, at this time, cut vent holes in the top crust.
- In a small bowl, mix one egg with 1 tablespoon of water. Whisk well. Gently brushed the egg wash over the surface of the piecrust. This creates a beautiful golden color.
- Place the pie in the oven on the center rack. Bake for 25 minutes. *You can place a rimmed baking sheet on the lower rack, if you are worried about drippage.
- Lower the heat to 375°F. Then continue to bake for an additional 45 to 50 minutes. Watch the pie crust to make sure it doesn't turn dark too quickly. If it starts looking dark long before the filling has baked through, loosely place a piece of foil over the top of the pie.
- Once the pie is fully baked, allow it to cool at room temperature for at least 2 ½ hours so that the filling can set. Then cut and serve with vanilla ice cream or whipped cream.
