Angel Biscuits
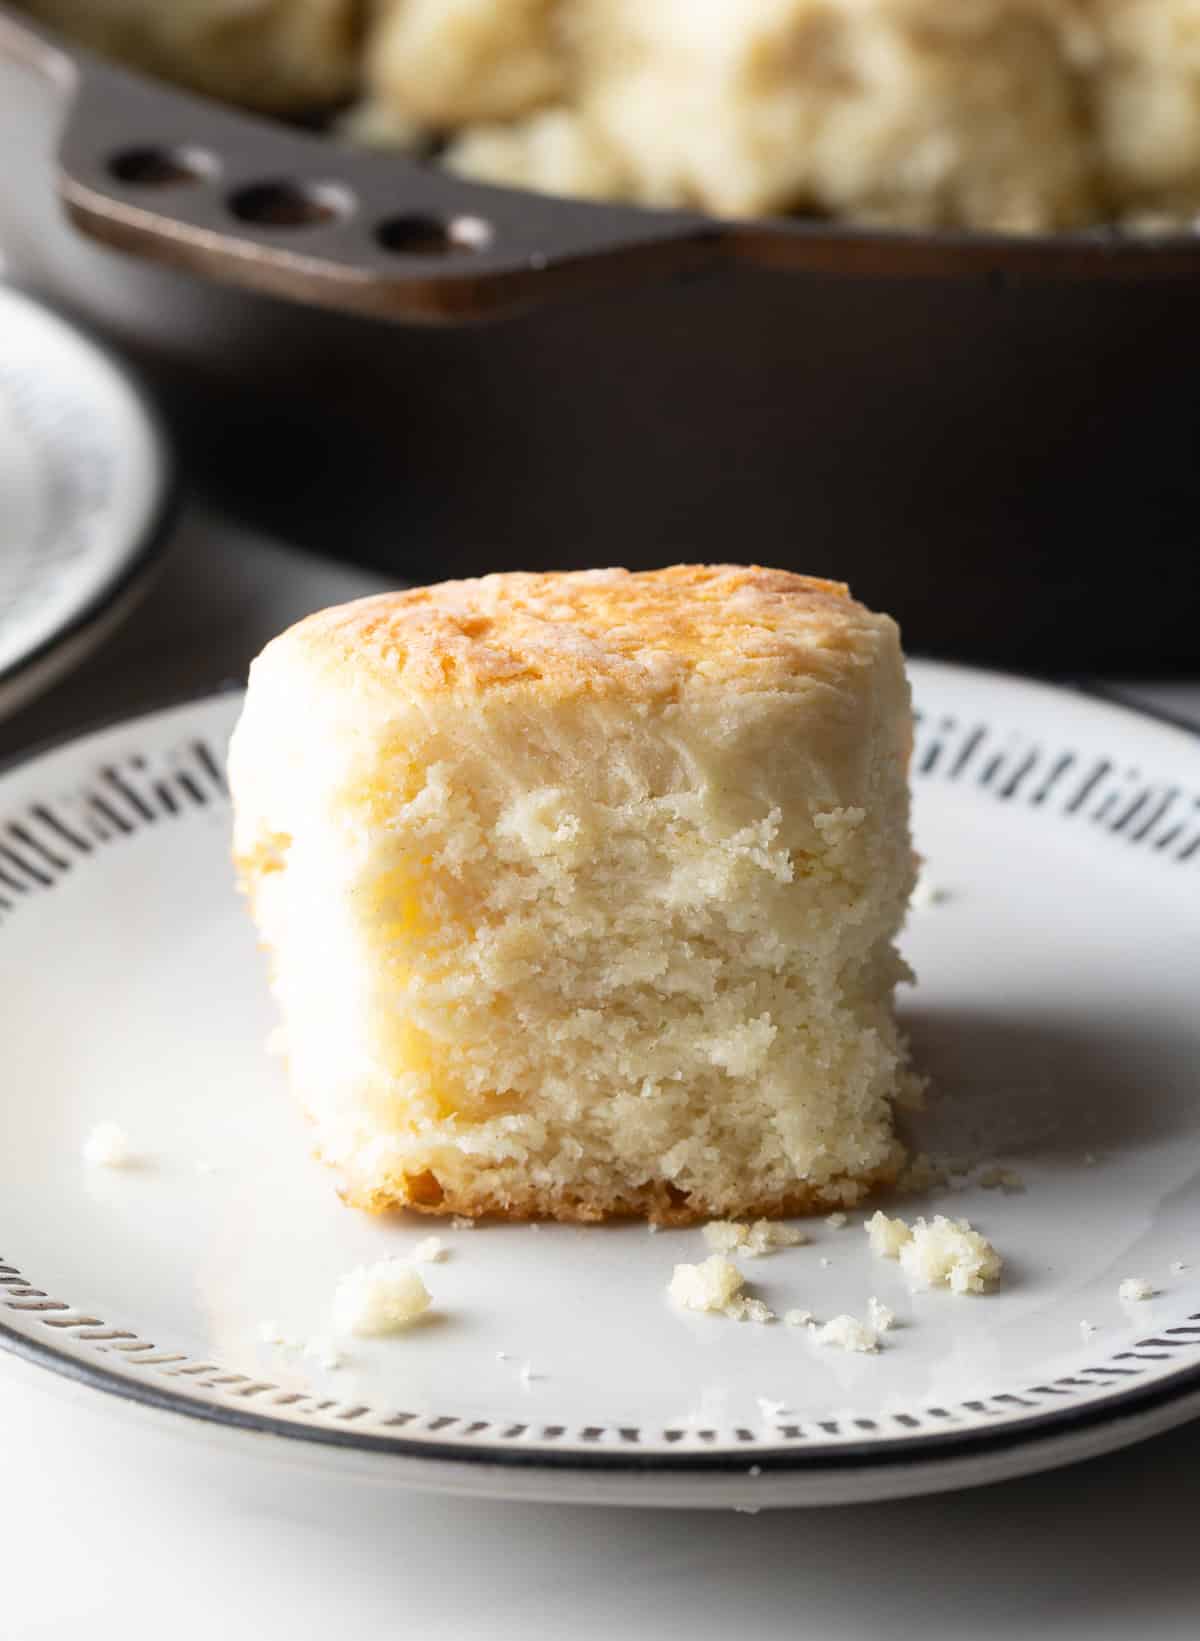
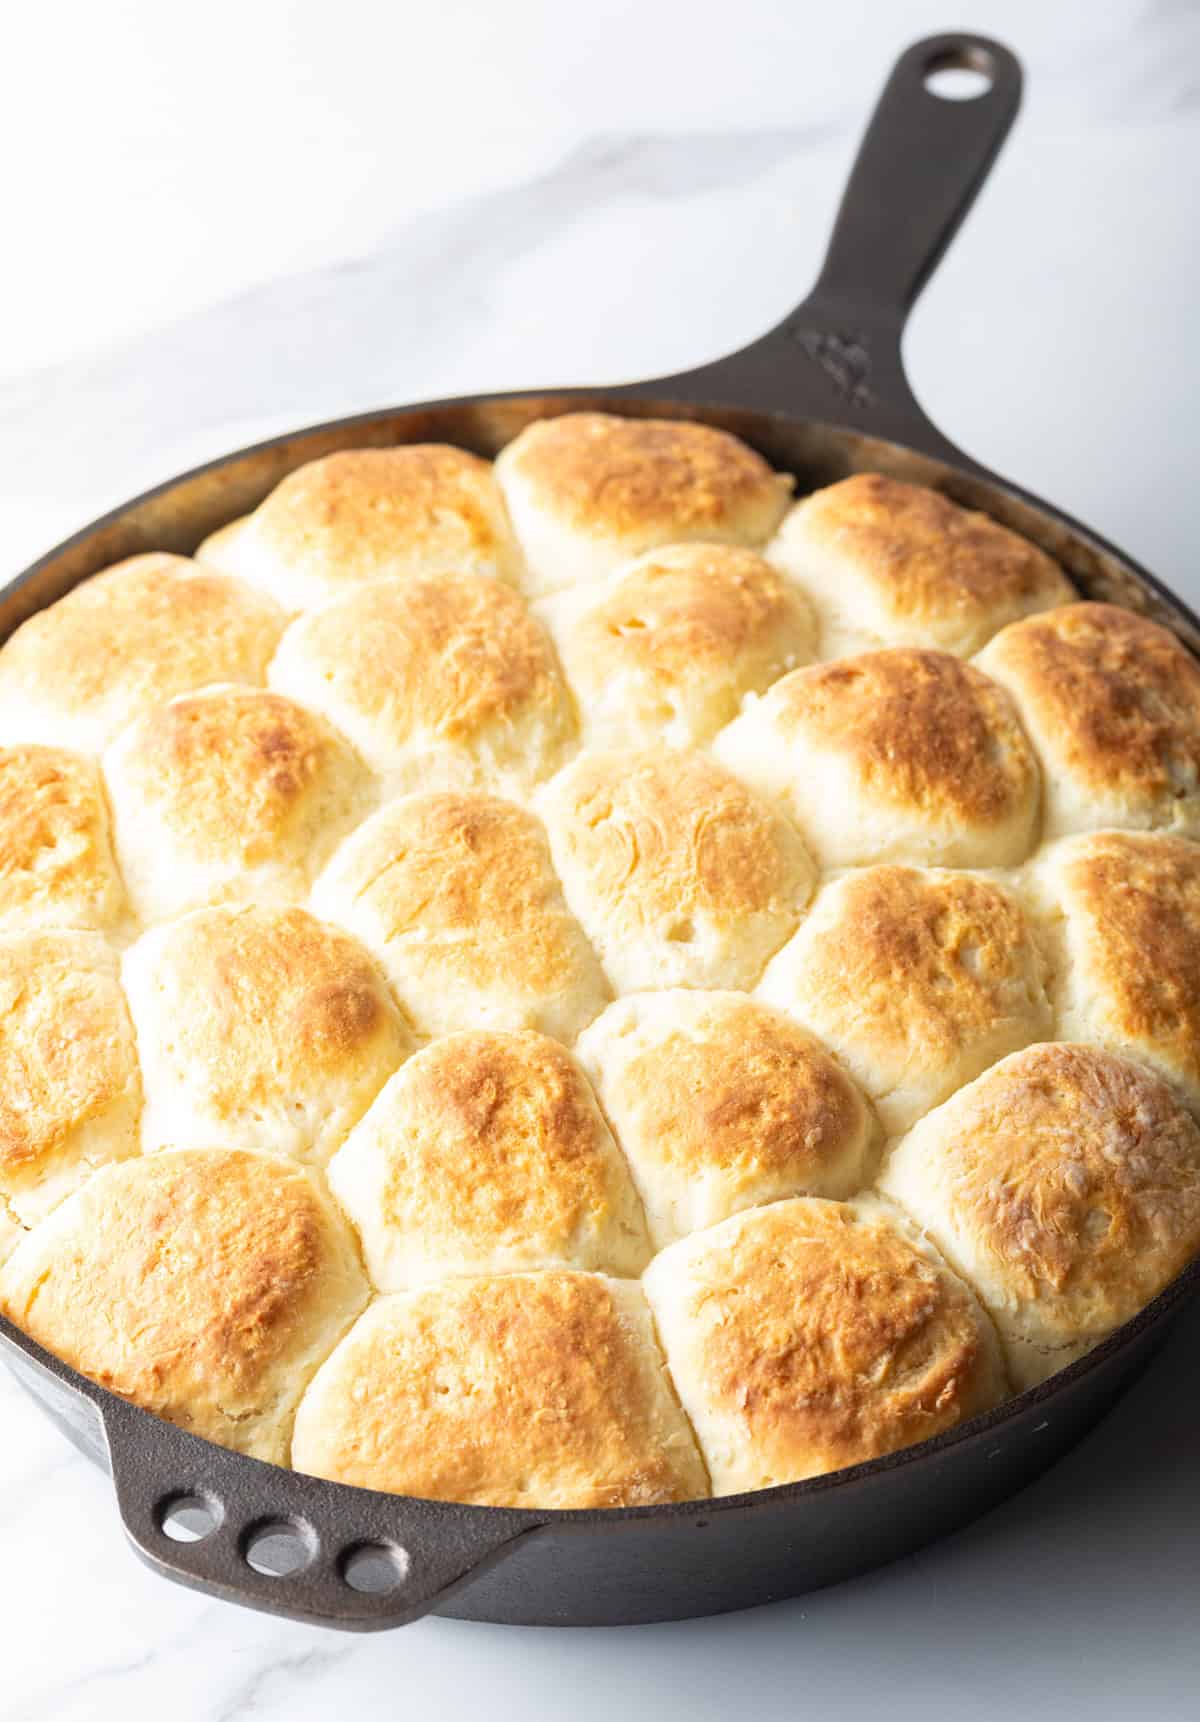
The secret to these incredibly fluffy angel biscuits is a simple ingredient you won’t find in most biscuit recipes: yeast. I use it alongside buttermilk to help the biscuits rise extra high while keeping the centers delicate and tender. I bake them together in a cast-iron skillet, so they pull apart beautifully, and are a perfect platform for slathering butter, honey, or jam.
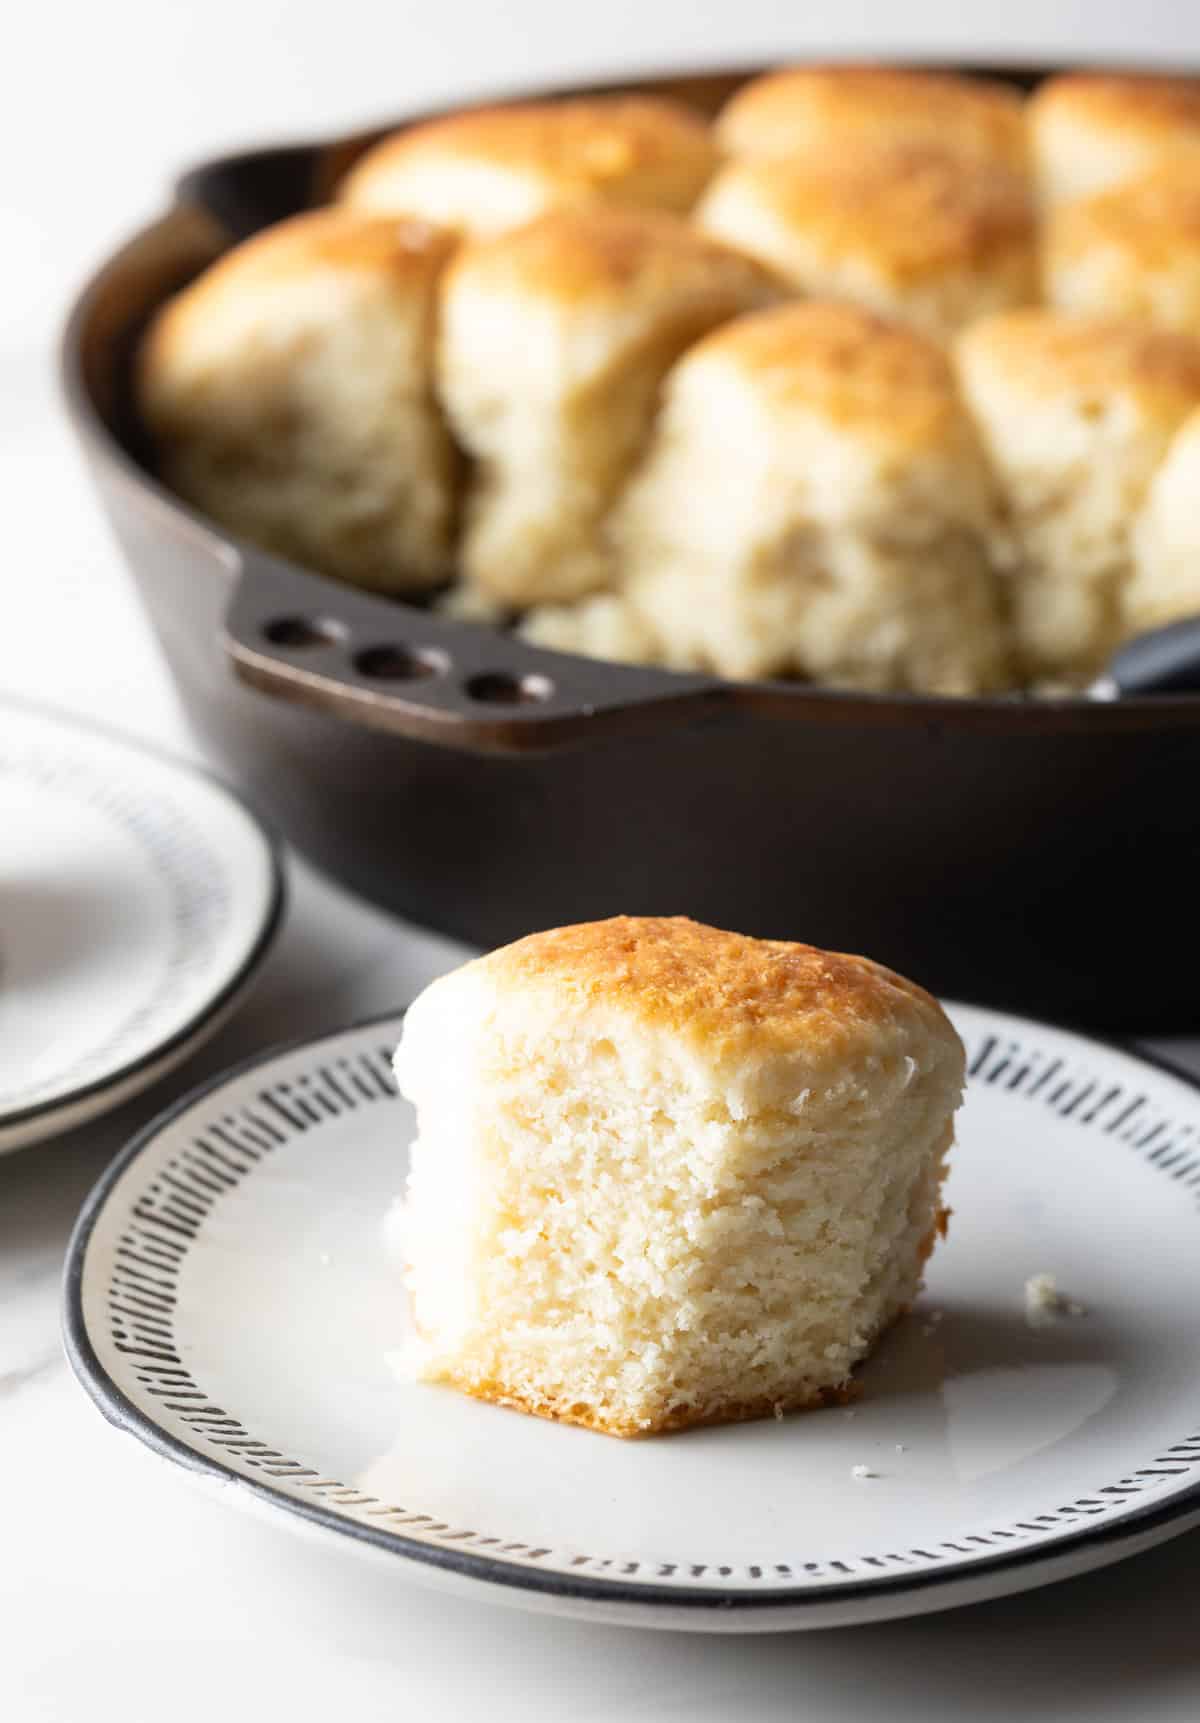
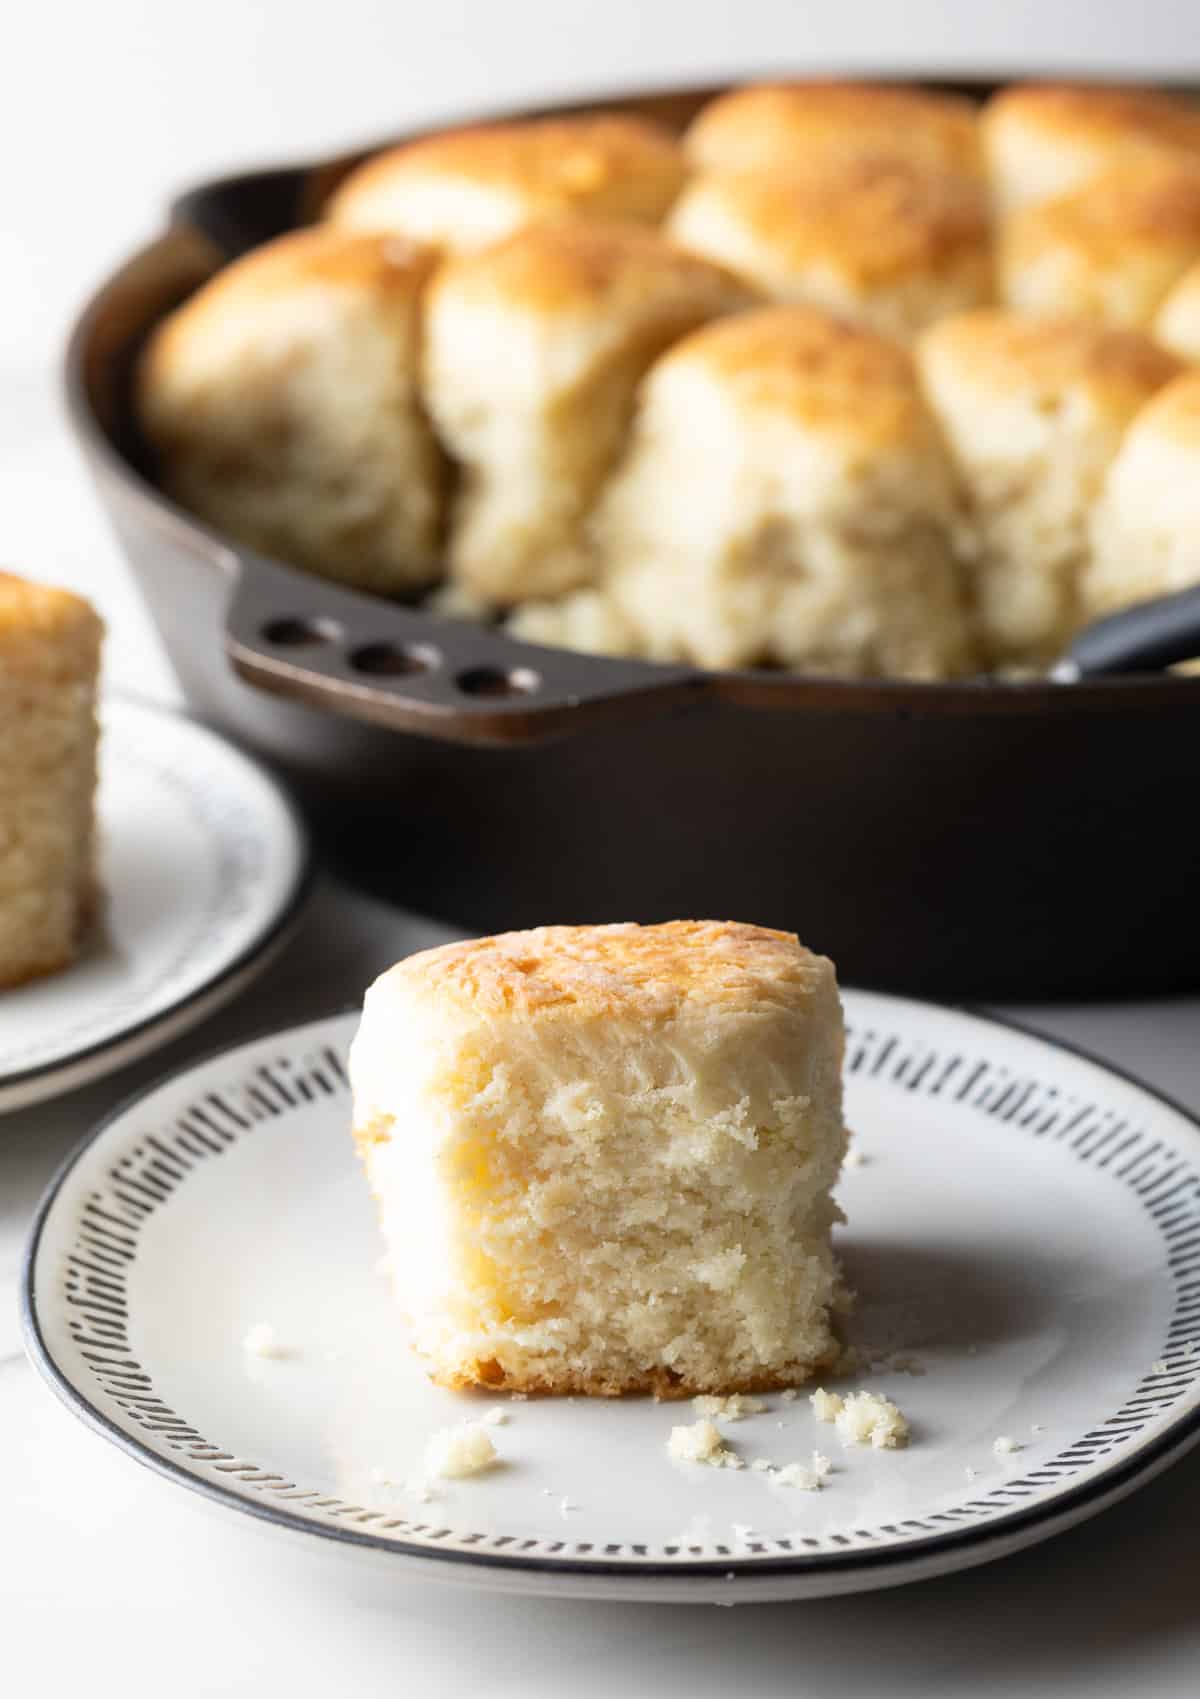
Sinking my teeth into a soft, tender angel biscuit, just like grandma used to make, is an absolutely heavenly experience! What makes them so special? Unlike traditional flaky Southern biscuits, which are considered a “quick bread” made with just baking powder and baking soda for lifting, these are lighter than air and extra tall because they’re also made with yeast. This key ingredient makes ultra-fluffy biscuits with a distinct and delicious baked yeasty flavor. Like my rich buttery cathead biscuits, these smaller and lighter biscuits are also made in a skillet, with the sides of the cast-iron pan helping to support the biscuits as they rise. Don’t be surprised when they get eaten up faster than you can say “Hallelujah!”
Table of Contents

Sommer’s Recipe Highlights
Worth the Wait – These pillowy biscuits admittedly take a little longer to make than a quick bread, such as my Red Lobster biscuit recipe. Although you have to wait a bit for the biscuits to rise, they bake so tall and fluffy that they look like little carby clouds with golden tops. Trust me, it’s totally worth the practice in patience!
Made to Share – As-is, my recipe makes roughly 24 (two dozen) biscuits. These are on the smaller side, and I consider a serving to be two biscuits, for a total of 12 servings (one dozen). There really is no good way to halve the recipe, so if you don’t need them all at once, I suggest baking and freezing however many you want for later. More on that below!
Butter Your Biscuits, or Not – I’m a big fan (huge understatement) of slathering warm biscuits with soft, rich and creamy butter… But that’s not all! Enjoy them your way with fruit jam, or to use as the base for other old-fashioned Southern recipes.
Key Ingredients and Tips
- Leaveners – I use a combination of dry active yeast, baking powder, and baking soda to make consistently fluffy yeast rolls.
- All-purpose flour – A softer flour works best. White Lily is ideal, but any all-purpose flour will work if you don’t overpack it.
- Sugar – Granulated sugar helps to feed the yeast even more, resulting in even more fluffy biscuits!
- Cold butter AND shortening – I use both to get biscuits that are soft and pillowy. Too much of one or the other can cause the biscuits to be flatten or become super dense.
- Buttermilk – The acid in buttermilk helps the bloomed yeast to froth up even more and make the biscuits extra tender.
How to Make
Find the full ingredient proportions, detailed instructions, storage tips, and a video tutorial in the printable form at the bottom of the post.
Bloom Yeast – I get out a medium bowl and start by stirring the yeast into warm water (not hot!) and letting it sit for about 10 minutes until it looks foamy on top. This tells me the yeast is active and ready to work its magic and make the biscuits tall. If the yeast doesn’t bloom, it means that it’s gone bad or you killed the yeast with too hot of water, and sadly that means you need to start over with fresh yeast.
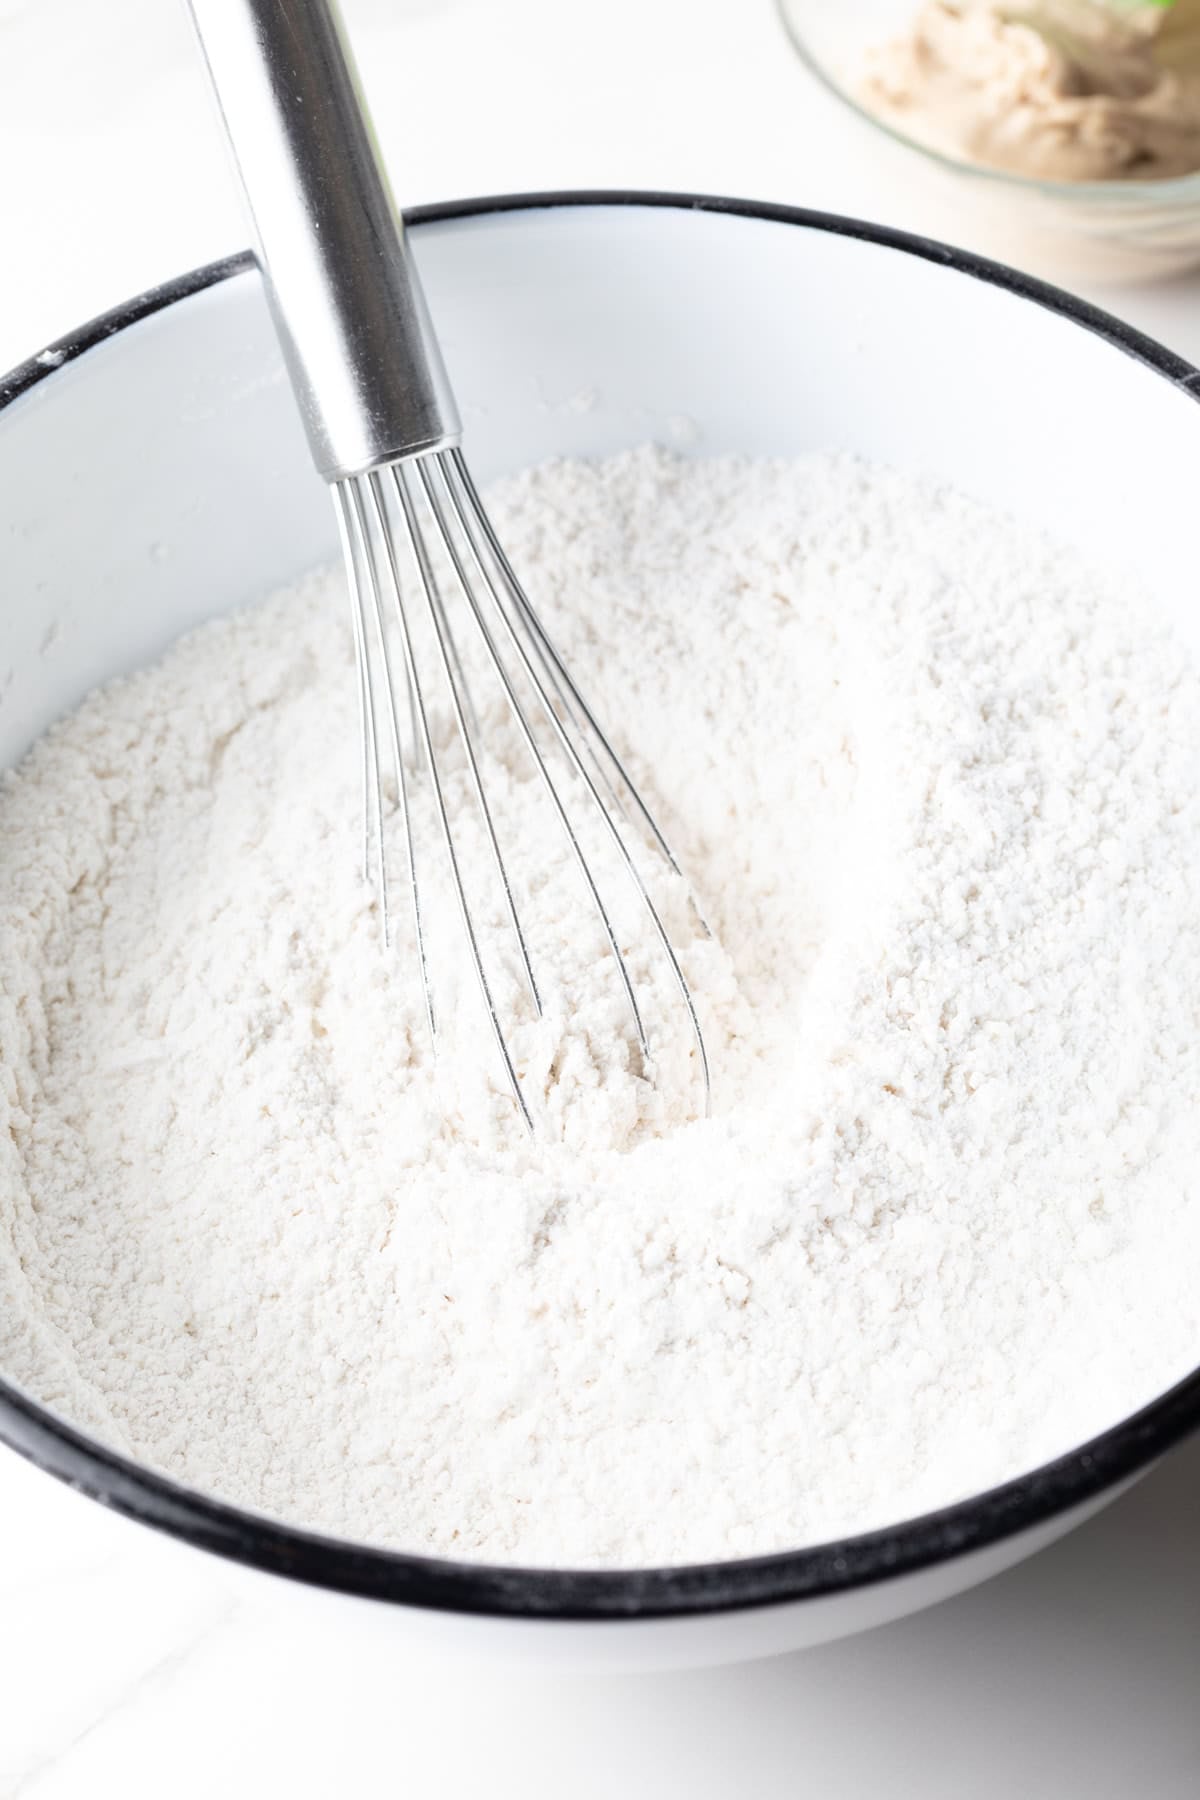
Measure Flour and Add to Bowl – Then I whisk the flour, sugar, baking powder, baking soda, and salt together in a separate large bowl.
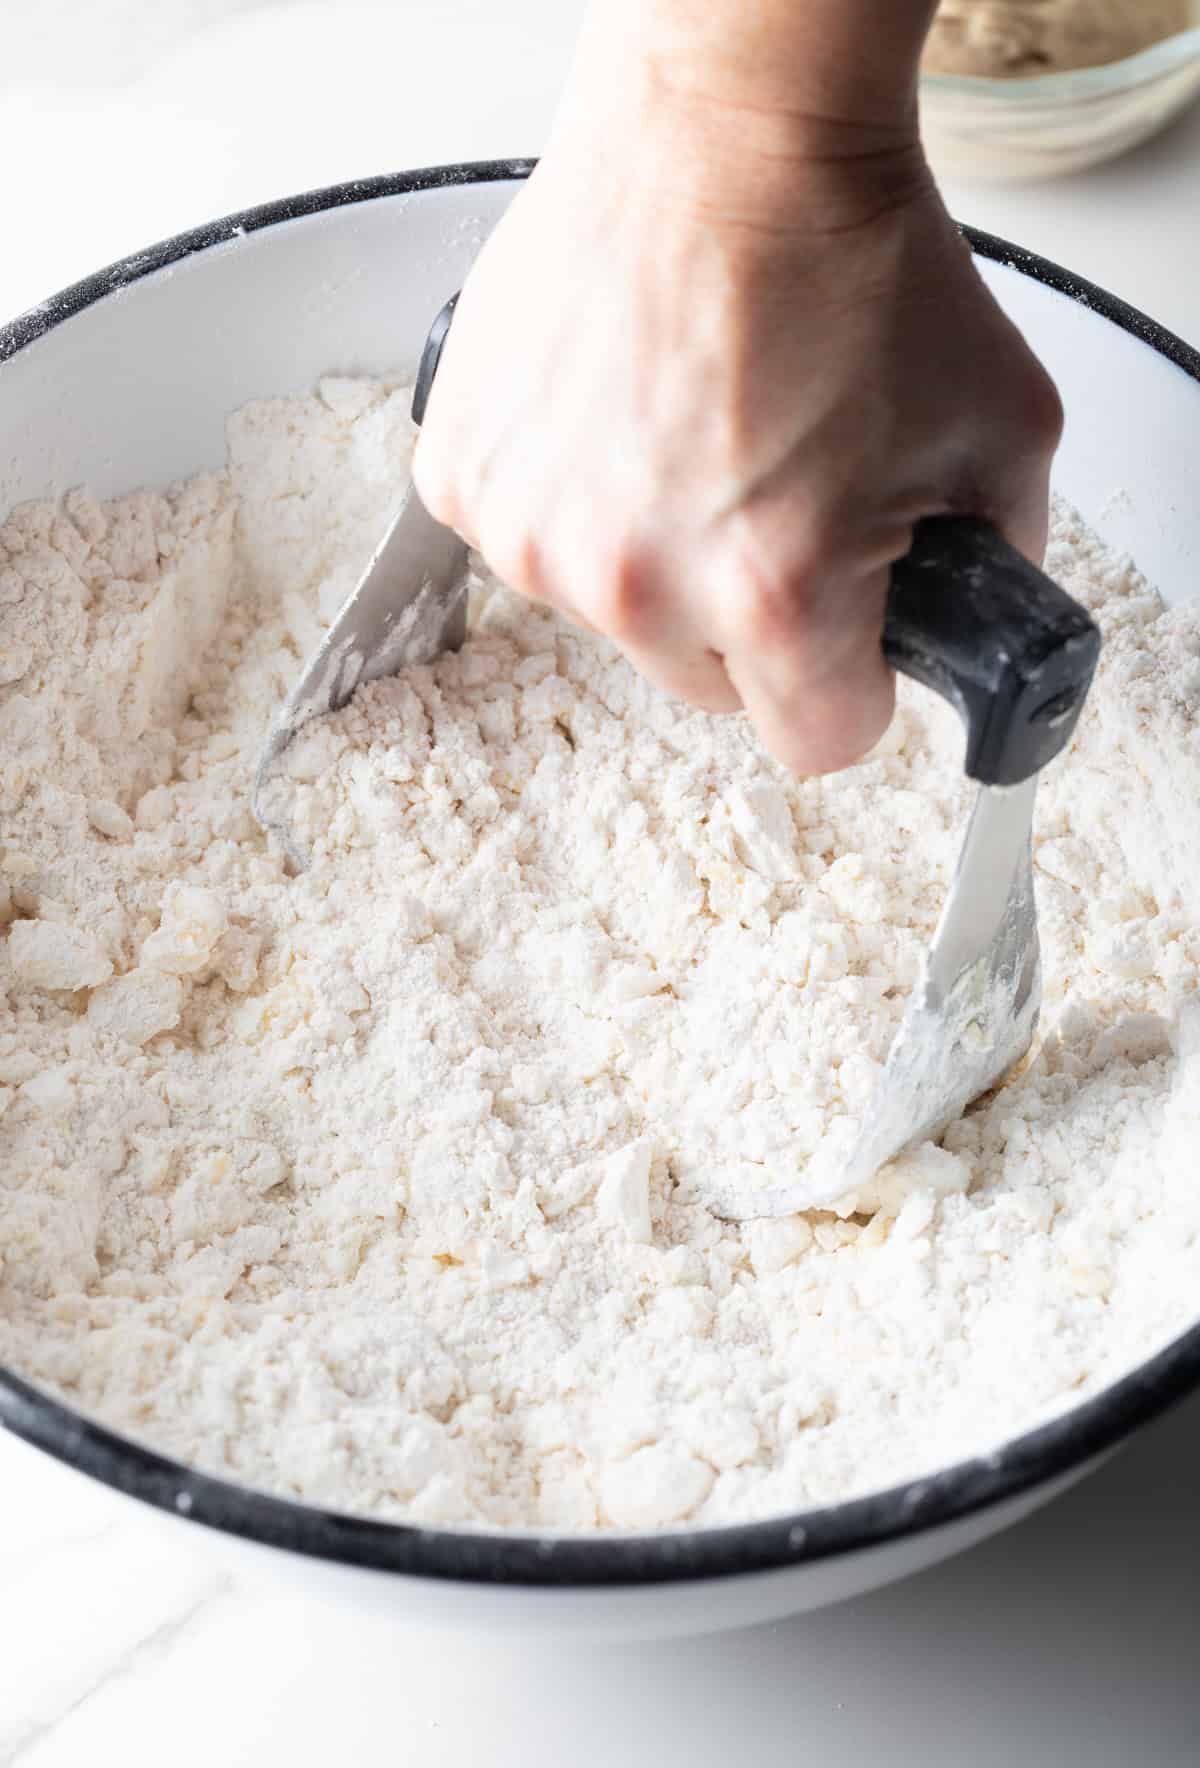
Add Butter & Shortening – I chop the cold butter into chunks, and add it with shortening straight into the flour. Then I use a pastry cutter to cut it in until the mixture looks like coarse crumbs with small pieces of fat throughout. The crumbles should look a bit like oatmeal, with some chunks about the same size of peas.
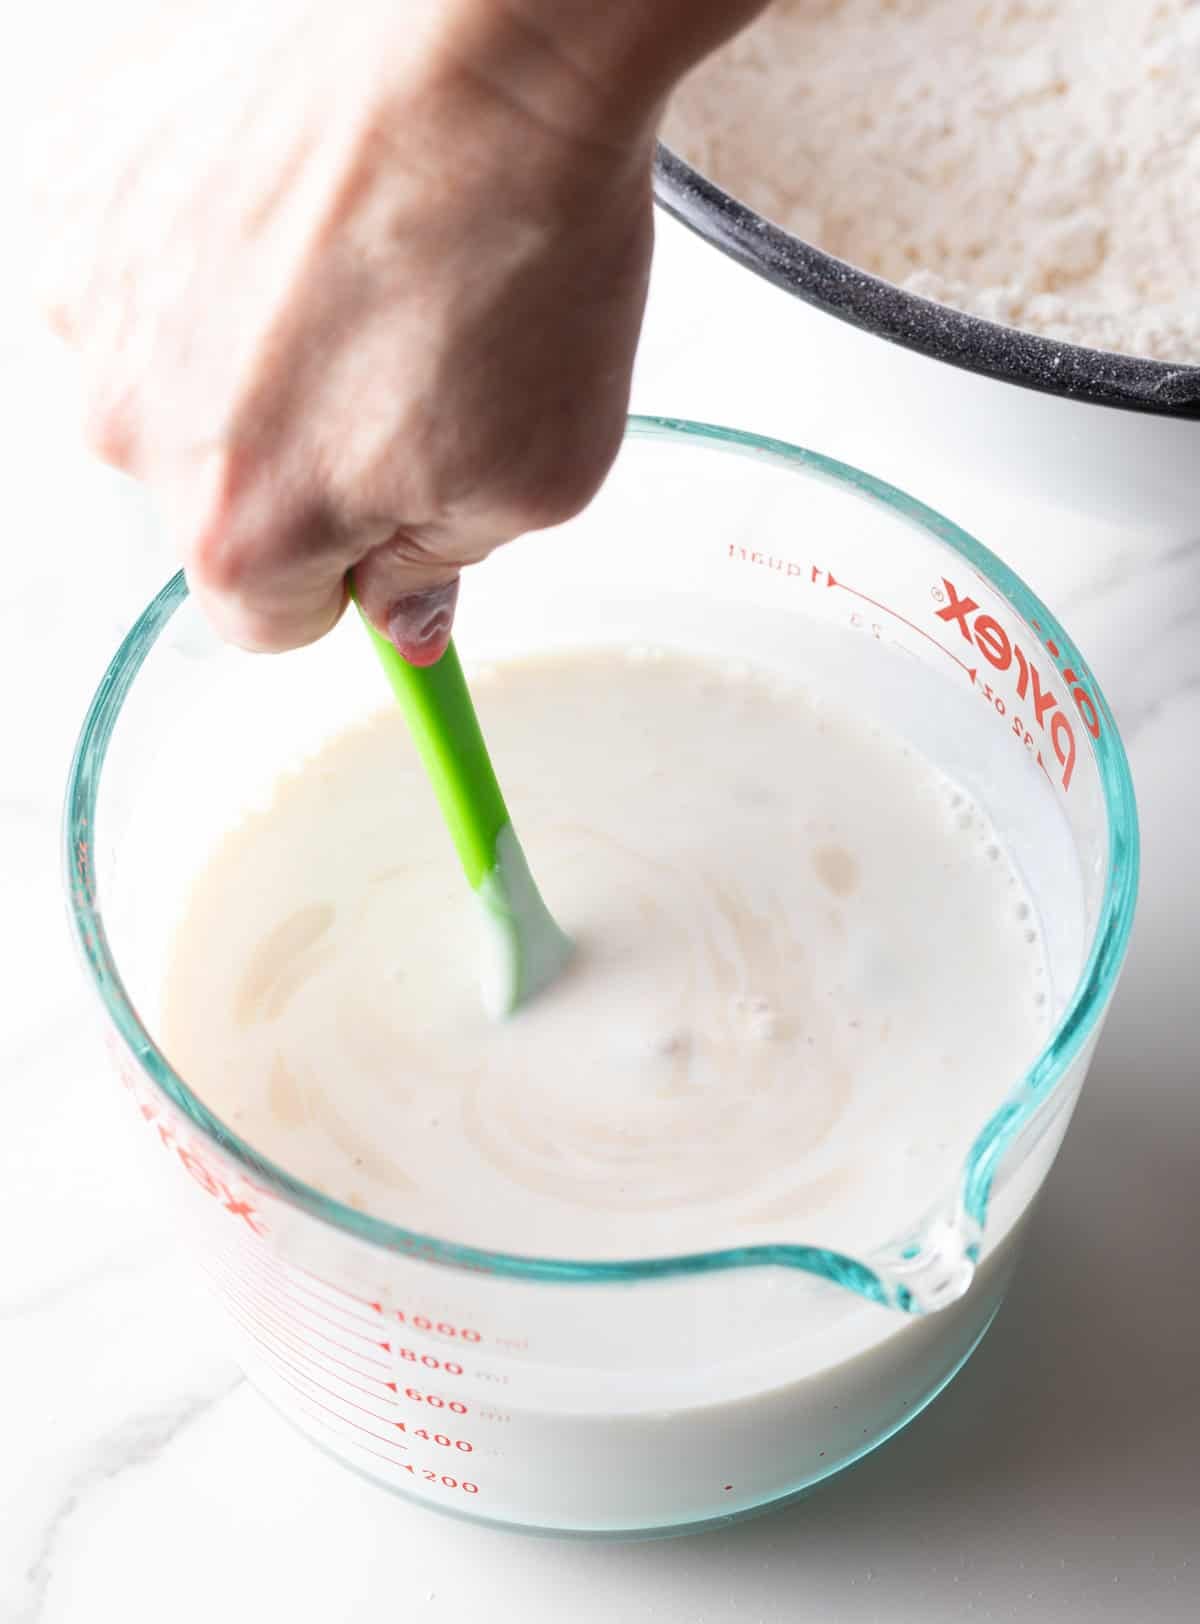
Combine Wet Ingredients – Now I use a silicone spatula to stir the bloomed yeast into the cold buttermilk until it’s combined well.
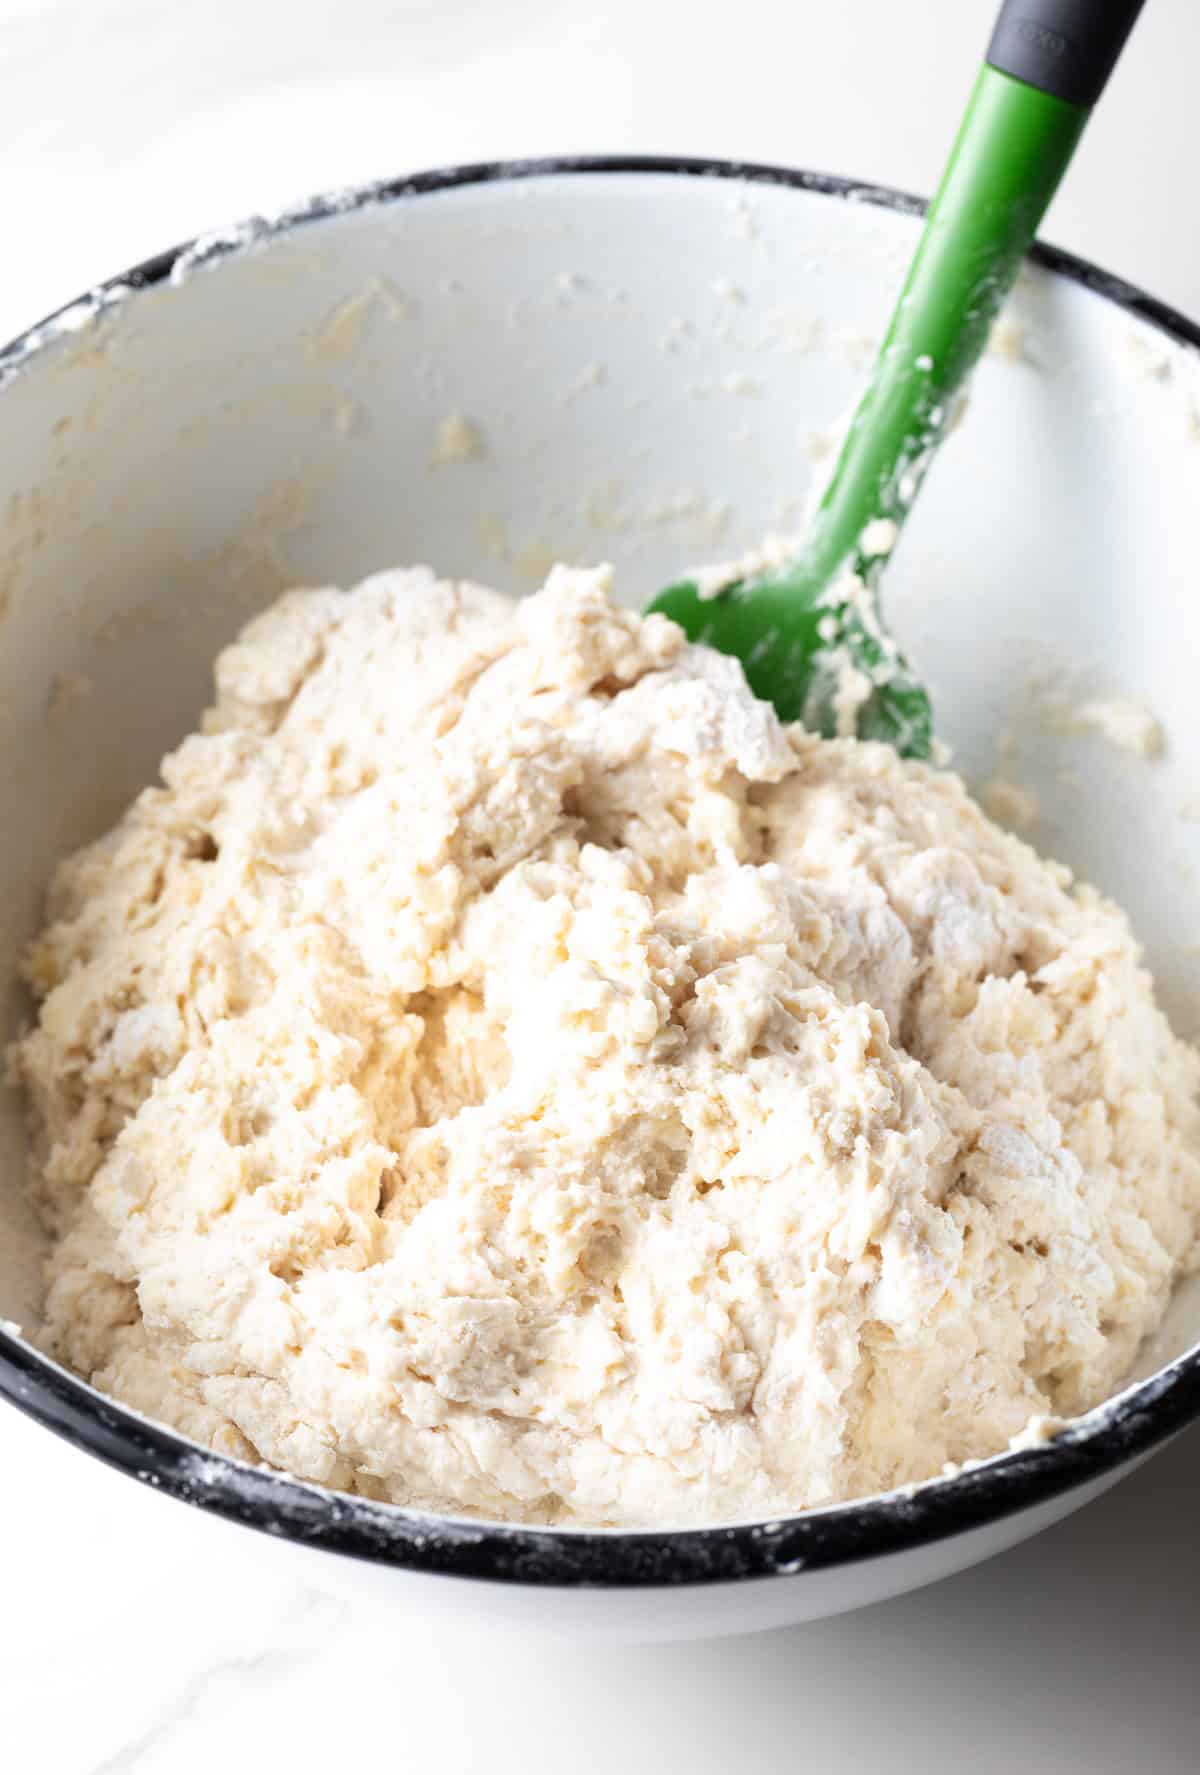
Make the Dough – Next, I pour the yeasty buttermilk into the flour mixture. I mix just until the dough comes together into a shaggy mess. I stop as soon as there are no large dry patches left. Overmixing can make the biscuits tough instead of soft… So don’t do it!
Shape and Cut the Biscuits – I turn the dough out onto a lightly floured surface and gently press it together. Then I fold it over itself a few times to build light layers, but don’t knead it. Kneading develops too much gluten and changes the texture. I just want it to hold together, not become smooth.
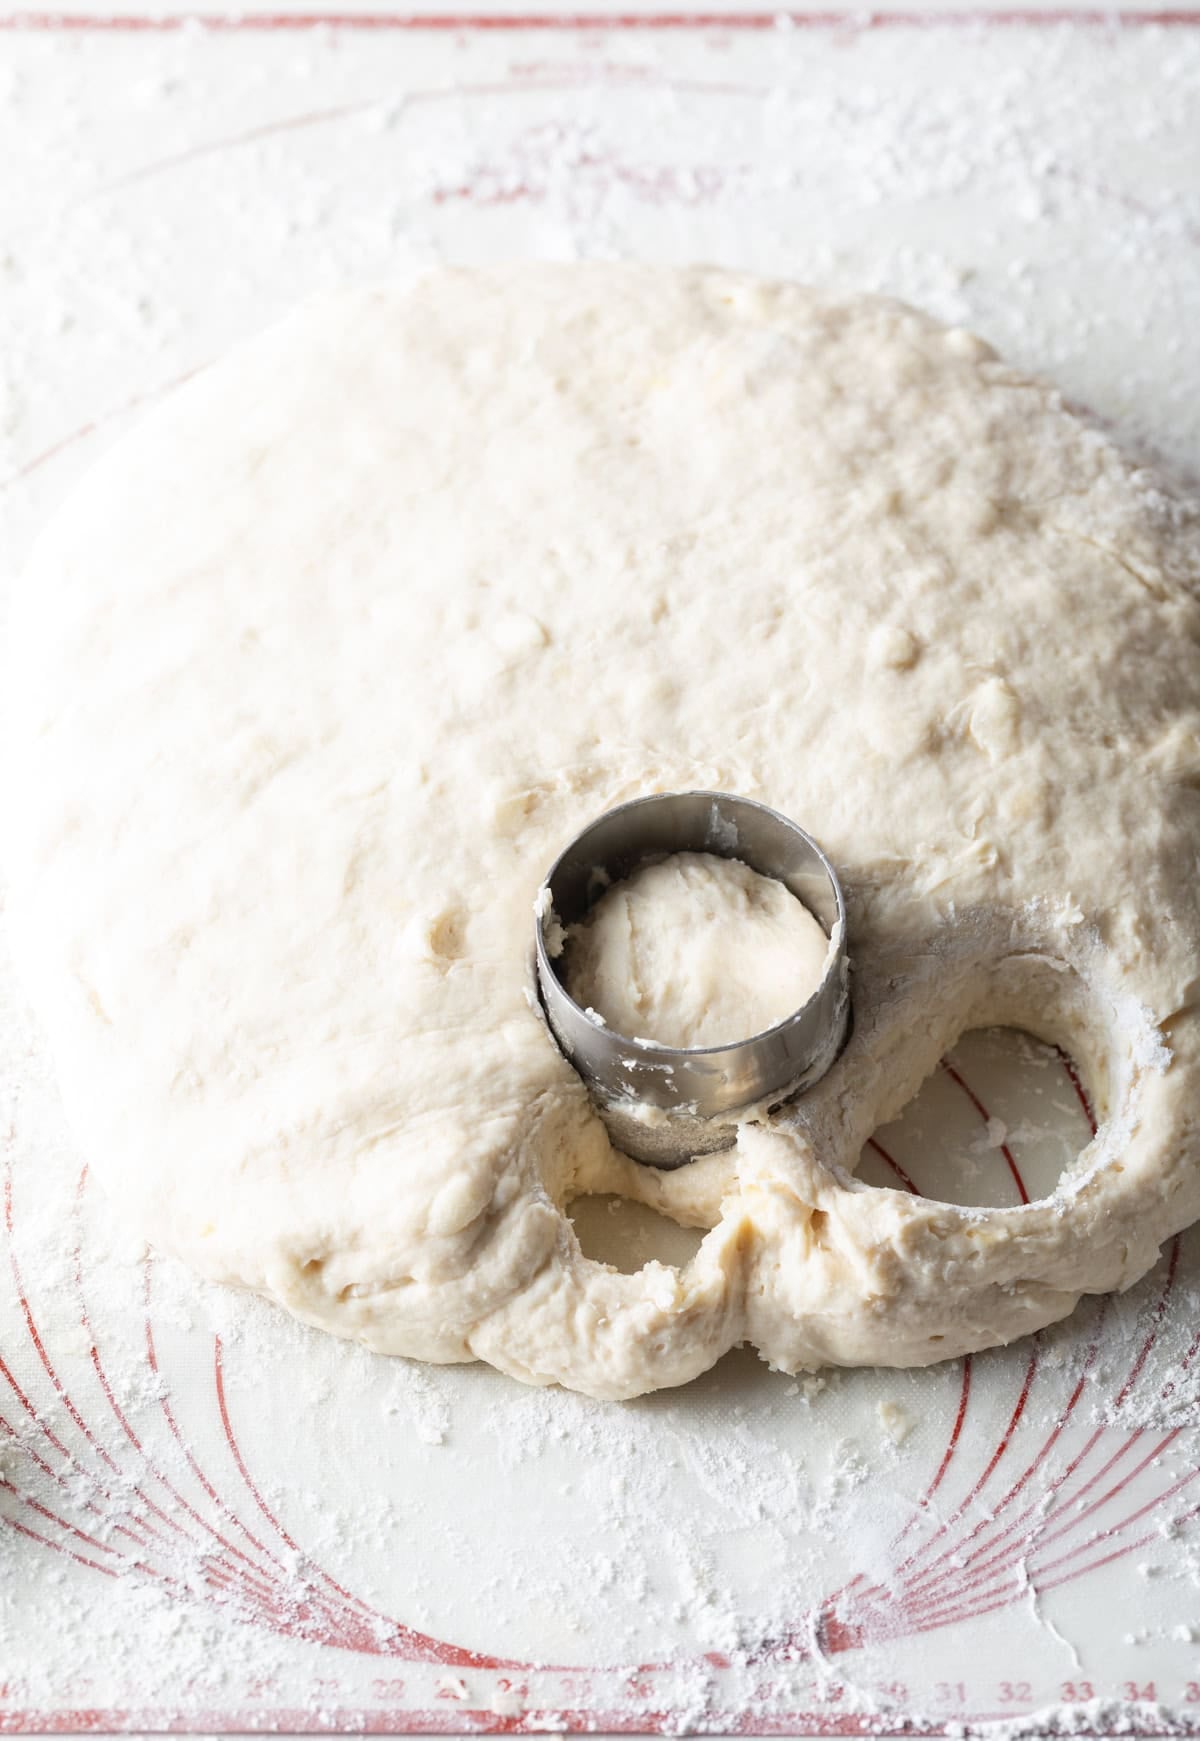
Next, I pat the dough out to an even thickness. Then I lightly flour my round biscuit cutter, and use it to cut straight down. Resist the urge to twist the cutter because that seals the edges and keeps them from rising as high. Also, I cut them as close together as possible the first time through, so I’m not reworking scraps. After I’ve cut all of the circles, I bring the scraps together and gently work them back out into another even layer of dough. Use the cutter again, and repeat the process until you’ve used up as much dough as possible.
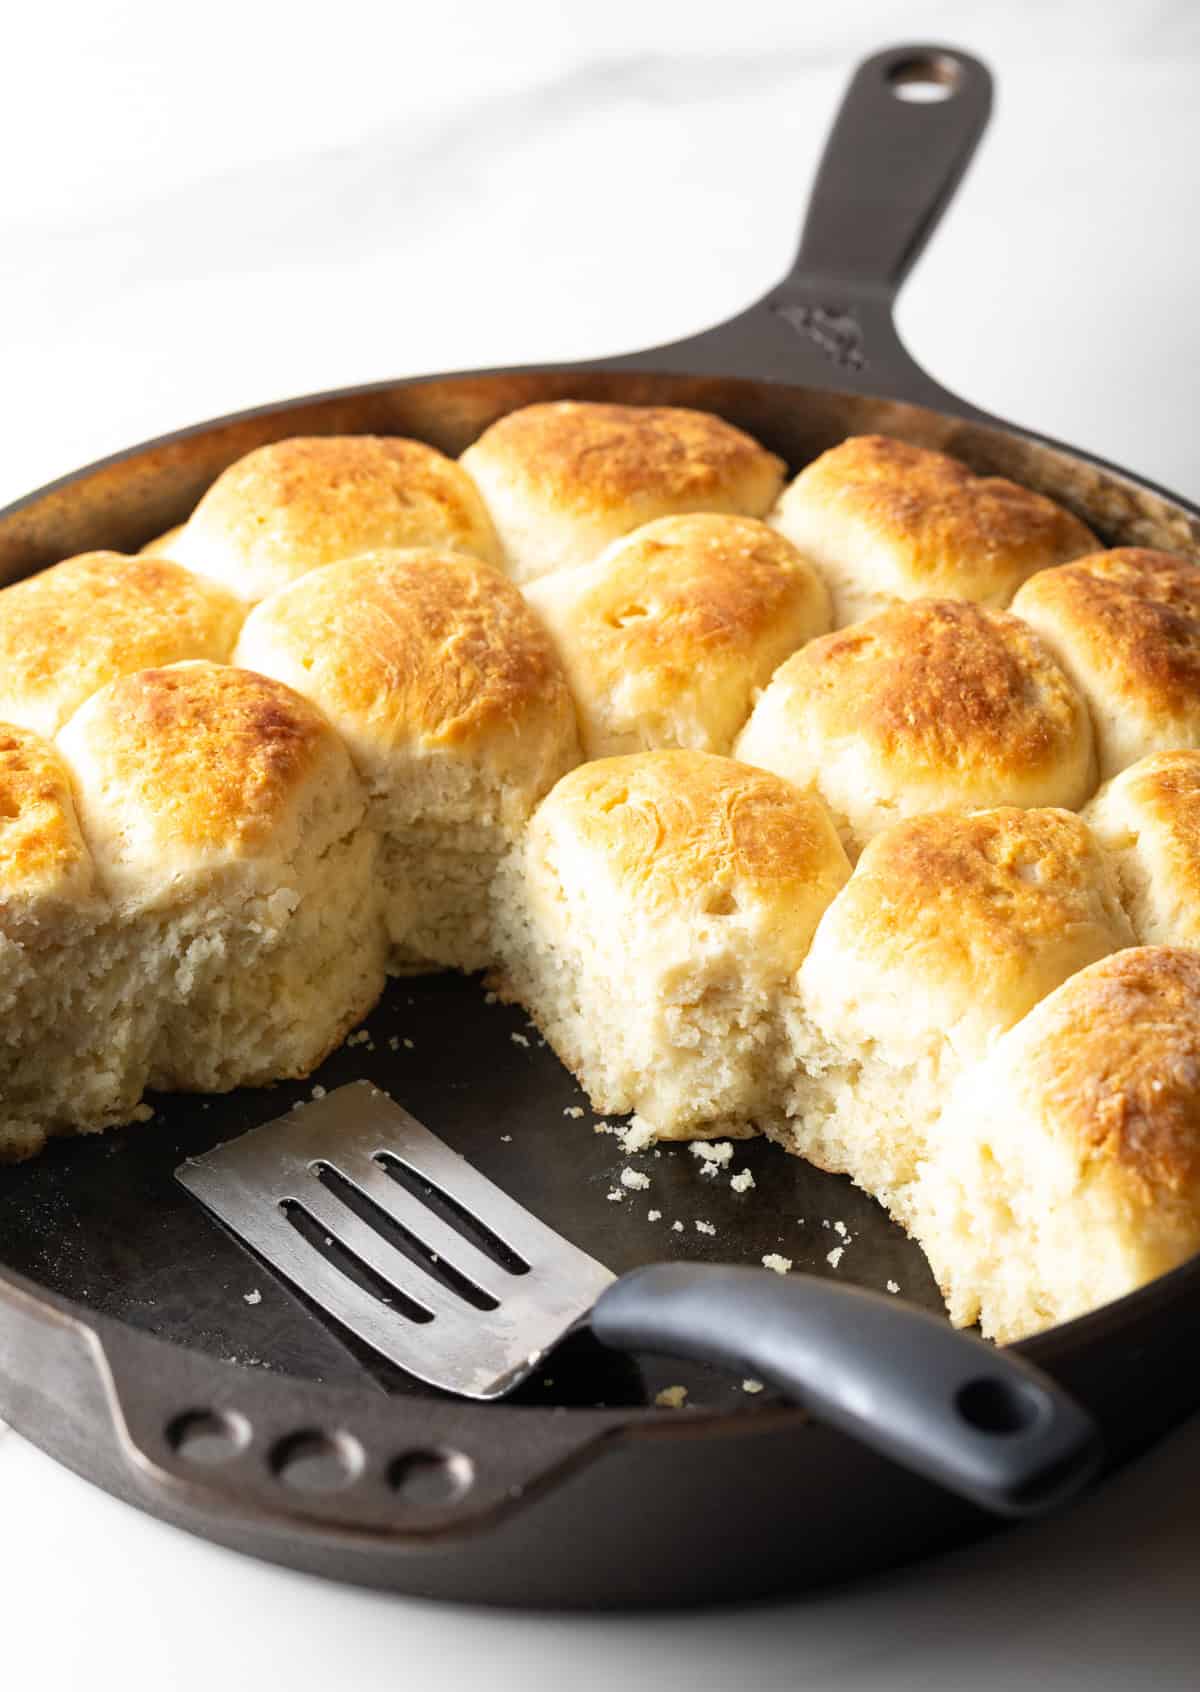
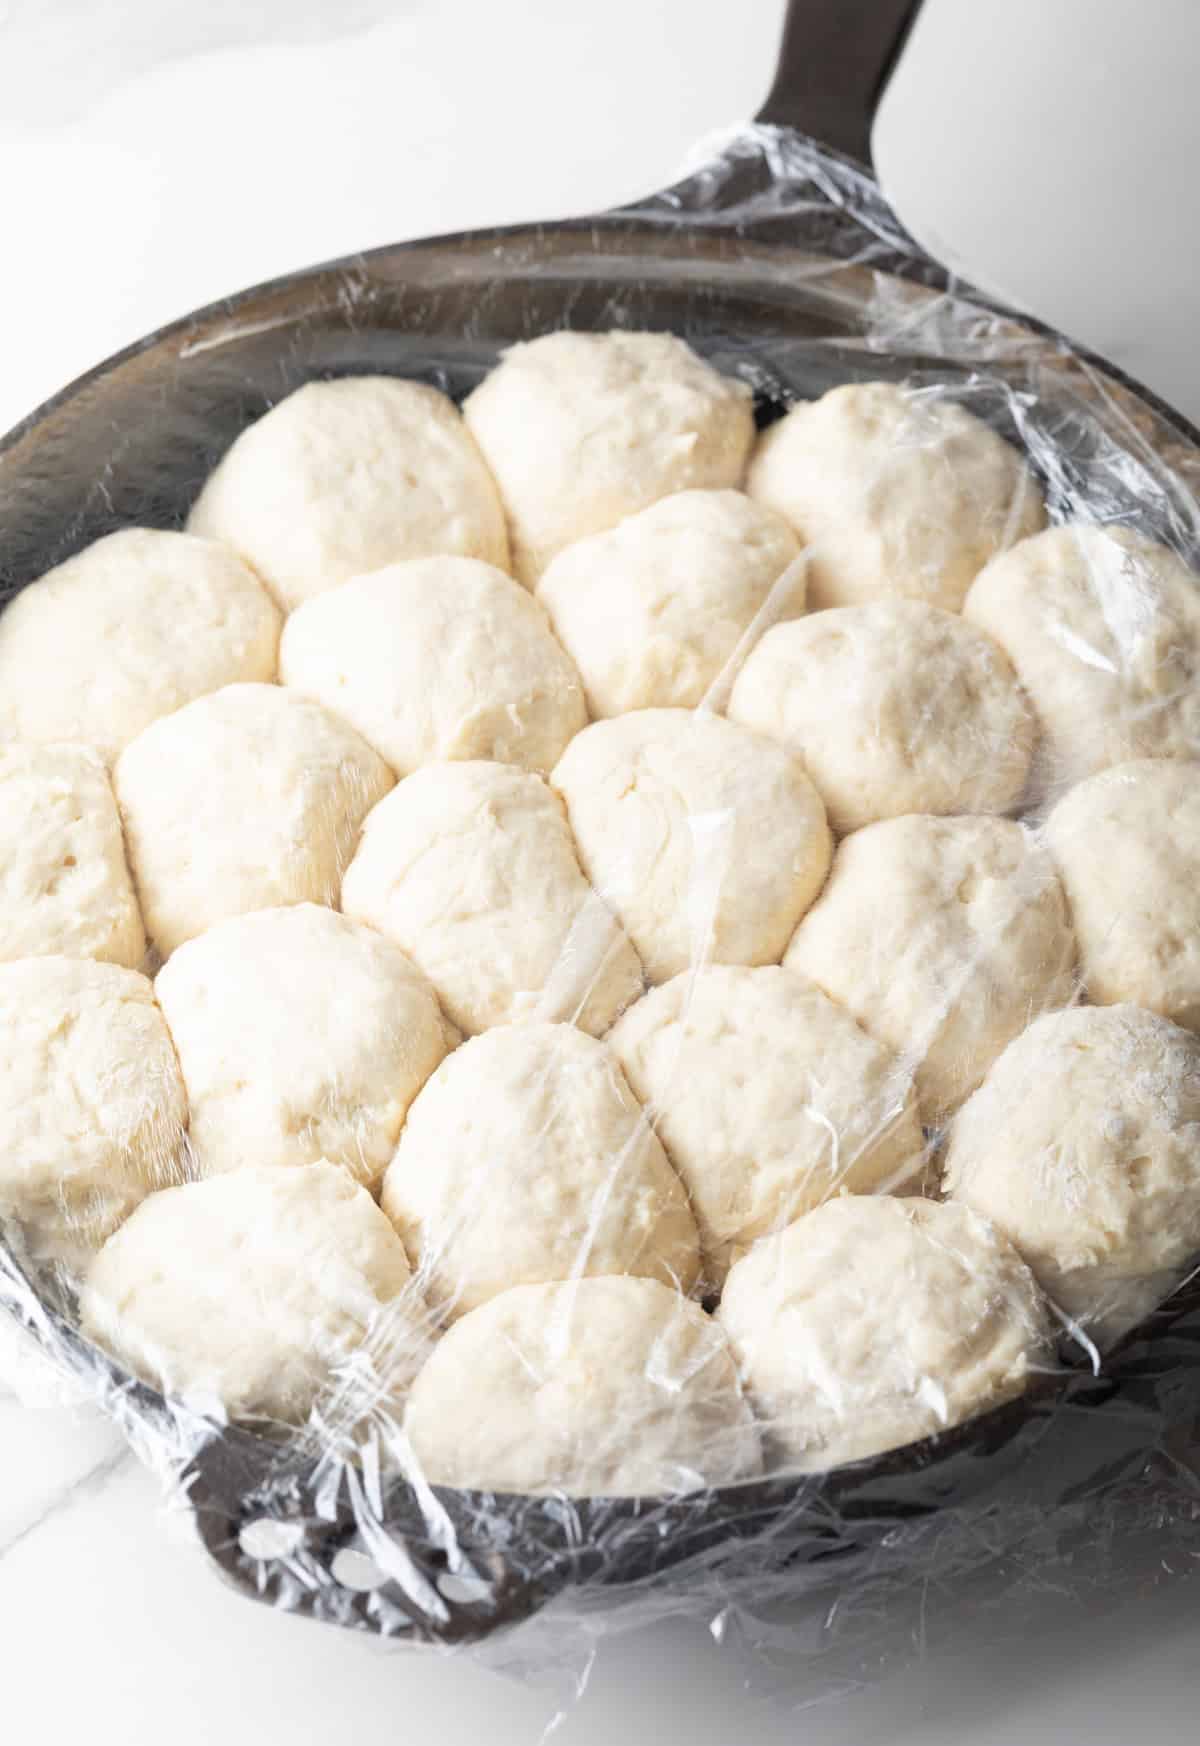
Arrange and Proof – I grease my cast iron skillet with softened butter, and arrange the biscuits in the skillet so they’re touching. I know it might seem odd because we usually want some space between baked goods, but in this case the contact helps them rise upward instead of spreading out.
Then I loosely cover the pan with plastic wrap, and let them sit until they look noticeably puffy. This usually takes about 45-60 minutes. Don’t try to rush the process!
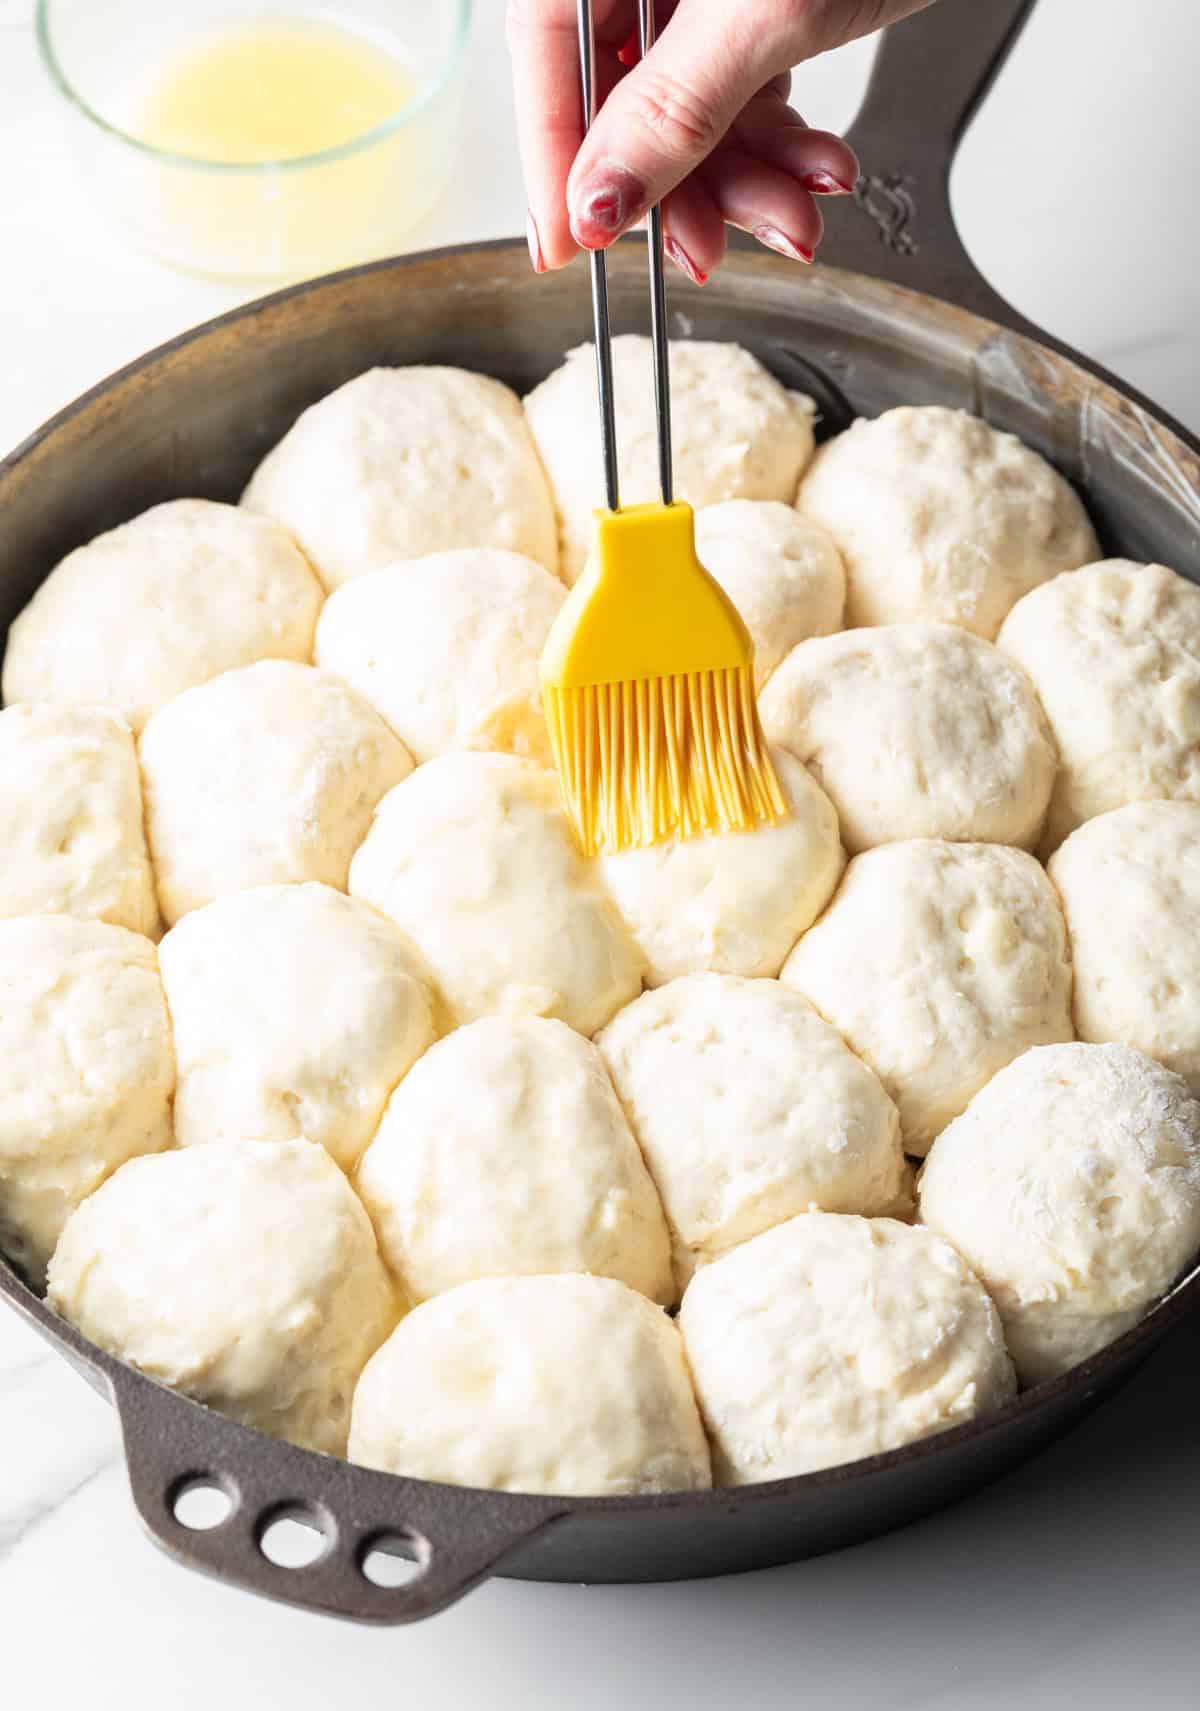
Brush with Butter – Once they have reached peak puffiness, I melt a bit of butter in the microwave, remove the plastic wrap from the skillet, and preheat the oven to 400 degrees Fahrenheit. When the oven is just about preheated, I use a silicone pastry brush to lightly coat each yeast biscuit with a bit of the butter. They should all look shiny, but not saturated… Be thorough but not heavy-handed with the butter.
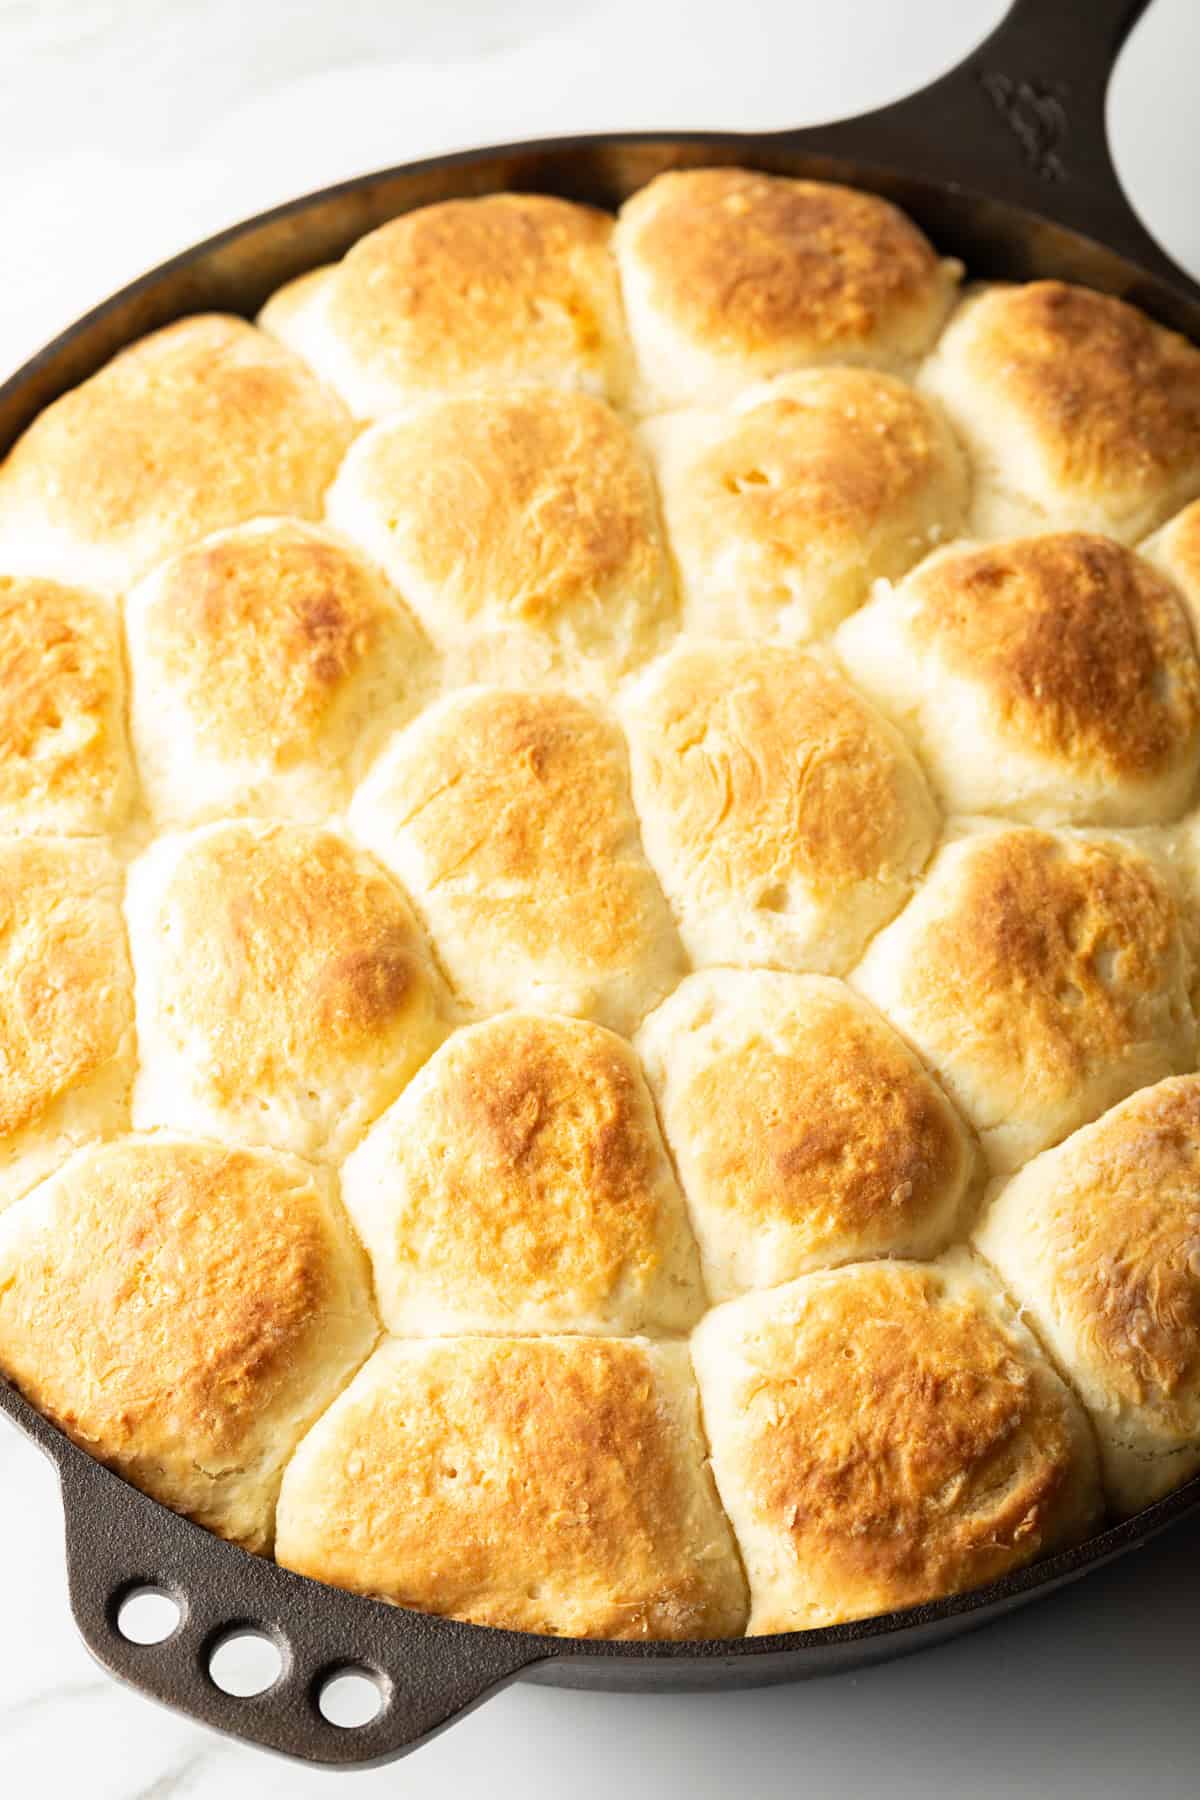
Bake! – Into the oven they go! I bake the yeast biscuits for 15 minutes, then check them for doneness to make sure they don’t overbake. I look for even browning and full rise in the center of the skillet; the middle biscuits should be just as tall as the ones on the outside. If they’re not quite there yet, I keep the skillet in the oven for another 2-5 minutes, until they reach that peak gorgeous golden brown color. You can check by inserting a sharp knife in between two biscuits near the middle to see if the knife comes out clean.
Expert Tips
The first step is blooming the yeast, and this is by the far the the most important step! The perfect warm water temperature to bloom yeast is about 105 degrees F. Hot water that’s 115+ degrees will “kill” the yeast and make it ineffective.
When cutting the butter and shortening into the dry ingredients, be careful to just combine to create a crumbly mixture. If it becomes too fine like sand, those little bits of cold butter and shortening can’t melt properly to make the biscuits evenly tender.
I always use a metal biscuit cutter, and not a drinking glass or anything similar. Biscuit cutters, as you might have guessed, are specifically made to ensure that the dough is cut sharp and evenly, thus allowing the biscuits to rise evenly fluffy. A glass will basically pinch the dough together and create denser and non-fluffy edges.
While I note a 15-20 baking time in the recipe card below, I recommend you check the angel biscuits on the low end of the bake time. The tops should be light golden brown but not brown brown, or they’ll be crunchy and dry. You can keep them in the oven for another minute or two if they don’t look totally done, but keep a close eye so you don’t accidentally tip over from under to over-baked.
You can check by inserting a sharp knife in between two biscuits near the middle to see if the knife comes out clean.
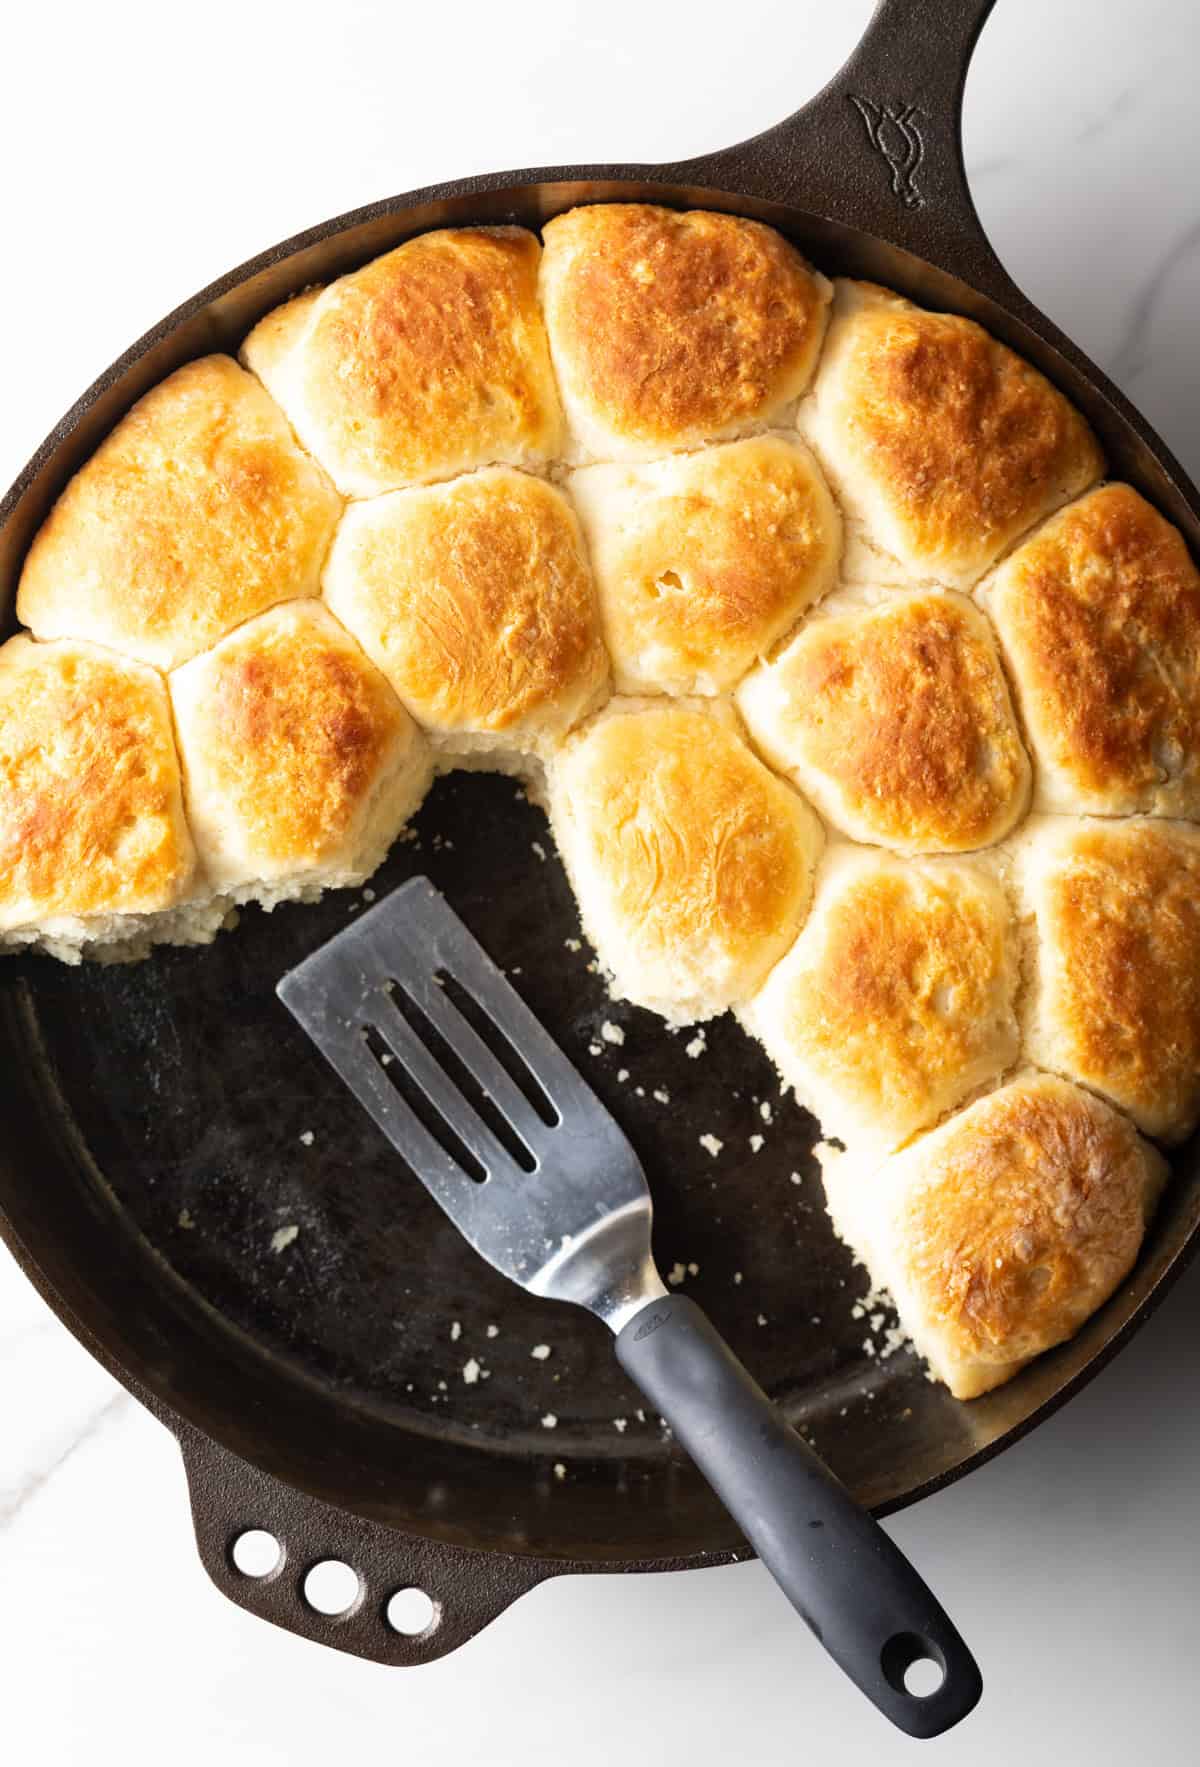
Once the pan cast iron skillet cools slightly, I use a flat metal spatula to divide the baked biscuits and pull them out of the pan. Other utensils might squish them!
Serving Suggestions
These angel biscuits are divine to serve with a thick smear of softened butter, whipped honey butter, or Texas Roadhouse-style sweet cinnamon butter.
They’re also great for jamming out with your favorite store-bought or homemade jam! I’ve got a few great recipes on the site for preserves that are sweet, one that is savory, and even one that has a nice ‘lil spicy kick –
- Peach Preserves
- Strawberry Rhubarb Jam
- Freezer Jam – with whatever fruit you like!
- Old Fashioned Tomato Jam
- Sweet and spicy Jalapeno Jelly
And I LOVE to use these tender yeast biscuits to make biscuits and sausage gravy on the weekends!
Storage Notes
I store leftovers at room temperature in an airtight container for up to 3 days.
For longer storage, I suggest freezing them by wrapping each individual biscuit in a layer of plastic wrap. Then I place all of the wrapped biscuits together in a plastic ziploc bag, and freeze them for up to 3 months. Thaw them in the fridge overnight or on the countertop for an hour before reheating.
The best way to reheat them is in a 350 degree oven for 5-7 minutes. This brings the texture back closer to fresh. Yes, you can microwave them as well by wrapping each biscuit loosely in a damp paper towel, and microwaving for 10 seconds at a time at 50% power. The biscuits will be soft and still delicious, but won’t get that crisp topping back.
Frequently Asked Questions
Yes, this step really is THAT important! The rise is what makes these angel biscuits different from standard biscuits. The yeast needs time to activate and puff the dough before baking. If you skip or shorten the rise, you’ll lose most of the height and softness.
Sure! After you cut the biscuits and place them in the skillet, you can cover and refrigerate the unbaked biscuits overnight. When you’re ready to bake, let them sit at room temperature until they look puffy before putting them in the oven, about 60-90 minutes from cold. That rise time is still important, even if you prep ahead.
Usually, it comes down to one of three things. The yeast may be inactive, the dough didn’t get enough rise time, or the environment was too cold for proper proofing. I also see this happen when the dough is over-floured, which makes it too heavy to rise properly.
Hard biscuits usually mean the dough was overworked or too much flour was added during mixing or shaping. Overmixing develops too much gluten, which changes the texture. I also see this when the butter and shortening get too warm before baking, instead of staying cold and creating that tender crumb.
Help Me Spread the Word about this Fabulous Free Recipe! Sharing this recipe link on Pinterest and Facebook is super impactful, and I greatly appreciate it! Find the share buttons below the recipe form.
More Bread Recipes


Angel Biscuits
Video
Ingredients
- 2 packets dry active yeast 4 ½ teaspoons
- 3 tablespoons warm water
- 6 cups WhiteLily all-purpose flour or 5 ½ cups from another brand
- 1/3 cup granulated sugar
- 1 tablespoon baking powder
- 1 ½ teaspoon salt
- 1 teaspoon baking soda
- ½ cup cold butter cut into cubes + 2 tb melted butter for tops
- ½ cup cold shortening cut into cubes
- 2 cups buttermilk
Instructions
- Pour the yeast into a small bowl. Measure out 3 tablespoons of slightly warm water, just over room temperature. (Hot water will kill the yeast and it will not bloom.) Pour the warm water over the yeast and allow 10 minutes for the yeast to bloom. When it's ready to use, it should look foamy.
- Meanwhile, set out a large mixing bowl. Measure the flour into the bowl. *Make sure you measure the flour precisely, meaning you need stir the flour in the bag to fluff it up, spoon the flour into the measuring cups, then level each measuring cup before pouring in the bowl.
- Add the granulated sugar, baking powder, salt, and baking soda. Whisk well to evenly incorporate the ingredients into the flour mixture.
- Chop the cold butter and cold shortening into chunks and place them in the flour mixture. Use a pastry cutter to cut the fat into the flour until the mixture is full of very small clumps.
- Measure the buttermilk in a measuring pitcher, then add the bloomed yeast to the buttermilk and stir well to incorporate. Slowly mix the buttermilk into the flour mixture until the biscuit dough comes together in a large sticky clump.
- Move the clump to a floured work surface. Gently flatten the dough into a 2-inch disk, then fold it over on top of itself and fold it over again. Flatten the dough one more time and gently fold it in half and fold it in quarters. Now press the dough out gently into a 2-inch thick disk. It's time to cut. *Be careful not to "knead" the dough. The more you handle the dough the tougher it will become. Therefore, you don't want to fold it too many times, four tops, and you don't want to gather and cut the biscuits out more than once. So cut the biscuits as tightly together as you can the first time.
- Use a well floured 2-inch biscuit cutter to cut the biscuits out. Keep the biscuit cutter tight against the edge of the dough so that you can cut all the biscuits out in one round.
- Grease a 12-inch cast-iron skillet. Arrange the biscuits in the skillet and place in a warm area of the kitchen. Cover the skillet loosely with plastic wrap and allow the biscuits to rise for 45-60 minutes.
- Preheat the oven to 400°F. Once the biscuits have risen tall to the edge of the skillet, gently remove the plastic and brush the tops with melted butter. Place in the oven and bake for 15-20 minutes. The biscuits are done with the very center biscuits are puffed as much as the edge biscuits. You can check by inserting a sharp knife in between two biscuits near the middle to see if the knife comes out clean.
- Use a flat metal spatula to divide the biscuits and pull them out of the pan.
